Keeping Kids Safe at Meals: Preventing and Responding to Choking

Introducing solid foods is an exciting developmental milestone, but it can also raise concerns about choking for parents and caregivers. Choking occurs when an object, such as food or a toy, blocks a child’s airway and prevents air from moving in and out of the lungs. This can have serious or even life-threatening consequences. Food is the most common choking hazard in infants and young children due to several factors, including their tendency to explore the world by putting things in their mouths, smaller airways, developing chewing and swallowing skills, and ability to become easily distracted while eating (Chang et al., 2021; Siddell et al., 2013). This fact sheet offers practical guidance on how to prevent food-related choking, recognize the signs of a choking emergency, and what to do if a child is choking.
How You Can Prevent Choking
Parents and caregivers can lower the risk of food-related choking emergencies by following three key strategies:
- Ensure food is prepared and served safely,
- Create a safe eating enivronment, and
- Help children develop safe eating behaviors (Lorenzoni et al., 2022; Saccomanno et al., 2023).
Preparing and Serving Food Safely
Around 6 months of age, infants start eating complementary foods in addition to breast milk or formula to meet their growing nutritional needs (World Health Organization, 2023). During this transition and through-out early childhood, parents and caregivers need to understand how to prepare their child’s food safely, as a food’s shape, texture, and size can increase the likelihood of choking (Saccomanno et al., 2023). Foods that are cylindrical, stringy, compressible, hard, sticky, or round are particularly hazardous for children under age 4 (Saccomanno et al., 2023; Shaw et al., 2018). Table 1 offers recommendations for preparing these foods safely to help reduce choking risks. Keep in mind that if you are unsure about specific foods or have concerns about your child’s chewing and swallowing development, it is always best to consult a pediatrician.
Table 1. Safe Food Preparation
| Dangerous foods | How to prepare safely |
|---|---|
| Meat, poultry, and fish |
|
| Vegetables |
|
| Fruits |
|
| Cheese |
|
| Grains |
|
| Nuts or seeds |
|
| Nut or seed butters |
|
| Marshmallows and hard, gooey, or sticky candy |
|

Creating a Safe Eating Environment
Creating a safe eating environment is crucial for preventing choking in infants and young children. Active supervision during meals and snacks is key to keeping your child safe (Centers for Disease Control and Prevention, 2022). By keeping a close watch on your child, you can ensure all their food has been prepared safely, detect any difficulties with chewing or swallowing, reinforce safe eating behaviors, and respond quickly if they are choking (Hemsley et al., 2019). Supervision should always come from an adult, as older siblings may not recognize which foods pose a choking hazard or be prepared to handle an emergency.
Serving meals and snacks at a table or in a highchair is another effective strategy to reduce choking risks (Food and Nutrition Service, n.d.). Make sure your child sits upright and remains still while eating. Avoid feeding them in the car, stroller, or while they are lying down, playing, or moving, as these positions can increase the risk of choking (Lorenzoni et al., 2022)
Additionally, meals and snacks should be provided in a calm and focused environment to prevent choking (Saccomanno et al., 2023). Eliminate potential distractions such as TVs, tablets, and smartphones, and ensure your child is not rushed to finish their food (Seattle Children’s, 2024). It is also important for your child to be relaxed during mealtimes, so avoid offering food when they are laughing or crying, as this can disrupt their breathing and swallowing patterns (Lorenzoni et al., 2022).
Teaching Safe Eating Behaviors
As your child grows, teach them to develop safe eating behaviors that can help prevent choking, such as:
- Identifying how food should feel before swallowing (e.g., similar to blended vegetable soup),
- Taking small bites and eating slowly,
- Finishing chewing and swallowing before talking or laughing,
- Sitting upright and holding still while eating,
- Avoiding playing games with food, and
- Detecting and spitting out bones, seeds, or other inedible food parts (Saccomanno et al., 2023; United States Department of Agriculture Food and Nutrition Service, n.d.).

Recognizing and Responding to Choking Emergencies
When a child is choking, oxygen cannot reach their lungs or brain. Since brain damage or death can happen if the brain goes more than four minutes without oxygen, it is crucial to recognize the signs of choking and respond immediately (Shaw et al., 2018). It is also important to tell the difference between choking and gagging.
Gagging
Gagging is a common reflex in infants as they begin to eat solid foods. Though it can be unsettling to watch, gagging is a natural mechanism that helps prevent choking by allowing your child to learn how to manage food in their mouth (Arvedson, 2023; Białek-Dratwa et al., 2022). Gagging may include signs such as coughing, gurgling, sticking out the tongue, or making retching movements, and does not require emergency first aid.
Emergency First Aid
Choking, on the other hand, is a serious emergency that requires immediate action. Signs of choking include:
- Weak coughing or inabilitiy to cough,
- High-pitched squeaking sounds,
- Inability to make noise,
- Pale or blue skin,
- Inability to cry,
- A panicked or suprised look,
- Holding the throat (in older children), and
- Loss of consciousness or responsiveness (American Red Cross, n.d.-a, n.d.-c; Shaw et al., 2018).
Emergency First Aid
If the infant or child shows any of the choking signs listed above, call 911 immediately and follow the emergency first aid steps outlined in Tables 2 (infants) or 3 (children).
Infant Choking
If the infant is conscious, give back blows and chest compressions.
Table 2. Infant (Ages 0-12 Months) Choking and CPR Response
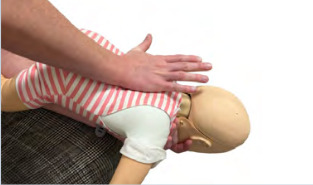
Step 1:
 Place the infant face down on your forearm. Their head should be lower than their bottom. Support their head by placing your hand near their neck, with your thumb cradling their cheek bones |
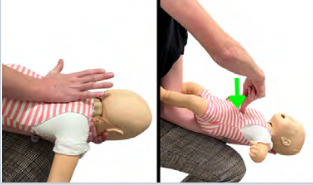
Step 2:
 Give five quick and forceful blows on the infant’s back between their shoulder blades with the heel of your hand Back blows create vibrations and pressure in the airway that can help force the stuck object out. |
Step 3:
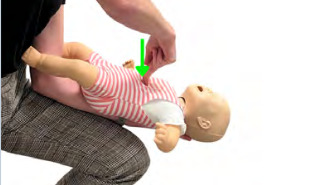 If the object is still stuck, turn the child over to their back and place two fingers in the center of their chest just below the nipple line. Give five quick chest compressions. Chest compressions push air out of the lungs, which can help force the stuck object out. |
Step 4:
 Alternate giving five back blows and five chest compressions until the object is cleared. If the infant goes unconscious, begin CPR. |
Infant CPR
Begin CPR if the infant is unconscious.
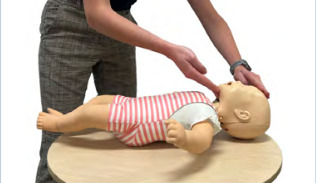
Step 1:
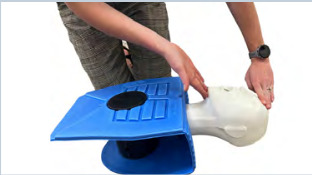
 Put the infant on a flat and hard surface. |
Step 2:
 Put two fingers in the center of their chest just below the nipple line. Give 30 chest compressions by pushing the chest down 1.5 inches. Let the chest rise to its normal position after each compression. Give compressions at a rate of 100 times per minute (similar to the beat of the song “Stayin’ Alive” or “Baby Shark”). If you cannot make the chest go down 1.5 inches, use the heel of your hand (as shown in the child CPR section below) to give compressions. |
Step 3:
 Open the airway by placing your hand on their forehead and tilting their head back to a neutral position. Use your other hand and place your fingertips under the chin and lift up Chest compressions push air out of the lungs, which can help force the stuck object out. |
Step 4:
 While keeping the airway open as described in Step 3, cover the infant’s mouth and nose with your mouth. Give two breaths. Breaths should be 1 second long and make the chest rise. |
| Step 5: Repeat Steps 2–4 until help arrives or the infant becomes responsive (coughing, crying, breathing). |
Child Choking
If the child is conscious, give back blows and abdominal thrusts (formerly called the “Heimlich Maneuver”).
Table 3. Child (Age 1-8 Years) Choking and CPR Response
Step 1:
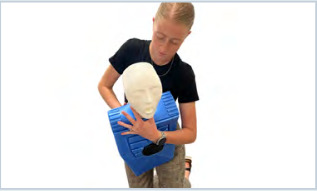 Stand behind and slightly to the side of the child (kneel if they are small). Reach under one arm and place your arm across their chest. Bend them forward so their chest faces the ground. |
Step 2:
 Give five quick and forceful blows on the child’s back between their shoulder blades with the heel of your hand. Back blows create vibrations and pressure in the airway that can help force the stuck object out. |
Step 3:
 Stand the child up and get behind them (kneel if they are small). Find their belly button and place your fist just above it. Cover the fist with your other hand. |
Step 4:
 Push both hands upward and inward with force to give five adnominal thrusts. Abdominal thrusts push air out of the lungs, which can help force the stuck object out. |
Step 5:
 Alternate giving five back blows and five abdominal thrusts until the object is cleared. If the child goes unconscious, begin CPR. |
Child CPR
Begin CPR if the child is unconscious.
Step 1:
 Put the child on a flat, hard surface and kneel next to the child. |
Step 2:
 Give five quick and forceful blows on the child’s back between their shoulder blades with the heel of your hand. Put the heel of your hand in the center of the child’s chest, just below the nipples. Place the other hand on top with your fingers interlaced. If the child is small, use one hand. |
Step 3:
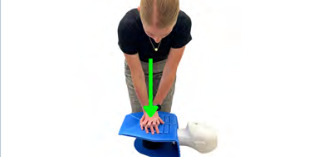 Lean over the child so that your arms are straight and give 30 compressions. Push the chest down 2 inches and let the chest rise to its normal position after each compression. Give compressions at a rate of 100 times per minute (similar to the beat of the song “Stayin’ Alive” or “Baby Shark”). |
Step 4:
 Open the airway by placing your hand on their forehead and tilting the head back past neutral position. Use your other hand and place your fingertips under the chin and lift up. If you see the object, sweep it out with your finger. DO NOT sweep if you cannot see the object since it could cause the object to further block the airway. |
Step 5:
 While keeping the airway open as described in Step 4, pinch the nose closed and cover their mouth with your mouth. Give two breaths. Breaths should be 1 second long and make their chest rise. |
| Step 6: Repeat Steps 2–4 until help arrives or the child becomes responsive. |
Putting It All Together
Infants and young children are at a higher risk for choking, but you can lower this risk by making sure your child is served safely prepared food, eats in a safe environment, and develops safe eating behaviors. It is also important to seek out reputable, research-supported sources when searching for answers to questions, and consult your pediatrician. Regularly practicing your emergency first aid skills or completing a first aid training course, like those offered by the American Red Cross, can help you develop confidence to respond to choking emergencies effectively.
References
- American Red Cross. (n.d.-a). Adult/child choking. https://www.redcross.org/take-a-class/resources/learn-first-aid/adult-child-choking
- American Red Cross. (n.d.-b). Child and baby CPR. https://www.redcross.org/take-a-class/cpr/performing-cpr/child-baby-cpr
- American Red Cross. (n.d.-c). Infant choking: How to help. https://www.redcross.org/take-a-class/resources/learn-first-aid/infant-choking
- Arvedson, J. C. (2023). Complementary feeding in the first year of life: Choking and gagging; What about nutrition? Jornal de Pediatria, 99(6), 534–536. https://doi.org/10.1016/j.jped.2023.08.002
- Białek-Dratwa, A., Kowalski, O., & Szczepańska, E. (2022). Traditional complementary feeding or BLW (Baby Led Weaning) method? - A cross-sectional study of Polish infants during complementary feeding. Frontiers in Pediatrics, 10, 992244. https://doi.org/10.3389/fped.2022.992244
- Centers for Disease Control and Prevention. (2022). When, what, and how to introduce solid foods. U.S. Department of Health and Human Services. https://www.cdc.gov/nutrition/infantandtoddlernutrition/foods-and-drinks/when-to-introduce-solid-foods.html
- Centers for Disease Control and Prevention. (2023). Choking hazards. U.S. Department of Health and Human Services. https://www.cdc.gov/nutrition/infantandtoddlernutrition/foods-and-drinks/choking-hazards.html
- Chang, D. T., Abdo, K., Bhatt, J. M., Huoh, K. C., Pham, N. S., & Ahuja, G. S. (2021). Persistence of choking injuries in children. International Journal of Pediatric Otorhinolaryngology, 144, 110685. https://doi.org/10.1016/j.ijporl.2021.110685
- Committee on Injury, Violence, and Poison Prevention. (2010). Prevention of choking among children. Pediatrics, 125(3), 601–607. https://doi.org/10.1542/peds.2009-2862
- Food and Nutrition Service. (n.d.). Reducing the risk of choking in young children at mealtimes. U.S. Department of Agriculture. https://www.fns.usda.gov/tn/reducing-risk-choking-young-children-mealtimes
- Hemsley, B., Steel, J., Sheppard, J. J., Malandraki, G. A., Bryant, L., & Balandin, S. (2019). Dying for a meal: An integrative review of characteristics of choking incidents and recommendations to prevent fatal and nonfatal choking across populations. American Journal of Speech-Language Pathology, 28(3), 1283–1297. https://doi.org/10.1044/2018_AJSLP-18-0150
- Lorenzoni, G., Hochdorn, A., Beltrame Vriz, G., Francavilla, A., Valentini, R., Baldas, S., Cuestas, G., Rodriguez, H., Gulati, A., van As, A. B. S., & Gregori, D. (2022). Regulatory and educational initiatives to prevent food choking injuries in children: An overview of the current approaches. Frontiers in Public Health, 10, 830876. https://doi.org/10.3389/fpubh.2022.830876
- Saccomanno, S., Saran, S., Coceani Paskay, L., De Luca, M., Tricerri, A., Mafucci Orlandini, S., Greco, F., & Messina, G. (2023). Risk factors and prevention of choking. European Journal of Translational Myology, 33(4), 11471. https://doi.org/10.4081/ejtm.2023.11471
- Seattle Children’s (2024). Choking. https://www.seattlechildrens.org/globalassets/documents/for-patients-and-families/ce/CE458-choking.pdf
- Shaw, J. S., Hagan, J. F., Shepard, M. T., Curry, E. S., Swanson, J. T., & Janies, K. M. (2018). Bright futures tool and resource kit. American Academy of Pediatrics.
- Sidell, D. R., Kim, I. A., Coker, T. R., Moreno, C., & Shapiro, N. L. (2013). Food choking hazards in children. International Journal of Pediatric Otorhinolaryngology, 77(12), 1940–1946. https://doi.org/10.1016/j.ijporl.2013.09.005
- World Health Organization. (2023). Infant and young child feeding. https://www.who.int/news-room/fact-sheets/detail/infant-and-young-child-feeding

January 2025
Utah State University Extension
Peer-reviewed fact sheet
Authors
Mia Dustin, dietetics student, Savannah Daines, M.P.H., Stacy Bevan, M.S., R.D., Palak Gupta, Ph.d., and Mateja R. Savoie Roskos, Ph.D., M.P.H, R.D.

Palak Gupta
Extension Specialist- Hunger Solutions; Assistant Professor, Department of Nutrition, Dietetics and Food Sciences
Department of Nutrition, Dietetics and Food Sciences