Growing Iris
Garden irises are hardy, long-lived perennials that need a minimum of care. They are an established “backbone” of home gardens because they bloom when few other plants do—after spring-flowering bulbs and before peonies, delphinium and phlox.
Easy-to-grow iris varieties adapted to every region of the United States are available. They produce graceful flowers in a wide range of shapes, sizes and colors.
Description
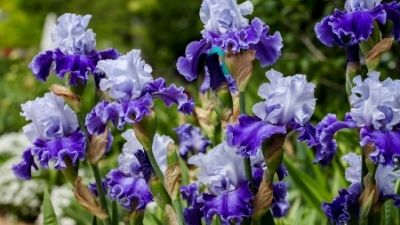
Iris flowers have 6 petals. The 3 upright petals are called standards; the 3 that hang down are called falls. Flowers may be white, yellow, pink, purple, blue, reddish or bicolored.
Principal types of irises are bearded, beardless, crested and bulb.
Bearded irises have a fuzzy line, or beard, that runs down the middle of the falls. They are called German iris or pogoniris. Iris germanica is the most commonly grown bearded species.
Bearded irises live through severe droughts and cold. The swordshaped leaves are evergreen in warm climates and remain green until late fall in cold climates. Most bearded iris plants grow 2 to 3 feet tall.
Because they are easy to grow, tall bearded irises are recommended for beginning gardeners.
Usually, tall bearded irises bloom in May and June. Several varieties bloom in both spring and fall.
A group of bearded irises that naturally grow 4 to 9 inches tall are called dwarf iris. The two most common species are I. pumila and I. chamaeiris. Both are well adapted to rock gardens because they spread quickly and form dense mats of foliage. They bloom in March, April and May.
Beardless irises are called apogoniris or apogons. They have smooth fall petals and thin, grasslike leaves. Plants grow 1 to 4 feet tall. Most varieties bloom in June.
Japanese (I. kaempjeri) and Siberian (I. sibirica) irises are the most commonly grown beardless species.
Japanese irises have soft, drooping standards and wide falls. Plants grow 2 to 4 feet tall. Flowers are borne on long stems.
Siberian irises have stiff, narrow falls and narrow, upright standards. Stems grow 18 inches to 2 feet tall. Beardless types, which thrive in moist soil, frequently are planted on stream and lake banks.
Crested irises have a small raised area, or crest, on the middle of each fall. Often, the color of these crests contrasts with petal colors. One of the more popular crested irises is a dwarf species, I. cristala.
How Irises Grow
Bearded, beardless, and crested irises grow from thick, underground stems—called rhizomes—that store food produced by the leaves.
Rhizomes grow slightly below the surface of the ground or at ground level. Many small roots penetrate the soil deeply.
Every year, underground offshoots develop from the original rhizome. Offshoots may be divided and transplanted to grow new irises.
A rhizome that will produce a plant has at least one bud or growing point. Each bud produces a large fan of leaves and a flower stalk. Irises grown from rhizomes should bloom the next spring after planting.
Irises may be grown from seed. A seedpod may develop below a pollinated flower that is left on the stalk after blossoming. Most seedlings do not bloom for 2 or 3 years after planting.
The slow process of growing plants from seed is used chiefly by breeders to develop new varieties. Because irises are hybrids, flowers of seedlings rarely look like flowers of parent plants.
Varieties
From the several thousand varieties of irises available, select varieties that will provide the colors you want in your garden. Many new varieties are introduced each year. Growers’ and breeders’ catalogs and garden magazines describe and picture many popular irises.
Planting Irises
The best time to plant irises is in late summer or early autumn. They should be established in the soil before winter.
Most garden supply stores sell rhizomes only during the planting season. If you order irises by mail, usually you will receive rhizomes at the planting time recommended for your locality.
Plant rhizomes as soon as practical after you receive them.
Where to Plant
Irises need full sunshine. Select a site with southern exposure and good air circulation.
Bearded and crested irises need lime soil with good drainage; rhizomes may rot in soil that holds water around them. Beardless types need moist soil that is slightly acid.
Preparing the Soil
Prepare the bed 1 to 2 weeks before planting irises to allow the soil time to settle. Dig and loosen the soil at least 18 inches deep. Thoroughly break up all lumps.
Use commercial fertilizer to enrich poor soil in the iris bed; use organic matter to improve soil structure and productivity.
For poor soil, add ½ pound of a 5-10-5 fertilizer for each 5- by 10- foot area, or ½ cup for every 6 or 7 rhizomes. Thoroughly mix fertilizer into the soil so that lumps of it do not touch iris roots.
Spading organic matter—compost, well-rotted manure, or peat moss—into relatively heavy soil may improve drainage.
How to Plant
In a well-prepared bed, dig a shallow hole large enough to receive the rhizome or clump of rhizomes you are planting. Form a cone of earth in the center of the hole for the planting base. The height of the cone—or planting depth—is determined by the type of garden soil.
In the medium soil, make the cone high enough so that the planted rhizome is just below ground level. In light or well-drained soil, build a low cone. The top of the planted rhizome should be 2 inches below ground level.
In heavy soil, build a cone even with the ground surface. The top of the planted rhizome should be slightly above ground.
Place the rhizome on the cone, parallel with the ground surface. Carefully spread the roots around the cone. Do not wad roots together.
Fill the hole with soil and press it firmly in place around the rhizome. Water immediately; thoroughly soak soil around roots.
To obtain a good display of iris color, use at least 3 rhizomes of the same variety in a triangle or a pattern that alternates plants in rows. Plant rhizomes about 18 inches apart. Point each fan of leaves away from other plants in the group.
If you want to produce masses of flowers quickly, plant undivided rhizome clumps or set 3 individual rhizomes 8 to 10 inches apart.
Before replanting a full-grown iris, cut leaves to one-third their full height.
Care of Plants
Water plants often enough before blooming time to keep soil moist but not wet. Remove weeds and grass around the rhizomes.
Before plants bloom, loosen the surface soil with a hoe or hand cultivator. Be careful not to injure the rhizomes or the roots.
Cut flowers as soon as they fade, unless you want to obtain seeds.
Plants that are growing well with good green foilage usually do not need fertilizer. If you use fertilizer, apply it immediately after plants bloom. Work it into the soil around plant bases. Use about ½ cup of 5-10-5 fertilizer for 6 small plants or about 1 cup for a large iris clump.
In early fall, cut leaves 6 to 8 inches from the ground.
All irises need mulch the first season after planting. Apply a light mulch of straw or evergreen boughs after the ground first freezes. Mulch prevents roots from freezing and stops the alternate freezing and thawing of the soil that harms plants by pushing them out of the soil. Irises in northern states may need mulch every year, even after they are established.
Propagating Irises
When plants become crowded, divide the offshoots from the rhizomes. Irises should be divided 2 to 5 years after planting.
Divide and transplant irises in the late summer or early fall, after plants have bloomed. Cut leaves to one-third their full height. Dig under a clump of rhizomes and lift out the while clump at once. Wash away soil with a steady stream of water.
Make small divisions if you want many flowers the year after planting. Large divisions should be separated in 2 or 3 years.
Cut rhizomes apart with a sharp knife. Each division must have at least one growing point (or fan of leaves), a few inches of healthy rhizome, and a number of welldeveloped roots. When separated from the original iris clump, each division is ready to plant.
Iris Diseases
Iris diseases reduce the number of flowers, disfigure the leaves, and sometimes kill the plant.
Prevent diseases by giving plants plenty of space, sunlight and good drainage. Clean up dead material quickly. Do not plant irises in crowded or completely shaded areas.
Bacterial Soft Rot
Bacterial soft rot is the most destructive iris disease. Bacterial enter the plant through breaks in the rhizome. Leaf bases and rhizomes begin rotting, and the plant soon dies.
Control - Dig up the diseased rhizome. If rot is extensive, destroy the iris. Cut out and discard diseased parts on less seriously affected plants.
Fungus Rots
Sclerotic rot, or southern blight, attacks irises in warm, humid areas. A fungus affects plants at or near the soil surface. The leaves turn yellow and dry prematurely or rot off at the base. Small, yellowish, brown seedlike structures appear.
Another fungus disease, Botrytis rhizome rot, occurs in cool areas. The fungus produces small, black seedlike structures on the rhizomes and in the soil. A dry, pithy, gray rot develops in the leaf bases and rhizomes.
Control - Dig and burn plants that are seriously infected with either kind of fungus rot. Remove soil from the surrounding area; replace it with new or sterilized soil. Cut out the rotted areas of slightly damaged rhizomes.
Iris Leaf Spot
Iris leaf spot disfigures leaves and weakens plants. About flowering time, infected leaves are dotted with small, brown spots. Water-soaked margins around the spots turn yellow. Spots later develop a grayish center with black fruiting tufts. The leafspot fungus overwinters in old leaves and produces new spores in the spring.
Control - If iris leaf spot has been a problem in your area, spray or dust the plants every 2 weeks from the time leaves emerge until they stop growing. Use a copper fungicide spray or zineb dust. Follow label directions.
In mild climates, cut and burn leaves of infected plants in the fall. If leaves are not removed, the fungus may remain active throughout winter.
In cold areas, remove dead foliage before shoots appear in spring.
Rust and Bacterial leaf Spot
Rust and bacterial leaf spot weaken, but seldom kill, iris plants.
Rust produces small, raised, dark red dots on iris leaves.
Bacterial leaf spot causes dark green, watery spots and streaks. The spots later turn yellow and become translucent.
Control - Remove and burn all leaves that show signs of rust or bacterial leaf spot. Do not let any diseased leaves remain around plants. Infected leaves harbor spores that spread rust and leaf spot.
Nematode Infection
Root-knot nematodes and lesion nematodes are microscopic worms that attack irises and a wide range of other plants.
Root-knot nematodes cause distinct knots or galls on the roots. These knobby swellings on a root look like beads on a string.
When lesion nematodes attack iris, the roots discolor and decay. In advanced stages of infestation, many roots rot off. Small, lateral roots that replace the rotted ones give the root system a matted or turfed appearance. Younger, newer roots are dotted with small reddish-brown spots.
Control - Remove and burn plants with knotted roots or unthrifty plants with extensive root decay. Do not replant irises in the same place until nematodes have been eliminated.
Treat infested soil with a nematicide. Use according to manufacturer’s directions.
Mosaic
Iris mosaic, the most widespread disease of irises, is caused by a virus transmitted by aphids.
Diseased flowers may be mottled or striped. Light green streaks appear on the leaves of some plants.
Many infected plants do not show signs of disease. Individual plants may have typical symptoms at one season of the year and appear disease free at another season.
Control - Dig up and burn irises that show severe mosaic damage. Reduce the spread of iris mosaic by controlling aphids.
Iris Insects
Iris borer
The iris borer causes more damage to iris than all other insects.
The pink, caterpillar-like larvae have rows of black spots along their sides. They are about 1 ½ inches long when full grown. Iris borer adults are large brown moths with black markings.
First symptoms of borers are tear stains and chewed leaf edges that appear on leaves in early spring. Irises later develop loose, rotted bases and holes in rhizomes.
Borer larvae hatch in early spring from overwintering eggs. These caterpillars pierce leaves and tunnel into the stem. Then they bore into the rhizome, where they remain to feed and grow. At maturity, larvae leave the rhizome and pupate in the soil.
Bacterial rhizome rot readily attacks borerinfested plants.
Control - To eliminate overwintering eggs, clean up and destroy old leaves, stems, and debris in fall or winter. To kill young, hatching larvae, apply dimethoate spray to the iris beds at 2-week intervals from time first growth starts until June 1. To kill older larvae in fans and rhizomes, spray with dimethoate. Read the directions and heed all precautions on the container label. With aid of pointed stick or pencil, locate and destroy borers in young leaf sheaths that escape dust treatment. Transplant infested iris after it flowers; destroy larvae and infested rhizomes and chestnut brown pupae in soil before replanting. Community effort is important in iris borer control.
Aphids
Aphids, or plant lice, are small, green, pink or mealy-white insects that attack many plants.
Aphids may appear on iris plants in early spring. They pierce leaves and suck the juices. When they feed, they may transmit the virus that causes iris mosaic.
Control - To kill aphids, spray plants with malathion. Repeat if aphids reappear. Read the directions and heed all precautions on the container label.
Verbena Bud Moth
Larvae of the verbena bud moth tunnel into new iris shoots and buds. Larvae are about one-half inch long. They have greenishyellow, worm-like bodies and black heads. Mature moths do not attack irises.
Control - Cut and burn infested shoots and buds.
Iris Thrips
Larvae and adults of the iris thrips pierce the surfaces of young leaves and leaf sheaths. They suck juices that ooze from the wounds. Dry wounds become small, straw-colored spots. Flower buds blacken; plant tops weaken. Iris thrips are especially injurious to Japanese iris.
Larvae of iris thrips are milky white. The black-bodied adults usually are wingless; they are about one twenty-fifth of an inch long when mature.
Control - Spray plants with dimethoate 4 times at weekly intervals during May and June. Do not spray during flowering.
Precautions
Pesticides used improperly can be injurious to man, animals and plants. Follow the directions and heed all precautions on the label.
Store pesticides in original containers—out of reach of children and pets—and away from foodstuff.
Apply pesticides selectively and carefully. Do not apply a pesticide when there is danger of drift to other areas. Avoid prolonged inhalation of a pesticide spray or dust. When applying a pesticide it is advisable that you be fully clothed.
After handling a pesticide, do not eat, drink, or smoke until you have washed. In case a pesticide is swallowed or gets in the eyes, follow the first aid treatment given on the label, and get prompt medical attention. If a pesticide is spilled on your skin or clothing, remove clothing immediately and wash skin thoroughly.
Dispose of empty pesticide containers by wrapping them in several layers of newspaper and placing them in your trash can.
It is difficult to remove all traces of a herbicide (weed killer) from equipment. Therefore, to prevent injury to desirable plants do not use the same equipment for insecticides and fungicides that you use for a herbicide.
NOTE: Some states have restrictions on the use of certain pesticides. Check your state and local regulations. Registrations of pesticides are under constant review by the U.S. Environmental Protection Agency. Use only pesticides that bear the Federal regulations number and carry directions for home and garden use.
Related Research
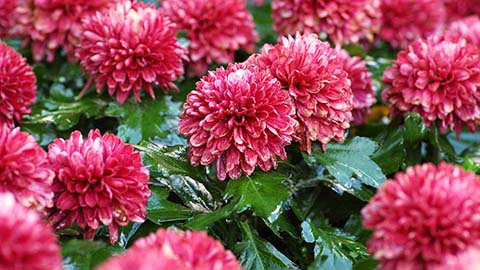
Growing Chrysanthemums in the Home Garden
The plants are easy to grow and can be grown throughout the United States. Even without care, they usually produce flowers. However, neglected mums may have weak branches, yellowish leaves, and only a few small flowers.
Growing Iris
Garden irises are hardy, long-lived perennials that need a minimum of care. They are an established “backbone” of home gardens because they bloom when few other plants do—after spring-flowering bulbs and before peonies, delphinium and phlox.

How to Grow English Lavender in Your Garden
English Lavender (Lavandula angustifolias) thrives in full sun, well-drained soil with a pH of 6.5-7.5. Grow in full sun. Climates suitable for lavender range from zones 5 to 10 on the USDA hardiness scale. It does not perform well in wet or water-logged
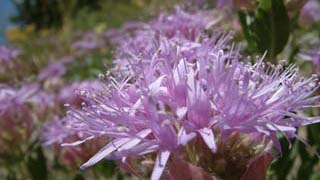
Mountain Beebalm in the Landscape
This mound-forming perennial is typically seen in higher elevations in the interior West. The lavender or rose-purple flowers are attractive to insects, especially bees and butterflies. This plant is easy to establish and maintain in Intermountain West la

Wisteria in the Garden
Wisteria is a vigorous, cold-hardy, long-lived, true climbing/twining vine best known for large panicles of beautiful spring blooming flowers.
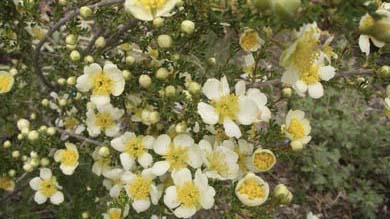
Mexican Cliffrose in the Landscape
Mexican cliffrose occurs throughout the southern regions of the Intermountain West and has great potential for use in low-water landscapes.Cultural Requirements: