Growing Chrysanthemums in the Home Garden
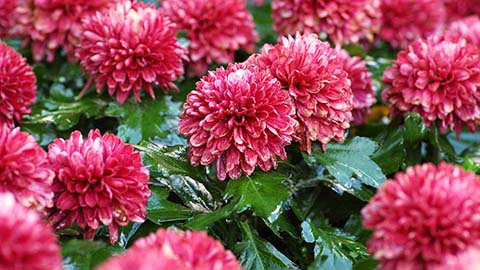
Chrysanthemums can bring a variety of bold colors to your garden from mid-July until killing frost. Flowers may be shades of yellow, orange, red, purple, bronze, pink or white. They range in form and size from clusters of small, round pompons to individual 4-inch decoratives.
Usually, chrysanthemums are planted in masses or in small groups. Almost every garden setting is suitable for them. Because of their long-lasting flowers, mums are popular in indoor arrangements as well as in gardens.
The plants are easy to grow and can be grown throughout the United States. Even without care, they usually produce flowers. However, neglected mums may have weak branches, yellowish leaves, and only a few small flowers.
Selecting Plants
Mums are sold in the spring as cuttings, in spring and fall as packaged plants, and year-round as potted plants.
Well-rooted cuttings quickly establish themselves in the soil; they bloom the same year they are planted.
Packaged plants are sold with their roots wrapped in burlap. They bloom in the normal time for the individual variety. If you do not want to spend time growing cuttings, buy packaged plants with well-developed buds. Although potted chrysanthemums purchased from florists may be transplanted into the home garden, most of these plants do not survive the first winter
Hardiness
Hardy varieties produce underground shoots, or stolons, which enable these mums to persist from year to year without replanting. Usually, hardy varieties thrive in home gardens.
Nonhardy varieties do not persist from year to year. They produce few or no stolons; they are winter-killed by the alternate freezing and thawing of the soil; or they bloom so late in the season that flowers are killed by frost.
For these reasons, commercial florists grow nonhardy varieties in greenhouses or under cloth-covered frames. You can grow some of the nonhardy varieties in your garden if you give them extra protection.
Types
Chrysanthemums are classified according to shape and arrangement of petals. Following are the major types and their characteristics:
Single
Daisylike flowers, with 1 to 5 rows of long petals radiating from a flat, central “eye;” nearly all varieties hardy.
Pompom
Small, stiff, almost globular flowers; some hardy varieties.
Cushion
Sometimes called “azalea” mums; early flowering; grow on low, bushy plants; nearly all varieties hardy.
Anemone
Flowers like single mums, but with a rounded crest of deeper colored petals; nearly all varieties hardy.
Decorative
Flowers “incurved” (close, regular petals curving toward flower center), “incuring” (loose, irregular petals curving toward flower center), or “reflexed” (all petals curving away from flower center); many hardy varieties.
Spoon
Petals spoon shaped; some hardy varieties.
Spider
Petals long and tubular with hooked ends; few hardy varieties.
Quill
Petals straight, long and tubular; few hardy varieties.
Single, pompon, cushion and anemone types normally are small flowered—or garden—mums; usually, they are varieties selected to bloom before killing frost. Mums that have blossoms over 3 inches in diameter are large flowered. Usually, these are grown under greenhouse conditions; they may be single, anemone or decorative types.
Planting
Plant chrysanthemums in fertile, well-drained soil. Plants should be in full sunshine all day.
When to Plant
When you buy packaged mums in the fall, plant them early enough for the roots to become established before winter—about 6 weeks. Wait until after killing frosts to plant those you buy in the spring.
Ten days to two weeks before planting chrysanthemums, prepare a soilbed. Dig and loosen the soil to a depth of 6 inches; break up all lumps. Spade organic matter—peat moss, compost, or well-rotted manure—into the soil. If the soil is very poor, use 5-10-5, 7-6-5, or similar garden fertilizer. Apply 1 to 1½ pounds per 100 square feet and work it into the soil.
Just before planting mums, respade the soilbed to kill weeds that have germinated.
To grow chrysanthemums on extremely heavy soils, you may have to install underground drainage. For information about soils and drainage, see your county agent.
How to Plant
Dig a hole large enough to accommodate the chrysanthemum plant or cutting. As you plant, press soil firmly around roots to prevent air pockets between roots and soil. Water thoroughly to settle the plant.
Plant low-growing, bushy varieties 2 to 2 ½ feet apart; plant other mums 1 to 1 ½ feet apart.
Place a coarse mulch (1 to 2 inches of straw, or a layer of evergreen boughs) on soil around plants. Use an extra inch of mulch if you plant mums in the fall.
Propagating
Chrysanthemums become crowded quickly. Divide them or take cuttings from them every 2 years.
Dividing
After the last killing frost in spring, lift plants out of the soil. Wash some of the soil from the roots. You will find that several small plants—each with its own roots—surround the old plant. Separate plants carefully. Plant the small ones outdoors in newly prepared soil. Discard the old plants.
Taking Cuttings
In the spring, take cuttings from plants already established in the garden.
Fill shallow pots or wooden boxes with clean sand or sterile rooting material—such as perlite or vermiculite. Wet rooting material thoroughly. Make a cut in it 1 ½ inches deep to receive each mum.
Do not take cuttings from diseased plants.
Keep cuttings where the temperature is about 65° F. Protect new cuttings from strong sunlight by covering them with newspapers for a day or two.
Growing
Watering and Fertilizing
In most areas, rainfall gives chrysanthe-mums enough water. Water plants if they seem to need it; never let them wilt.
About four weeks after planting, apply 1 to 1 ½ pounds of 5-10-5, 7-6-5; or similar garden fertilizer per 100 square feet. Cultivate and water in.
Fertilize again at the same rate later in the season, if plants are not growing vigorously.
Pinching and Disbudding
When small-flowered varieties are 6 to 8 inches high, pinch off the light-green, growing tips to encourage branching. Unless the growing tips are pinched, plants may develop tall, weak stems that produce only a few flowers. After you pinch, new branches will develop along the stem. Pinch all shoots every two weeks until June 10 for early varieties, June 20 for mid-season varieties, and July 1 for late varieties. Flowers will not form if you continue to pinch later than these dates.
Disbud large-flowered mums. Concentrate growth in a few flowers by taking off side buds. When plants are 5 to 6 inches high, pinch out the growing tip. New shoots will develop along the stem. Break off all but 2 or 3 of these new shoots. Let those that remain grow into branches. Every two weeks, remove all side shoots that grow from these branches. When flowerbuds show, remove all except those on the top three inches of the branch.
As these top buds develop, notice the first, or crown, bud. When you are sure it is healthy and well developed, pinch off all other buds. Do this by carefully bending the stem of the bud downward and sideward with your thumb. The stem should snap off easily at the point where it joins the branch.
If the terminal flowerbud is injured, or looks as if it will not develop, pinch it off and leave the second flowerbud from the tip. Take care not to damage or break off the one flowerbud that is left. A new one will not develop after you have taken the others off.
Continue to remove side branches until flowering time.
Disbudding small-flowered varieties does not make them produce large flowers.
Staking
Stake tall or weak plants. Each branch of large-flowered varieties needs support.
If heavy, pounding rains or hailstorms are common in your area, protect large flowered chrysanthemums with a frame covered with cheesecloth or soft plastic sheeting.
Care After Blooming
When plant tops die after blooming, cut them to the ground. Clean up fallen leaves. Remove the mulch you applied at planting. Burn all refuse.
New shoots begin to grow late in the fall.
Protect them from frost; put down a new mulch.
Diseases
Many diseases attack chrysanthemums. Although diseases rarely kill, they damage and often disfigure plants.
Prevention
You can prevent many diseases by following these suggestions:
- Don’t plant in wet, shady places.
- Don’t crowd plants. Leave room for air to circulate.
- Water early in the day so leaves can dry before nightfall. Fungus diseases thrive on wet leaves.
- Stake plants. Keep branches off the ground.
Remove and burn dead or diseased leaves, stems and flowers. - As soon as plants become well established, apply a diseasepreventive spray every 7 to 10 days and after heavy rains. Apply a spray containing zineb or Bordeaux mixture; follow mixing instructions on the label of the spray-material container. To make the spray spread evenly over leaf surfaces, add 1/3 teaspoon of synthetic detergent or mild soap to each gallon.
- Be sure to spray undersurfaces of leaves.
- Stop spraying when beds show color.
Control
In the following discussion, diseases are grouped according to the kind of injury they produce.
Disfigured leaves
Mildew, rust, bud rot, and septoria leaf spot disfigure chrysanthemum leaves. Each of these diseases is caused by a fungus that lives on the plant. All can be controlled with dusts or sprays.
Mildew causes grayish-white powdery patches on leaves. Later, leaves turn yellow and wither.
Control: As soon as you notice the disease, dust plant with finely ground sulfur. Repeat once a week until buds show color.
Rust causes small, brown blisters on undersurfaces of leaves. Areas around blisters turn light green. Leaves curl and die.
Control: Dust plant with sulfur as soon as you notice the disease. Spray or dust once a week until buds show color.
Bud rot causes growing tips and buds to soften and turn brown. Affected buds do not open.
Control: Apply a spray containing Bordeaux mixture 7 days until just before the plant flowers.
Septoria leaf spot causes leaves to turn brown, yellow or reddish. Then black spots develop. Infection starts at the bottom of the plant and spreads upward.
Control: Spray plants Bordeaux mixture every 7 to 10 days; continue until buds show color.
Wilting
Verticillium wilt is caused by a fungus that lives in the soil. Diseased plants usually wilt, turn brown, become stunted, and produce poor flowers. If the plants do not wilt, areas between veins of the leaves turn yellow.
Control: Remove and burn infected plants.
Do not plant chrysanthemums where verticillium wilt has occurred.
Stunting
Chrysanthemum stunt, aster yellows and leaf nematode infection prevent normal growth. They are not easily controlled.
Pull up severely stunted plants and burn them immediately.
Chrysanthemum stunt is caused by a virus. Diseased plants are stunted; often they bloom earlier than healthy plants. Leaves fade to light green or turn a reddish color.
The virus may be carried to uninfected plants on a knife used to take cuttings or on your hands when you pinch plants. Prevent spread by thoroughly washing your hands and the cutting knife after touching any stunted plant.
Aster yellows is caused by a virus that is carried to chrysanthemums by leafhoppers. Diseased plants develop distorted flowers and many small, weak shoots.
Leaf nematodes are microscopic, parasitic worms that feed on many garden plants. Nematode-infected chrysanthemums have dark spots on the undersurfaces of the leaves. They often have brown areas between leaf veins. Leaves wither and dry, but they hang on the stems after they die. Plants are stunted and buds do not develop.
Leaf nematodes can live 3 or more years in dead chrysanthemum leaves. They also can live a long time in the soil. Do not plant healthy mums in soil where infected plants have grown. Wait at least 3 years.
Insects
Many species of insects attack chrysanthemums. Aphids, lace bugs, leaf miners, thrips, plant bugs, may be controlled with malathion. Follow directions on the insecticide label.
Related Research
Growing Chrysanthemums in the Home Garden
The plants are easy to grow and can be grown throughout the United States. Even without care, they usually produce flowers. However, neglected mums may have weak branches, yellowish leaves, and only a few small flowers.
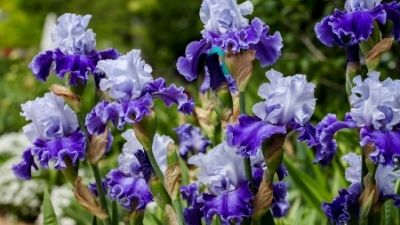
Growing Iris
Garden irises are hardy, long-lived perennials that need a minimum of care. They are an established “backbone” of home gardens because they bloom when few other plants do—after spring-flowering bulbs and before peonies, delphinium and phlox.
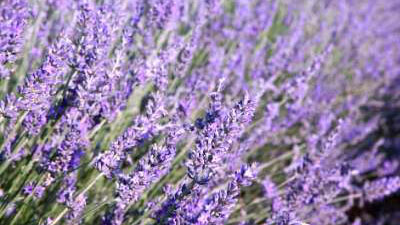
How to Grow English Lavender in Your Garden
English Lavender (Lavandula angustifolias) thrives in full sun, well-drained soil with a pH of 6.5-7.5. Grow in full sun. Climates suitable for lavender range from zones 5 to 10 on the USDA hardiness scale. It does not perform well in wet or water-logged
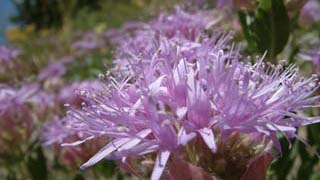
Mountain Beebalm in the Landscape
This mound-forming perennial is typically seen in higher elevations in the interior West. The lavender or rose-purple flowers are attractive to insects, especially bees and butterflies. This plant is easy to establish and maintain in Intermountain West la

Wisteria in the Garden
Wisteria is a vigorous, cold-hardy, long-lived, true climbing/twining vine best known for large panicles of beautiful spring blooming flowers.
Mexican Cliffrose in the Landscape
Mexican cliffrose occurs throughout the southern regions of the Intermountain West and has great potential for use in low-water landscapes.Cultural Requirements: