The Do-It-Yourself Guide to Backyard Drip Irrigation
Background
Water in the Intermountain West
- Utah is the third driest state.
- Landscape irrigation accounts for 60% of household water use.
- Most homeowners apply double the irrigation than is needed by plants.
- Drip irrigation can be 90% efficient, reducing water loss and waste.
- Trees, shrubs, and flowers vary in their irrigation requirements.
- Landscape irrigation is an area with the potential for substantial water savings.
In the arid West, efforts continue to conserve water. With Utah being the third driest state in the nation (PRISM, 2022), it is critical to use water as wisely as possible. Since water is a limited resource, the ability to use water efficiently, especially in outdoor landscape settings, should be a goal for everyone. According to the Utah Division of Water Resources, 60% of potable water is used in outdoor landscapes. There are decades of research on water use and lawns. Based on research data from local water audits, many homeowners apply double the amount of irrigation to their lawns than is needed. Landscape irrigation is an area with the potential for substantial water savings.
This fact sheet provides information on efficiently irrigating plants, simplifying drip irrigation for homeowners, and introducing irrigation strategies that help increase efficiency and conserve water use in the home landscape.
Efficient Irrigation and Evapotranspiration (ET)
The amount of water needed varies based on the climatic factors (sunny or cloudy, hot or cool, humid or dry, windy or calm), the season, the soil’s water-holding capacity, and the size and age of the plants. Evapotranspiration (ET) is a term used to measure the amount of water loss via (1) evaporation from plant and soil surfaces and (2) transpiration, which is water loss through microscopic openings on the underside of the leaves called stomata. The opening and closing of stomata enable plants to regulate their temperature and exchange gases produced during photosynthesis. This loss of water vapor through these openings is referred to as transpiration.
Irrigation, then, becomes the practice of replenishing the amount of water lost through evapotranspiration (ET). Based on estimates from the Utah Climate Center and Hill et al. (2011), irrigation requirements for landscape plants (trees and shrubs) during the peak growing season (typically around July) are approximately 0.25 to 0.30 inches of water per day in most parts of Utah. Turfgrass water use is generally closer to 0.15 to 0.20 inches per day (Hill et al., 2011).

The Utah State University (USU) Extension’s Center for Water-Efficient Landscaping (CWEL) website offers helpful, research-based information and resources on lawn water use, how to conduct a water audit, and other programs promoting water savings.
The Utah Department of Natural Resources website also offers the Weekly Lawn Watering Guide, based on seasonal ET estimates. The site’s map provides customized irrigation recommendations for each area of the state, allowing homeowners to quickly determine when and how much to irrigate, as well as the optimal number of days between irrigation events.
A simple way to increase water efficiency in turfgrass and lawn settings is by implementing new irrigation technologies, such as rotor-style sprinklers (Figure 1). By switching out the traditional pop-up spray sprinkler with rotor-style heads, homeowners can reduce the flow rate by 40% to 50%.
Drip Irrigation Systems
When designed correctly, drip irrigation systems can be up to 90% efficient (Solomon et al., 2007), meaning water loss via evaporation, runoff, and leaching is minimized (~10% of applied water). However, drip irrigation is a new technology to many and can be intimidating when converting existing systems or installing an appropriate system. For the do-it-yourself homeowner, installing a well-planned drip system is not difficult once you understand a few key concepts and the general layout of a drip irrigation system. It is also helpful to know that some sprinkler supply stores will design your drip irrigation system at no cost if you purchase the supplies from them.
Converting Existing Systems to Drip Irrigation
A straightforward way to use drip irrigation systems is to retrofit older irrigation systems in flowerbeds or for shrubs and trees. Traditionally, flower beds are irrigated with pop-up-style sprinkler heads that apply water over a broad area. These heads are typically designed to have “head-to-head” coverage, much like a lawn area. However, these pop-up heads often irrigate areas within the flower bed where ornamentals are not planted. This indiscriminate application of water is wasteful and usually increases weed growth and the risk of foliar fungal diseases such as powdery mildew. Another problem occurs as plants grow and become larger, blocking the spray pattern and creating a rain shadow for other plants not near the sprinkler heads.
In recent years, landscape irrigation design and water conservation efforts have focused on transitioning flower beds from pop-up sprinklers to drip irrigation. For these existing irrigation systems, simple conversion kits from irrigation supply companies (or online) make the conversion quite easy. These kits typically consist of an adapter shaped like a sprinkler head canister, with a design similar to a pop-up sprinkler. However, instead of a pop-up spray head, the canister has a supply adapter for drip or micro irrigation tubing. These canister bodies also often have an internal pressure-reducing mechanism, which reduces the pressure needed for drip irrigation to function properly. (More about pressure reduction is covered in this fact sheet’s “Pressure Regulators” section.) A variety of different adapters can then be screwed onto the canister head where a sprinkler nozzle would normally attach. These adapters can be used to supply micro-sprays, bubblers, or even point-source drip emitters. If plants are farther away from the sprinkler head, a smaller “spaghetti” tube (¼-inch-diameter tubing) can be inserted and run to individual plants. The overall goal, especially regarding drip irrigation, is to soak or wet 50% to 60% of the area where roots are actively growing (the root zone), then allow the root profile to dry between irrigations.
New Drip Irrigation Systems
For drip irrigation systems in flower and shrub beds, the design consists of a primary blank (meaning no holes) supply tube, typically ½-inch in diameter, “snaked” throughout the bed, usually above ground, and placed near the plants (Figure 2). Smaller spaghetti tubes with micro emitters are then inserted into the blank supply tube and run to each plant. This system ensures precise water delivery to flower bed plants, minimizing water waste in areas without plants. In densely planted beds, a grid-style pattern of supply tubes (½-inch diameter) with built-in pressure-compensating emitters is evenly spaced to provide uniform irrigation delivery.

Drip Irrigation - Filters
Drip irrigation consists of small emitters and micro-sprays with small orifices or openings. Therefore, the water must be free from sand and other debris to reduce clogging and plugging. Potable city (culinary) water is typically fine to run through drip systems. However, secondary water requires filtering. Filters are installed on the supply side of the drip irrigation systems. Filter size is categorized by the mesh size that screens various particles. Most drip irrigation systems require a filtration of 120–200 mesh to capture sediment and debris. Filters are also sized based on flow capacity. It is essential to have a filter large enough for the system, as it may restrict or clog the system.
The two most common filters for household drip irrigation systems are disk filters and screen filters. Both can perform well. Disk filters have more filter area than most screen filters of similar dimensions. Some irrigation valves, made specifically for drip systems, will have a filter built into the valve assembly.
Regular filter cleaning or purging is required for systems to operate correctly. Check with the manufacturer’s suggestions. Generally, inspect and clean filters monthly during the growing season. However, if the source water has high sediment loads or during spring runoff, it may require weekly inspection. Some commercial filters will “self-clean” or flush debris after a set amount of water has passed through the system or if the pressure loss in the filter becomes too great.
Drip Irrigation - Pressure Regulators
Each neighborhood and home differ in the available and supplied water pressure. Water pressure is measured in pounds per square inch (psi). Most home irrigation systems operate at pressures ranging from 40 to 100 psi. However, most drip irrigation systems are designed to operate between 10 and 30 psi. Because of this, for the system to operate as designed, the irrigation water pressure should be reduced. There are multiple ways to do so. A simple method involves installing inline pressure reducers before the irrigation valve. Local plumbing and irrigation supply stores typically carry these items, and they are also available online. Prices range from $10–$40, depending on the style. As mentioned with filtrations, some manufacturers make irrigation valves designed specifically for drip systems with built-in regulators. It is important to select a pressure regulator that matches the pressure rating of the drip emitters used.
Determining Available Water (Flow Rate)
One initial step in designing a drip irrigation system is determining the amount of water available that will be supplied to emitters on the various zones. To determine this (available water for any given line), you can perform a measurement using simple calculations. You will need a 5-gallon bucket and a stopwatch.
Steps- Fill the 5-gallon bucket from an outside faucet.
- Use a stopwatch to measure the time it takes to fill the bucket.
- Divide the amount of water (5 gallons) by the number of seconds it takes to fill the bucket. This will provide you with the number of gallons per second (gps). Measuring seconds instead of minutes eliminates having to account for partial minutes in the calculation.
- Multiply that number by 3,600 (number of seconds in an hour) to get gallons per hour (gph).
- Example:
If it takes 60 seconds to fill up the 5-gallon bucket, the equation will look like this: - 5 gallons / 60 seconds = .0833 gallons per second (gps)
- .0833 gps x 3,600 (number of seconds in an hour) = 300 gallons per hour (gph)
This shows that the irrigation system can supply up to 300 gallons per hour. However, water pressure varies according to the time of day, depending on the number of homes being irrigated at once, and different irrigation supply pipes have varying flow rates. For example, a ¾-inch supply line can supply more gallons per hour than a ½-inch supply line. For these reasons, obtaining a professional irrigation design ensures each valve has a sufficient flow rate for the desired number of emitters or plants per valve.
Drip Irrigation - Supply Lines and Emitters

Drip irrigation is divided into two broad categories: point source emitters and inline emitters.
1- Point source emittersPoint source emitters are used in landscape beds where perennials, shrubs, and trees are planted (Figures 3 and 4). They are also used in vineyards and orchards, as well as in some gardens. In these systems, a flexible line/tube is connected to a valve and placed to run adjacent to all the plants. Then, the user inserts an appropriate type of emitter, typically using a punch (or multiple emitters, depending on the plant size), into the pipe near the plant, thereby supplying irrigation water to the plant. There are several types of point source emitters. They vary in flow rate and how they emit water. Some emitters can also be attached to smaller ¼-inch spaghetti tubes, which are punched into the main pipe, to extend the area that can be irrigated.

A nice thing about this style of drip is that if you have several plant sizes, they can all be irrigated on the same line, using emitters with different flow rates according to the plants’ needs.
2- Inline emittersInline emitters have holes already punched into a pipe, spaced evenly along its length (Figures 5 and 8). Spacing varies from every 3 inches to 24 inches or greater. The flow rate of inline emitters also varies, ranging from half a gallon per hour or less to multiple gallons per hour.
Tubing with inline emitters can be run singularly (think row crops) or in an evenly spaced grid pattern. The grid pattern is handy for landscape beds where plants are planted closely together and spaced evenly. Inline drip irrigation lines are sold as ½-inch, thick-walled tubing and precut rolls, ranging from several feet to several hundred feet in length.
Soil Texture and Emitter Spacing

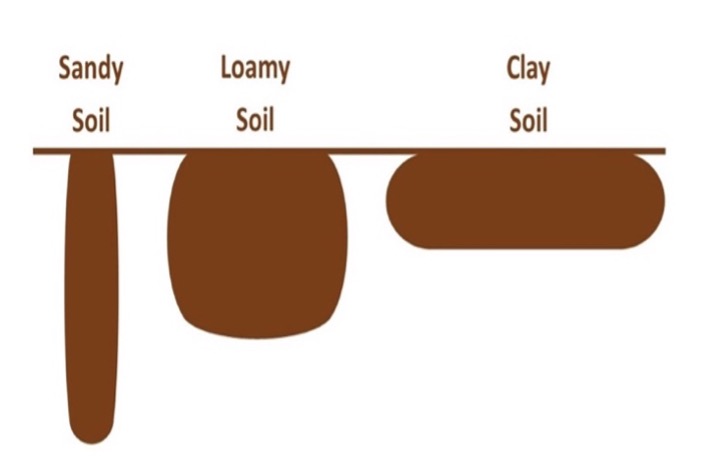
Whether using inline or point-source drip, the number of emitters to use and the flow rate of the emitters depend on the soil texture and the plants being grown. Soil texture (the percentage of sand, silt, and clay) determines how water moves through the soil profile and, thus, how much surface area each emitter wets (Figure 6).
As water flows out of each emitter, it penetrates both downward and outward in the soil, making a bulb-shaped wet area. However, the rate at which water flows downward and outward varies depending on the soil type or texture. For example, an average perennial planted in loam or clay soil usually requires one 1-gallon/hour emitter per plant.
Generally, 1 inch of water penetrates loamy soil to a depth of approximately 6 inches. However, each perennial in sandy soil needs two of the same emitters because water drains through the soil profile more rapidly in a narrower column. And so, in sandy soil, you would run two emitters per perennial but for half the time per irrigation event.
In the case of sharply drained sandy soil textures (as well as smaller particle, clay-based soils), it may be necessary to implement “pulse irrigation.”
Pulse irrigation involves shortening the duration of each irrigation event while increasing the frequency of irrigation events to maintain the soil around the root zone at a sufficiently moist level. Keep in mind that soils that remain excessively moist tend to increase the incidence of plant diseases and root rot. One common mistake, even with drip irrigation, is overwatering landscapes. Take care to allow the soil to dry down before irrigating again.
Example CalculationsWhen considering water requirements and application, it can be difficult to bridge the different ways water is measured. For example, plant requirements are usually given in inches of water, while irrigation parts’ flow rates are generally listed in gallons per minute (gpm) or gallons per hour (gph). To properly design a drip system, you will need to consider a few key formulas. Use these formulas to determine the inches of water per hour that are being applied.
- Calculating the plant area:
The diameter should be in feet so that the area will be in square feet.
- Calculating the number of emitters per plant (Table 1):
- Steps:
- Measure the diameter of the plant in feet.
- Compute the plant area in square feet.
- Multiply by the percentage of wetted area = 50% to 60% (a reasonable assumption).
- Divide by the square feet of soil wetted by each emitter (from Table 1).
- Example:
- You have a 15-foot diameter tree (crown) growing in loamy soil, and you want to wet 60% of the soil surface (Figure 7). Apply the formula as follows:
- (15 ft × 15 ft) × 0.7854 = 176.7 ft2 plant area
or 15 x 15 = 225, and
225 × 0.7854 = 176.7 ft2 plant area
- Next, calculate the percentage of the area to be wetted.
- (176.7 ft2 × 60% coverage) ÷ 21 ft2 per emitter = 5.05, or
176.7 × 0.6 = 106.0
106.0 ÷ 21 = 5.05
IMPORTANT: Round up to the nearest whole number. You will need six emitters.
Each emitter will cover 21 ft², and the wetted diameter of each is 5.2 ft, to provide 60% wetted coverage. Emitters should be evenly spaced around the dripline of the tree. As trees grow larger, rings of drip need to be added so they are spaced every 3–4 feet.

Table 1. Number of Emitters Required Based on Plant Type and Size
| Plant type | Canopy size (diameter in feet) | No. emitters | Flow rate (gph) |
|---|---|---|---|
| Flowers/Small shrubs | 1–3 | 1 | 1 |
| Large shrubs | 4-6 | 2 | 2 |
| Small trees | 7–10 | 3 | 2 |
| Large trees | 11-4 | 4-6 | 2-4 |
| 15-20 | 6-12 | 2-4 | |
| 21+ | 12+ | 4 |
Calculations for Point Source Emitters
- Water conversion to gallons:
- The conversion factor (in gallons) is 0.623 when 1 inch of irrigation is applied to 1 square foot of ground.
÷ (area covered by emitters in square feet)
- Example:
- If you have two point-source emitters (buttons) that each emit 1 gallon per hour to irrigate 1 square foot, figure the inches per hour by applying the numbers in the formula as follows:
- (2 emitters × 1 gph per emitter × 1.604) ÷ 2 ft2 = 1.604 in. per hour applied in that area
Calculations for Inline Drip Emitters
- For inline drip, use the following formula:
- Example:
- If your inline emitters are spaced every 12 inches, emit 0.9 gallons per hour, and the rows are 18 inches apart, apply the formula as follows:
- (0.9 gph × 231.1) ÷ (12-in. emitter spacing × 18-in. lateral spacing) = 0.96 in. per hour
Table 2 presents the overall inches of irrigation applied per hour, based on various emitter spacings and flow rates as recommended by the Arizona Municipal Water Users Association (AMUWA, 2001).
Table 2. Suggested Number of Drip Emitters for Mature Plants
| Inline drip emitters | |||
|---|---|---|---|
| Flow rate (gph) | Emitter spacing (inches) | Lateral line spacing 1 (inches) | Inches of water per hour |
| 0.5 | 6 | 12 | 1.6 |
| 0.8 | 6 | 12 | 2.7 |
| 0.9 | 6 | 12 | 2.9 |
| 1.0 | 6 | 12 | 3.2 |
| 0.5 | 8 | 12 | 1.2 |
| 0.8 | 8 | 12 | 1.9 |
| 0.9 | 8 | 12 | 2.2 |
| 1.0 | 8 | 12 | 2.4 |
| 0.5 | 12 | 12 | 0.8 |
| 0.8 | 12 | 12 | 1.3 |
| 0.9 | 12 | 12 | 1.4 |
| 1.0 | 12 | 12 | 1.6 |
1Lateral line spacing is the width of the area you expect to irrigate per line.
Installation and Maintenance

When installing a drip system, even slight variations in elevation can affect the amount of water released from any given emitter. This can cause plants to be over- or underwatered, depending on their location along the gradient. However, to alleviate this problem, specialized pressure-compensating emitters emit water at or near the manufacturer’s rate regardless of elevation differences. These pressure-compensating emitters are available as point source buttons or impregnated within the tubing (½ inch or ¼ inch). You must still run the emitters and tubing at the manufacturer’s recommended pressure for accuracy.
Since the tubing is often laid on top of the ground, it is also recommended that metal fabric staples be placed every 2 to 3 feet to secure drip tubing to the ground and help alleviate random bulging tubing above bark or ground covers. Staples also reduce the risk of the drip tubes becoming tripping hazards.
As plants grow and water demands change. Keep in mind, regardless of the type of drip irrigation installed, over time, you will need to add and adjust emitters to accommodate the plants’ size and growth. It is very common for trees and shrubs to die 3 – 4 years after they were planted due to the number of drip emitters not being increased. Do not increase the number of emitters around the trunk. Many feeder roots develop towards the edge of the canopy as the canopy grows outward. Emitters should be placed there.
Additionally, check the drip irrigation system regularly to ensure it remains intact and free from clogs. Highly alkaline or calcium-rich water sources can accumulate hard water deposits (Figure 8). In time, it may be necessary to replace emitters and drip tubing.
Conclusion
Drip irrigation is a strategic way for homeowners to implement water-saving practices into their landscapes to help conserve water in the arid Intermountain West. By using this information and understanding the various calculations that accompany irrigation rate recommendations, homeowners will do their part in conserving water and contribute to the overall health of their landscape plants.
Image Credits
Authors and USU Extension provided all photos and illustrations.
References
- Arizona Municipal Water Users Association (AMWUA). (2001). Guidelines for landscape drip irrigation systems. chrome-extension://efaidnbmnnnibpcajpcglclefindmkaj/https://www.azwater.gov/sites/default/files/2022-11/Guidelines%20for%20Landscape%20Drip%20Irrigation%20Systems.pdf
- Hill, R. W., Barker, J. B., & Lewis, C. S. (2011). Crop and wetland consumptive use and open water surface evaporation for Utah [Research report 213]. Utah Agricultural Experiment Station, Utah State University. https://extension.usu.edu/irrigation/crop-water-use
- Kuhns, M. (2024). Drip irrigation for trees. Utah State University Extension. Retrieved January 8, 2024, from https://extension.usu.edu/forestry/trees-cities-towns/tree-care/drip-irrigation
- PRISM Climate Group (PRISM). (2022, August 30). 30-year normals [Gridded dataset]. Oregon State University. Retrieved January 8, 2024, from https://prism.oregonstate.edu/normals/
- Rowell, B. (2019). Go with the flow: Simple calculations for small drip irrigation systems. Department of Horticulture, University of Kentucky. https://www2.ca.uky.edu/agcomm/pubs/HO/HO122/HO122.pdf
- Solomon, K. H., El-Gindy, A. M., & Ibatullin, S. R. (2007). Chapter 3: Planning and system selection. In G. J. Hoffman, R. G. Evans, M. E. Jensen, D. L. Martin, & R. L. Elliot (Eds.), Design and operation of farm irrigation systems (2nd ed.). American Society of Agricultural and Biological Engineers.

June 2025
Utah State University Extension
Peer-reviewed fact sheet
Authors
JayDee Gunnell, Taun Beddes, and Burdette Barker

JayDee Gunnell
Extension Professor | Horticulture | Cache County Director
Agriculture and Natural Resources

Burdette Barker
Irrigation

Taun Beddes
Extension Associate Professor | Horticulture | Utah County Director | Juab County
Agriculture and Natural Resources
Related Research