Manuals and Documents
Monitoring Guidelines Tier 1 Volunteer Manual Lake Datasheet Stream Datasheet Turbidity Tube Conversion Chart
Methods
- Rinse the collection cup with stream water three times and then fill to 25 mL with water below the surface of the stream
- Place glass ampule in cup and break tip under the water. Let ampule fill with water
- Mix the ampule by turning it up and down several times. *DO NOT PLACE FINGERS ON OR NEAR BROKEN GLASS TIP* Wait 2 minutes.
- With light shining on the comparator place the test ampule near the color standards. Place on both sides to determine the best color match. Record the concentration*.
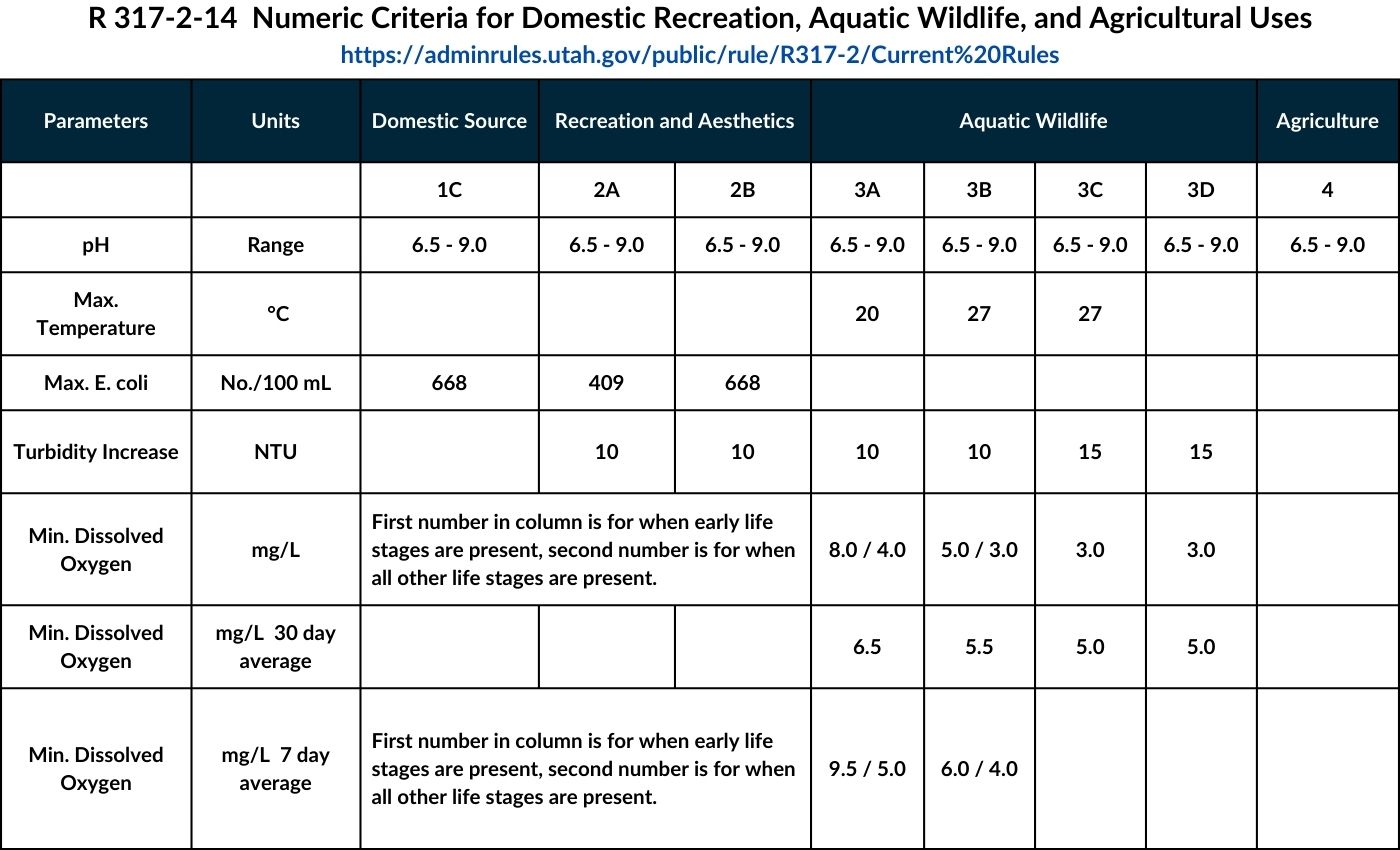
If the concentration is above the state standard of 6.5 mg/L for cold waters and 5.5 mg/L for warm waters, then there is enough oxygen for aquatic life. If the concentration is on the high end of the comparator, the color distinction does not matter as much as it does if the dissolved oxygen measurement is low.
Air Temperature
- Turn on the thermometer and make sure it is set in Celsius (°C).
- Measure the air temperature first by holding the thermometer in a shady location and let the thermometer adjust to the ambient conditions for at least 1 minute before recording.
Water Temperature
- Measure the water temperature by submerging the thermometer two-thirds below the surface of the water.
- Take the measurement in a central flowing location.
- Let the thermometer adjust to the water temperature for at least 1 minute before removing the thermometer from the water and quickly.
pH is a measurement of how acidic or basic the water is. The scale ranges from 0-14, where 7 is neutral, lower numbers are increasingly acidic, and higher numbers are increasingly basic.
- Remove the test strip from the container and the reseal the container.
- Place the colored end of the test strip in the water for 30 seconds.
- Remove the test strip from the water and shake off excess waster. Wait 2 min for the strip to fully react.
- Compare the test strip to the color guide and select the closest color match. Record the pH.
- Dip tube into the water at your sampling site and fill to the top. Be careful to sample flowing water and not the stream bottom. Do not stand upstream from the area you
are sampling. - Take the reading in an evenly lighted area
- Cover your hand over the top and shake the tube to re-suspend any sediment
- Look through the tube toward the target disk on bottom:
- If the disk is visible, record the water level in centimeters
- If the disk is not visible, slowly release water from the valve until the disk becomes visible and then stop the valve. Record the water level in cm. - To convert to NTUs, use our Turbidity Tube Conversion Chart
- This is best to do when the sun is high, generally between 10AM and 2PM. Remove sunglasses before measuring.
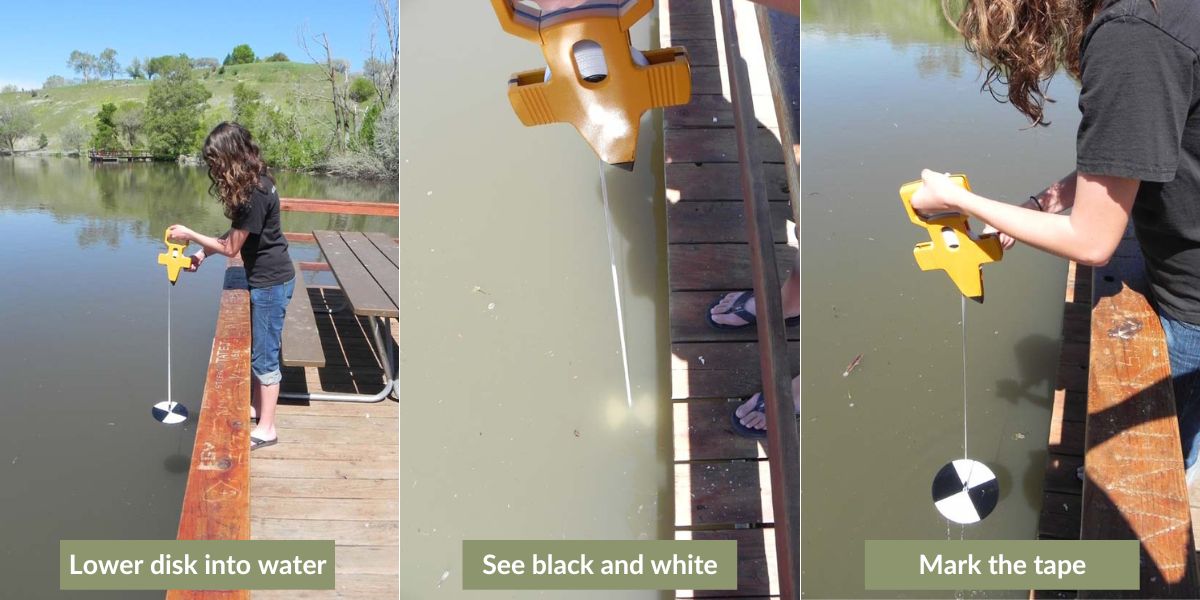
- On the shady side of a boat or dock, begin to lower the disk into the water.
- Lower the Secchi Disk until it completely disappears. Then slowly retrieve the disk. As soon as you can see the faint black and white markings, stop.
- Mark the tape at the surface of the water to record the depth to the nearest centimeter. If you are on a dock, use a clothespin to mark the height of the dock and then measure to the surface of the water. Subtract this from your final measurement.

Equipment Needed for Sampling One Site
Field Sample Collection
- Pull of the top of the Whirl-Pak using the perforated line.
- Use the white tabs to open the pouch; do not touch the top or inside of the bag.
- Face upstream and collect your sample from a depth below 15 cm (6 in.) if possible. Be careful not to sample disturbed substrate or surface scum.
- With bag open, in one quick motion, immerse the bag under water and fill making sure to leave some head space. Remove from water, hold yellow tabs and flip over twice. Seal by twisting the yellow ties closed.
- If you are monitoring more than one location record sample ID on bag.
- Water samples kept longer than 1 hour before plating need to be stored on wet ice or refrigerated. Samples can be stored for up to 8 hours.
Inside Plating
- Make sure Coliscan Easygel medium in the bottle has thawed. It takes about an hour for the medium to thaw once removed from the freezer.
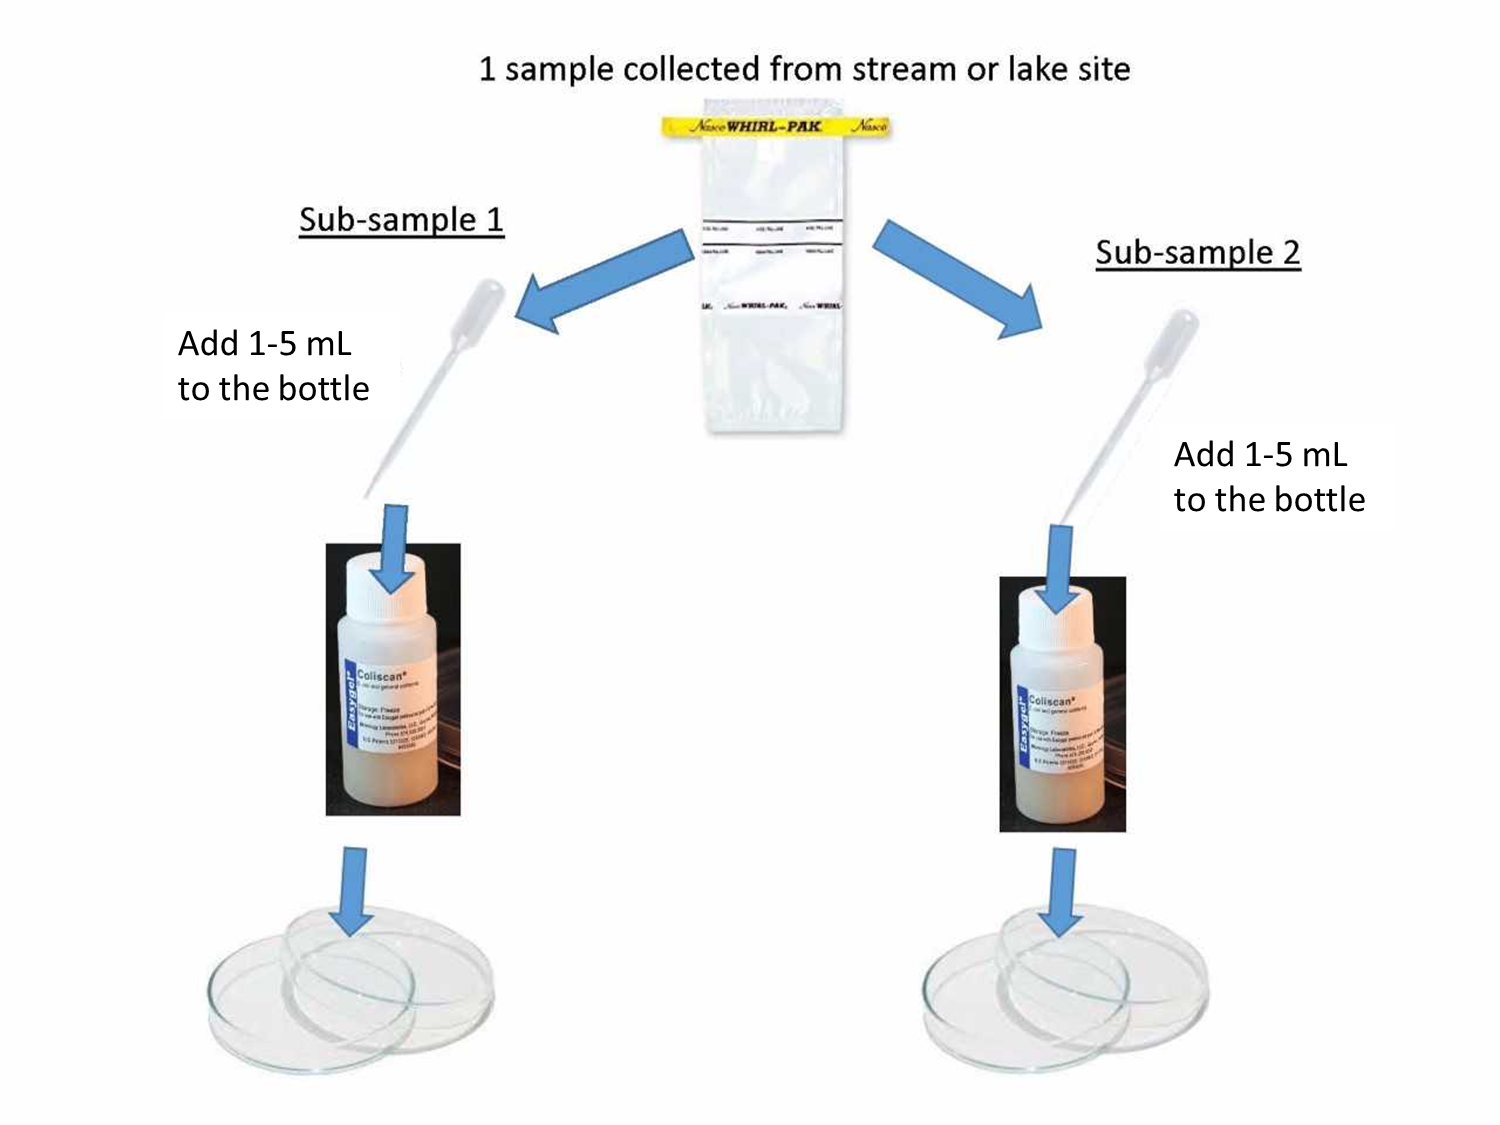
- Strongly shake Whirl-Pak to thoroughly mix the sample. Carefully open bag using white tabs so not to touch the lip or inside. Use a transfer pipe, and deposit 1 to 5 mL in the Coliscan Easygel bottle, cap and gently swirl. Repeat for second duplicate sample.
- Using a permanent marker record on the bottom of the petri dish the site id or name, date, time sample was plated, volume of sample, and sample # 1 or 2.
- Remove the lid, but be careful not to touch the inside of the petri dish or lid.
- Pour Coliscan Easygel medium with sample water from the bottle slowly into the bottom of the petri dish. Replace lid and gently swirly to coat entire bottom. Place the top on the petri dish and leave it on a level surface out of direct sunlight for 45 minutes to solidify. Once solid move to incubation location. Wash hands.
Incubation Period
- Store petri dishes in a warm, draft free location out of direct sunlight. Use the thermometer to measure the temperature. At room temperature, 20 - 24 °C (68 – 75°F), colored colonies will take at least 48 hours to develop.
- Check every 10-12 hours to observe if colored colonies have started to form. Upon sighting the formation of colored colonies, note the time and allow for another 24-30 hours for the maturation of these colonies. This is usually 48-60 hours after you poured the medium into the petri dish. Counts should not be made after 72 hours.
- When you believe the colonies have matured record the total number of hours on the data sheet in the Incubation time along with the normal temperature during incubation.
Record Results
- In a bright area, count ONLY colonies that have a dark blue or purple color. Dark blue and purple colonies indicate E. coli. Do not count pink, red, or teal, colonies as these indicate other Coliforms and different types of bacteria. Also, ignore tiny, pin sized colonies. If you are unsure, look at examples provided. If still uncertain check with another UWW volunteer or take a photo and send to UWW staff.
- Record the number of dark blue or purple colonies counted on the data sheet for each sample. Enter the sample size (1 to 5) for each sample. Now you can calculate the E.coli per 100 mL (cfu). First divide 100 by the sample size. Then multiply this dilution factor by the colonies counted EX: 100ml / 3 mL Sample size = 33. 33 X 9 colonies counted = 297 cfu /100mL
- Do this for both samples. Then average the two sample to the nearest whole number and record on the data sheet Average E. coli cfu / 100mL
Disposal
- Place a teaspoon of bleach onto the surface of the medium. Close the lid and let it sit for five minutes.
- Place both petri dishes in a sealed container (Ziploc bag) and throw in the trash.
- WASH YOUR HANDS after handling samples, plates, and water.
Always wash your hands and decontaminate equipment after monitoring. After collecting field samples or recreating in bodies of water known or suspected to have invasive species or harmful algal blooms, all equipment and clothing that came in contact with the water should be cleaned thoroughly. When practical, the least or least likely to be infected/polluted/dirty sites should be sampled prior to any infected/polluted/dirty sites. This will reduce the chance of accidentally introducing contaminants to a new area while sampling.
Utah Division of Wildlife Resources suggests 3 steps for decontaminating equipment:
- Remove any visual debris (e.g., mud, plants, or other debris).
- This is especially important between sites. If you have multiple sites, bring distilled or purified water with you to rinse the equipment between sites.
- Start monitoring with your LEAST contaminated site when possible.
- After monitoring, clean equipment with warm soapy water or a disinfecting solution (e.g., Ethanol, Lysol, bleach, etc.).
- Pay particular attention to crevices such as the tread of boots or waders.
- Drain well to remove excess water.
- Dry out equipment completely.
- Summer: 7 days
- Spring/fall: 18 days
- Winter: 30 days
Narrative Standards:
R317-2-6 -- Use Designations
- Class 1A -- Reserved.
- Class 1B -- Reserved.
- Class 1C -- Protected for domestic purposes with prior treatment by treatment processes as required by the Utah Division of Drinking Water
- Class 2A -- Protected for frequent primary contact recreation where there is a high likelihood of ingestion of water or a high degree of bodily contact with the water. Examples include, but are not limited to, swimming, rafting, kayaking, diving, and water skiing.
- Class 2B -- Protected for infrequent primary contact recreation. Also protected for secondary contact recreation where there is a low likelihood of ingestion of water or a low degree of bodily contact with the water. Examples include, but are not limited to, wading, hunting, and fishing.
- Class 3A -- Protected for cold water species of game fish and other cold water aquatic life, including the necessary aquatic organisms in their food chain.
- Class 3B -- Protected for warm water species of game fish and other warm water aquatic life, including the necessary aquatic organisms in their food chain.
- Class 3C -- Protected for nongame fish and other aquatic life, including the necessary aquatic organisms in their food chain.
- Class 3D -- Protected for waterfowl, shore birds and other water-oriented wildlife not included in Classes 3A, 3B, or 3C, including the necessary aquatic organisms in their food chain.
- Class 3E -- Severely habitat-limited waters. Narrative standards will be applied to protect these waters for aquatic wildlife.
6.5 Class 5 -- The Great Salt Lake.


