Hatching and Caring for Chicks

Introduction
There are many reasons people are interested in raising birds. Most people who desire to start are interested in saving money and becoming more self-sufficient. Many people find excitement in hatching eggs and raising chicks. This fact sheet will help you get started with hatching eggs and raising chicks.
Collecting Eggs
Take care when collecting eggs to ensure the highest possible hatch rate. Eggs must be fertile, and hens and roosters should be young, healthy, and penned together during the egg collection process. Curtis (1928) found that fertile eggs may be expected between 24 and 48 hours after mating [and] the number of fertile eggs from a single mating ranged from one to 11 eggs, with five being average. If you are unsure that eggs are fertile, cracking a few in a bowl to observe the yolk can prove educational. A fertilized egg will have a small “haloed” spot inside the yolk (Figure 1). You may need to move the yolk around to see it. Eggs should not be cracked or thin-shelled. Brush off dirty eggs; do not wash them. Washing the eggs can clog the pores on the eggshell and, unless washed at the correct temperature, could induce bacteria through the pores. Due to outdoor temperature, spring is a great time to gather eggs for hatching. If temperatures are too extreme, the embryo will not survive.
Storing Eggs

It is important to keep eggs at room temperature while storing them for incubation. When storing eggs, a regular breathable egg carton works well. As the embryo forms, the head and the air cell will take up the large end of the egg, so to keep the chick right side up, be sure to place the egg’s pointy end down (Poultry Hub Australia, 2020). You can collect and store eggs for up to 10 days before incubating (Cartwright, 2011). Tilting the carton at a 45-degree angle and then rotating the carton a few times a day is recommended. It is important to note that chicks hatched from eggs gathered at home may have different characteristics than the standard breeds of chickens raised commercially. If purchasing eggs, they must come from hatcheries surveyed by the National Poultry Improvement Plan (NPIP) to prevent disease.
Incubation
There are many incubators to choose from, and many will do a decent job. Choose an incubator that is the appropriate size for the number of eggs you plan to incubate. Most machines vary in size and can hold anywhere from a dozen to several hundred eggs. The most important feature of an incubator is the ability to maintain the proper temperature. Eggs should be turned several times daily, so an automatic turner is recommended. Opening the incubator as little as possible will help maintain the correct temperature. Most species require a temperature close to 99.5 degrees Fahrenheit to produce a successful hatch and must not exceed 102 degrees (Cartwright, 2011; Table 1). Humidity is also an essential factor, usually measured with a wet bulb. Most incubators come with a water reservoir that should be filled (unless otherwise specified) to keep the air at the correct humidity. Increasing the humidity over the last three days keeps the egg membrane pliable when the chick is hatching. Your incubator should specify how to increase the humidity, which is often achieved by closing vents or increasing water in the reservoir. If you have an incubator with a hatching tray, this is when to place the eggs there. All incubators vary. Follow the instructions that come with your incubator for optimal success.
Table 1. Incubation Requirements for Various Species of Fowl
| Species | Incub. period (days) | Temp. (F) | Humidity (F) | Do not turn after | Humidity lasts 3 days | Open vent more |
|---|---|---|---|---|---|---|
| Chicken | 21 | 100 | 85–87 | Day 18 | 90 | Day 18 |
| Turkey | 28 | 99 | 84–86 | Day 25 | 90 | Day 25 |
| Duck | 28 | 100 | 85–86 | Day 25 | 90 | Day 25 |
| Muscovy duck | 35–37 | 100 | 85–86 | Day 31 | 90 | Day 30 |
| Goose | 28–34 | 99 | 86–88 | Day 25 | 90 | Day 25 |
| Guinea fowl | 28 | 100 | 85–87 | Day 25 | 90 | Day 24 |
| Pheasant | 23–28 | 100 | 86–88 | Day 21 | 92 | Day 20 |
| Peafowl | 28-30 | 99 | 84–86 | Day 25 | 90 | Day 25 |
| Bobwhite quail | 23–24 | 100 | 84–87 | Day 20 | 90 | Day 20 |
| Coturnix quail | 17 | 100 | 85–86 | Day 15 | 90 | Day 14 |
| Chukar | 23–24 | 100 | 81–83 | Day 20 | 90 | Day 20 |
| Grouse | 25 | 100 | 83–87 | Day 22 | 90 | Day 21 |
| Pigeon | 17 | 100 | 85–87 | Day 15 | 90 | Day 14 |
Source: adapted from Smith, 2004
Candling Eggs

Clear egg: no dark areas or blood vessels.
Live embryo: arrow shows an organized blood vessels network.
Dead germ: arrow shows indistinct blood ring and no organized blood.
Figure 2. What to Look for When Candling Eggs: Clear (left), Live Embryo (middle), and Dead Germ (right)
Source: adapted from Aviagen Turkeys, Ltd.
Candling is the process of shining a light into an egg to see the embryo’s silhouette. This is done in a dark room and should be done every seven days. When candling, do not remove the eggs from the incubator for longer than necessary to ensure the embryo stays at the proper temperature. A healthy embryo will show veins extending and attaching to the eggshell by Day 7. A sterile or infertile egg will not show anything and should be removed. A stale egg is an embryo that has died and, most often, will have a ring around the egg sack with no healthy veins. Remove these eggs to prevent contamination (Figure 2). At Day 14, a chick can usually be seen. It can be hard to see inside dark-colored eggs. If the light is impeded and the egg seems darker than before, the embryo is likely still healthy and developing. After 14 days, most eggs should not be candled to keep the developing chick at a constant temperature. While candling, pay attention to the air sack at the top of the egg. To increase the air sack, decrease the humidity; to decrease the air sack, increase the humidity. The embryo needs oxygen as it grows, so the air sack should grow throughout the incubation process (Figure 3).
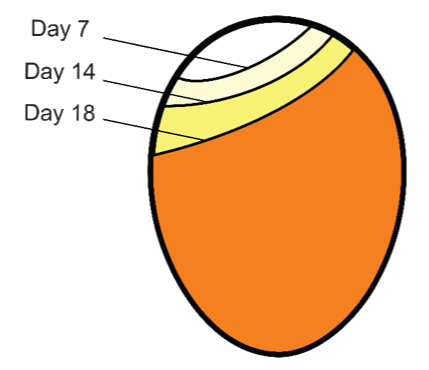
Image adapted from The Poultry Site
Hatching
Three days before the expected hatch, stop turning the eggs and place them in the hatching tray (if your incubator has one). Occasionally, some chicks will hatch a day or two early if temperatures are a little high and may hatch a day or two late if temperatures are a little low. Even a half of a degree makes a huge difference. You will begin to hear peeping as chicks begin hatching. This can be a lengthy process, and it is tempting to peek, but the incubator should remain closed until the hatch date. Once a day, dry chicks may be removed. Increasing the ventilation will help chicks to dry. Complete this process until it is evident that no more chicks will hatch. If a chick has not hatched by one or two days after the hatching period, they likely will not survive. Attempts to free a chick from its shell are usually unsuccessful (Cartwright, 2011).
Ordering Chicks
If you decide to order chicks, ordering them through a company that complies with NPIP surveys to prevent illness and disease is essential. Most chicks are sold straight run or sexed. Straight run means that the company did not sort or separate the chicks into male and female. It is extremely challenging to determine chick sex, and just because chicks have been sexed does not guarantee that they were properly identified. Most chick orders are day-old chicks, meaning they likely have not yet had any feed or water. They must be fed and watered as soon as they arrive. If you need to transport chicks, keeping them close together in a box will help them stay warm until they arrive home. The box should also have air holes so they do not suffocate.
New Chicks
Before placing chicks in the brooder, dip each beak in the water and the feed. This will help the chick know where to find them (Santino, 2024). If a chick is not eating or drinking, try this again and give it some time. New chicks require a lot of sleep, so give them some space for the first few days. If your chicks are arriving in the mail, they may be stressed. Sometimes, adding about 2 tablespoons of sugar to each quart of water will give the chicks an energy boost (DeCubellis, 2023). Some farm stores carry chick boosters with pre-ratioed sugar and electrolytes.
Brooder

Place chicks into a brooder, not a coop. A brooder is a small enclosure that will house the chicks for several weeks. Large feed troughs can serve as excellent brooders, but even a simple cardboard box will do (Figure 4). If raising gamebirds, a screen lid will be essential to keep them from jumping out even as freshly hatched chicks. Rules and regulations may apply to gamebirds that don’t apply to average poultry. Chickens will also need a covering within the first week. Place the brooder where the temperature is consistent and where it will not be investigated by predators (including dogs and cats).
Light
Affix a heating light to warm up the brooder before the chicks hatch or arrive. Red heating lamps are a good choice as they discourage pecking behavior in new chicks. If using a heating mat or table, allow enough space for the chicks to remove themselves from the heat if they become hot. You may decide to purchase a temperature gauge to place inside the brooder, but you can determine the proper temperature by watching the chicks; if they are huddling close together, they are cold, and you should lower the light. Huddling chicks often suffocate each other. If the chicks are spread out and hugging the edges, they are too hot, and you should raise the light (see Figure 5). Ensure that the light is secure and not touching anything, as this is a potential fire hazard. The light should stay on 24 hours a day. You can decrease the temperature slowly each week (Satino, 2024).
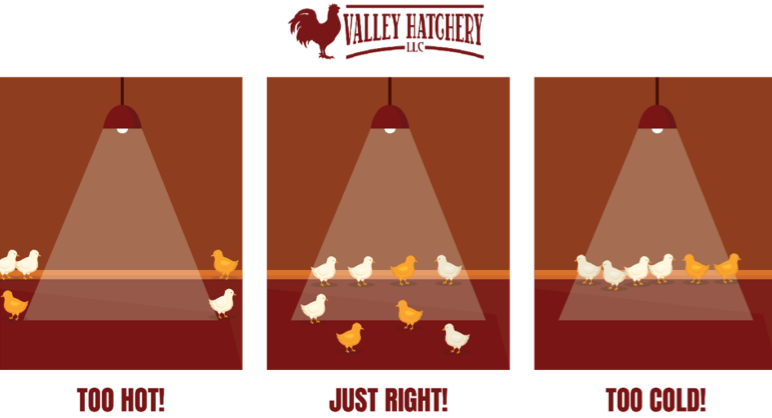
Photo courtesy of Valley Hatchery
Bedding
Add bedding from wood shavings to absorb moisture and hold warmth. Bedding should be changed occasionally as needed.
Water
Use water containers with shallow reservoirs to limit the risk of drowning. Keep the water clean and replenish it often as needed.
Feed
Feed troughs are most successful in feeding newborn chicks. Chick feed should be fine and powdery and should be about 18% to 22% protein for chickens and 28% to 30% for gamebirds for the first 16–20 weeks of age (Satino, 2024). As the chicks age, a larger feed container can be used instead of the trough. Poultry need grit to digest their food, so adding fine grit to the feed at a ratio of 1:10 may be required, depending on the feed purchased (DeCubellis, 2023). With adult chickens, this can be accomplished simply by letting them out of the coop to scratch around.
Moving to a Coop
Chicks should be moved to a coop (Figure 6) when they are old enough to handle an outside environment, usually about 5–6 weeks after they have some plumage. Mixing chicks with other adult birds is only recommended if they are introduced gradually, which will discourage cannibalism.

Photo courtesy of Stromberg’s
Conclusion
Successfully hatching and raising chicks can be a rewarding experience. This process is a great way to introduce youth to agriculture and help them learn responsibility and pay attention to practical details. Whether you plan to raise chicks for profit or as a hobby, you have the basic knowledge and guidelines to get started.
Image Credit
All figure images were provided by the authors or as indicated.
References
- Cartwright, A. L. (2011). Incubating and hatching eggs. Texas A & M University Extension. https://aggie-horticulture.tamu.edu/wp-content/uploads/sites/12/2011/02/Lee-Cartwright-Incubating-and-hatching-eggs.pdf
- Curtis, V. (1928). A study of the duration of fertility in poultry. In Proceedings of the Iowa Academy of Science, 35(1), 345–346. https://scholarworks.uni.edu/cgi/viewcontent.cgi?article=5429&context=pias
- DeCubellis, C. (2023). Care of baby chicks [AN-170]. Ask IFAS, University of Florida Extension. https://doi.org/10.32473/edis-an182-2007
- Lesley, C. (2023, September 15). 3 simple ways to tell if an egg is fertilized. Chickens and More. https://www.chickensandmore.com/how-to-tell-if-an-egg-is-fertilized/
- Poultry Hub Australia. (2020, December 13). Incubation. https://www.poultryhub.org/anatomy-and-physiology/incubation
- Santino. (2024, May 29). Valley hatchery guide to raising mail-order poultry. Valley Hatchery, LLC. https://valleyhatchery.com/care/
- Smith, T. W. (2004, May 27). Care and incubation of hatching eggs. The Poultry Site. https://www.thepoultrysite.com/articles/care-and-incubation-of-hatching-eggs

March 2025
Utah State University Extension
Peer-reviewed fact sheet
Authors
Cory Farnsworth, Jacob Hadfield, and Ashley Longmore

Cory Farnsworth
Professional Practice Extension Assistant Professor | Agriculture and Natural Resources | Grand County
Agriculture and Natural Resources

Ashley Longmore
Extension Assistant Professor | Livestock and Range Management | Box Elder County
Agriculture and Natural Resources

Jacob Hadfield
Extension Associate Professor | Agriculture and Natural Resources | Utah and Juab Counties | Juab County Director
Agriculture and Natural Resources