Splitting the Hive
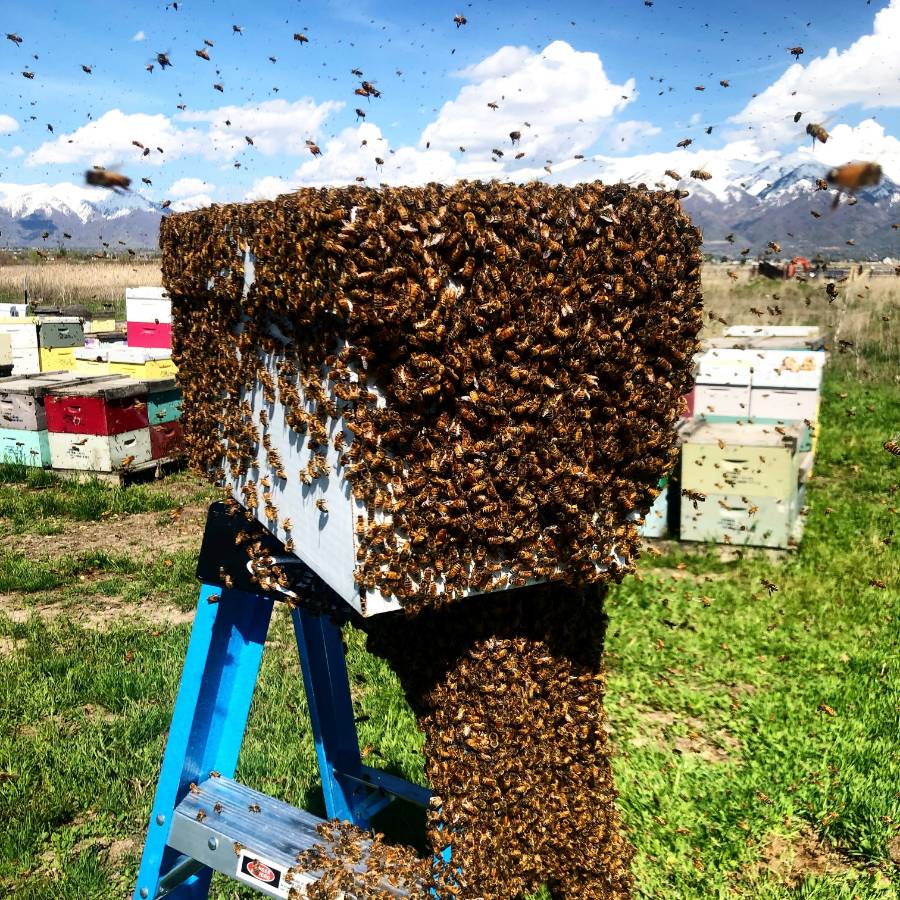
Figure 1. A captured swarm of bees moving into a nuc box. Once the queen moves inside the box, the remaining bees will follow her inside.
Warming late spring temperatures mark the beginning of swarm season in Utah, especially for beehives that have successfully overwintered. Swarming is when bees naturally divide the existing colony roughly in half, with half the bees remaining in the hive and the other half leaving (with the queen) to look for new accommodations. Colonies that swarm are often left with limited resources, do not produce much honey, and can be rendered too weak to overwinter. Splitting your hives in anticipation of swarming can help reduce the negative effects of swarming, giving bees a chance to build up resources and strength before the next winter.
There are many factors that contribute to swarming behavior such as rising populations, limited space, overabundance of food resources, and the age of the queen. However, the exact mechanism that triggers the swarm’s departure from the hive has not been fully identified. Once the colony decides to swarm, several things are known to happen in the hive: 1) worker bees begin to reduce the food for the queen, helping her lose weight so that she can fly; 2) new queen cells, called swarm cells, are constructed in order to feed and raise a new queen. As bees prepare to swarm, you will see bees gathering at the front of the hive and flying in mass numbers, in what looks like a bee frenzy. When the colony does decide to swarm, the bees cluster around the queen to protect her. The swarm will fly for short distances, landing and regrouping as they look for a new home (Figure 1). In the hive that was left behind, a new queen will be reared, hatch, make a mating flight, and hopefully return to start building up the existing colony. This process of rearing of a new queen can set brood production back by over a month.
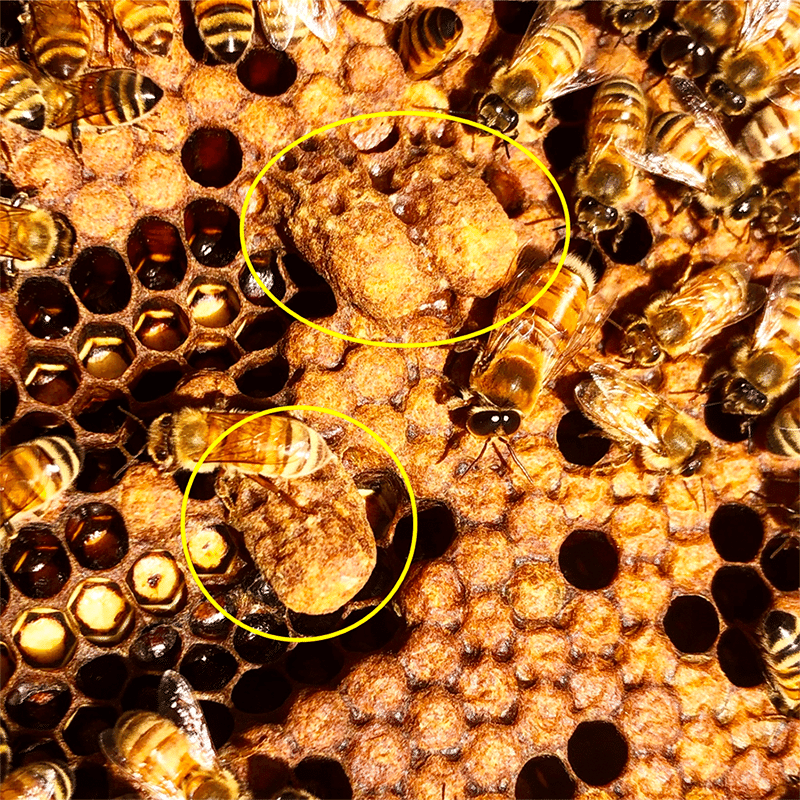
Queen cells are easy to spot, they are long and shaped like a peanut, and appear to hang down from the comb (Figure 2). The large size of the cell is to accommodate the development of the new queen bee. The location of the queen cells can sometimes indicate what is happening inside the hive. Supercedure cells are formed when a queen has been injured, contracted a disease, or is aging and no longer able to support hive growth. These supercedure cells are often found in the middle of the frames. Queen cells built at the base of the frames can be a sign that the colony is strong in numbers, crowded and preparing to swarm. These low-hanging queen cells are aptly referred to as swarm cells. It is important to note, however, that hives preparing to swarm can build a queen cell in any location on the comb and this is not a foolproof method to determining if a hive will swarm or not. When checking your hive, always look for queen cells, noting if eggs have been laid in the cells, or if the cells have been capped. If queen cells are found, an effort should be made to locate the queen in order to understand what is happening in the hive (i.e., if the hive has already swarmed or is undergoing preparations to do so).
Why is splitting my hive necessary?
There are a number of benefits to splitting your hives: 1) this is a natural way to increase number of your managed hives, 2) the lack of a queen for a short period of time will break the brood cycle and can reduce Varroa mite populations, 3) splitting is an easy way to increase income by selling the split as a nucleus colony (nuc), and 4) splitting helps maintain healthy and manageable bee populations.
When should splits be done?
Figure 3. A strong hive can be determined by the number of frames covered with bees in the brood boxes. The hive in this photo is an example of a strong hive.
Splits should be done early in the spring season (typically late March through April in Utah) before heavy nectar flows and when nighttime temperatures are warm enough for smaller bee populations to stay warm. Performing splits should be strongly considered when a hive has successfully overwintered and has a large population of bees early in the spring (Figure 3). Weak hives, with small populations or hives that have struggled to produce adequate honey supplies, should never be split. The following favorable conditions may help a beekeeper know that swarming is a possibility and that the beekeeper should consider preparations to split their hive(s):
- Mild winter and/or early spring
- Early pollen and nectar flow
- Observation of queen cells
- Queen is more than 1-year-old
- Drone rearing is earlier than usual
- High population in the hive early in the spring
How are splits done?
One thing is certain when splitting a hive, you will need a queen in each colony. How you obtain a queen will determine the way you split the hive. Each colony will also need an adequate supply of honey and enough population to care for and provide food for developing brood.
There are several ways to split a hive. The techniques vary but are largely based on whether you can locate the queen, if you want to purchase a new, younger queen, or if you want the colony to rear their own queen. Below are two of the most common methods of splitting a hive:
- the walk-away split (colony reared queen or purchased queen)
- the swarm-control split. The swarm-control split requires a higher skill level as beekeepers will need to find the queen and identify brood in various stages.
Splitting a hive takes practice. Not every split is going to be 100% successful. Beekeepers in all stages will, at one time or another, have a split fail or a queen rejected for various reasons. It is important to keep trying and if you are uncertain, ask other experienced beekeepers if you can observe them as they perform splits and tend to their hives. Often the best way to learn is through hands-on mentoring.
Table 1. Number of days and events from split to brood hatch laid by the colony raised queen. This is a basic timeline and can vary slightly due to climactic factors and available resources.
| Day 1 | Hive split |
| Day 5-6 | Queen cells built |
| Day 12-16 | Queen hatch, elimates rivals |
| Day 19-21 | Queen orientation flight and mating |
| Day 24-28 | First eggs are laid |
| Day 45+ | New brood hatches |
Walk-away split (purchased queen)
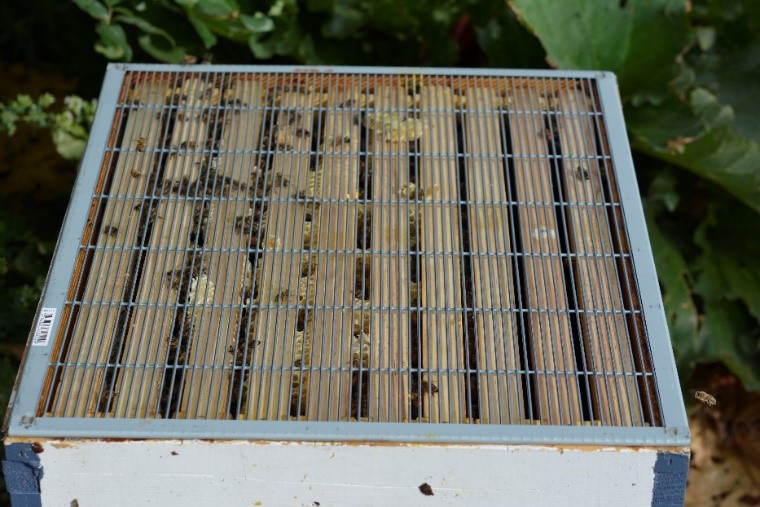
Figure 4. A hive body with queen excluder. The excluder allows bees, except the queen, to pass through, limiting the queen’s movement in the hive.
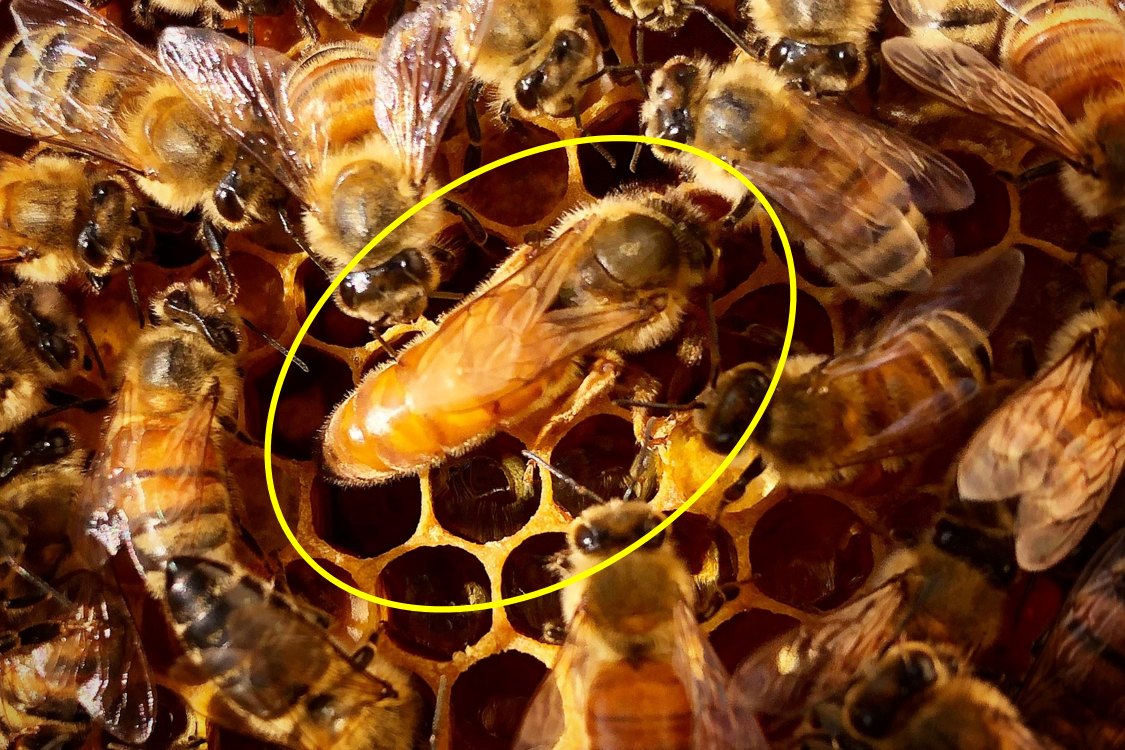
Figure 5. Queen bee (circled) surrounded by her attendants. A queen bee can be difficult to spot; look for an elongated abdomen and a hairless shield, often darker in color, on the back of her thorax.
The alternative to allowing a hive to raise a queen is to purchase one and install her into one of the splits. This requires making sure that the orginal queen is not in the split that you intend to re-queen. This method is fairly easy and consists of excluding a queen with a queen excluder in order to separate the hive into two colonies (Figure 4).
Equipment needed:
- To split: queen excluder
- For the new hive: hive body, bottom board, top cover, lid, entrance reducer, stand, empty frames with drawn comb, new queen
Step-by-step instructions:
- Open the hive and remove two frames containing brood of all stages and two frames containing honey and pollen. Shake the bees off the frames and place in a box to the side.
- Fill the remainder of the new box with empty frames, ideally with already drawn comb.
- Replace the frames taken from the original box with empty frames, ideally with already drawn comb.
- Place a queen excluder on the top of the original box.
- Place the new box with the frames removed from the original box on top of the queen excluder and replace the cover and lid. Nurse bees from the lower box will move up to feed the brood, but the queen is restricted to the original bottom box.
- Return to the hive in 24 hours and remove the top box. Set it on a new bottom board.
- Add a purchased queen to the hive following the queen installation instructions in the “Setting Up Your Hive and Installing Your Bees” fact sheet.
- Add a cover and a lid to the new hive. Ideally, move hive to an off-site location for a week (to prevent bees from drifting back to their original hive) and then return it to your bee yard. If not possible, move one hive as far away from the other as you can. You can block the entrance of the moved hive with handfuls of grass or a mesh screen, but make sure there is adequate ventilation.
- Check the queen in 2-3 days to ensure she has emerged from the queen cage. Check the hive again in 7-10 days to ensure she has started to lay.
It is recommended to add a new queen to the hive in a queen cage fitted with a cork to allow plenty of time for the colony to accept her. Check the queen 3 days later, remove the cork and replace it with a marshmallow. You will want to check again in 2-3 days to ensure she was released and check for eggs after 10-14 days to ensure she is successfully laying in the hive (for more information see “Setting Up Your Hive and Installing Your Bees”).
Swarm-control split
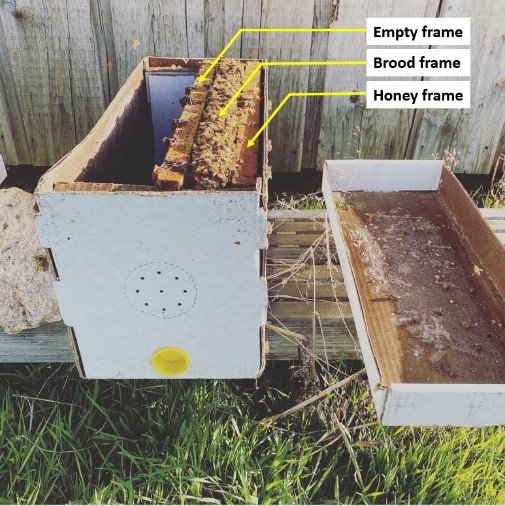
Figure 6. Nuc boxes will contain five frames including two full frames of honey (placed to the outside edges of the box), two frames containing brood in all stages with the queen (placed just to the inside of the honey frames), and an empty frame preferably with already built comb in the center where the queen can lay.
Unlike the walk-away split, the queen will need to be located for a swarm-control split (Figure 5). This method uses a nuc box to separate the two bodies (or colonies) of bees (Figure 6). The nuc will be given a small amount of brood and bees, mostly nurse bees, and will have the existing queen. In the nuc box you will need two frames of brood (with bees), additional nurse bees shaken off of two more brood frames, two frames of food (honey and pollen), and an empty frame with comb already built up (a total of 5 frames).
The original hive will keep a larger population of bees but will have to raise a new queen. The two colonies both have an advantage and a disadvantage that helps them even out production and gives each an opportunity to succeed.
Equipment needed:
- For the split: nuc box, empty frame with drawn comb
- For the new hive: hive body, bottom board, top cover, lid, entrance reducer, stand, new queen, empty frames
Step-by-step instructions:
- Get a nuc box and set it to the side of the hive you intend to split.
- Locate the queen. Check the frame that she is on to make sure it contains all stages of brood, including eggs. If the queen is not on a frame that contains brood, gently move her to a suitable frame. Place this frame and the queen into the nuc.
- Find and remove one more frame containing brood and two frames containing honey and pollen. The honey and pollen frames should be placed to the outside of the nuc box, while the brood should be placed toward the center (Figure 6).
- Take an empty frame with drawn comb and place it in the very center of the nuc box.
- Find two more frames with brood and forcefully shake the bees from the frames into the nuc box. Place the lid on the nuc box.
- The original hive will be left queenless. You can install a purchased queen following the instructions in the “Setting Up Your Hive and Installing Your Bees” fact sheet. Alternatively, you can allow the hive to requeen itself either naturally (see walk-away split sections) or by another method, such as On The Spot (OTS) Queen Rearing (Figure 7). More information can be found in the book “OTS Queen Rearing: A Survival Guide for Beekeepers” written by Mel Disselkoen.
- The nuc should be taken off-site for a week, or it can be sold. After a week the nuc can be returned to the original site and the frames placed in a new hive.
Because the colony from the nuc is small, feeding the bees a 1:1 sugar syrup will help them to gain strength, increase wax production, and promote nectar storage. The hive populated from the nuc should be checked every 7-14 days for the first month to ensure that it is building strength and progressing normally throughout the season.
Are there drawbacks to splitting my hive?
There can be drawbacks to splitting hives, some are temporary such as decreased honey production the year that hives are split. Most hives regain strength and can produce ample amounts of honey the year following a split. Other problems can be more detrimental as some splits can fail to raise a queen or may struggle to increase population. These problems sometimes require careful management and intervention such as adding brood frames or a new queen to the hive. Despite the problems that can occur, splitting hives is a better alternative than swarming, which, if left unchecked, can be detrimental to colony strength and hive longevity.
Special thanks to Stephen Sanko for suggestions and input on this article.
References
- Caron, Dewey & Connor, Lawrence. (2013). Honey Bee Biology and Beekeeping. Kalamazoo, MI. Wicwas Press.
- Disselkoen, M. (2016). OTS Queen Rearing: A Survival Guide for Beekeepers Worldwide. Wyoming, MI. International Mating Nuc, Inc.
- MacFawn, D.E. (2015). Walk-Away-Splits. South Carolina Beekeepers Association. Retrieved from https://scstatebeekeepers.wildapricot.org/Resources/Documents/Newsletter/August/Walk%20away%20splits_7-16_2015.pdf
- Sanford, Malcom T. & Bonney, Richard E. (2010). Storey’s Guide to Keeping Honey Bees. North Adams, MA. Storey Publishing.
Authors
Sheriden Hansen, Assistant Professor, Horticulture; Andree Walker Bravo, Urban Director; JayDee Gunnell, Associate Professor, Horticulture

Andreé Walker Bravo
Director of County Operations | Salt Lake County Director
Agriculture and Natural Resources

JayDee Gunnell
Extension Professor | Horticulture | Cache County Director
Agriculture and Natural Resources
Website created in partnership with: