A Home Dyer’s Garden, Part I: Growing Japanese Indigo

History
Japanese indigo (Persicaria tinctoria, also known as Polygonum tinctorium) has a rich history rooted in indigo dyeing. Originating from Vietnam and southern China, it likely reached Japan from China (John & Angelini, 2009; Marshall, 2018). The plant’s history cannot be separated from its end-use: indigo dye. Textiles dyed with Japanese indigo date back to the late 700s in Japan (Marshall, 2018), and it continues to be cultivated globally for traditional dyeing methods.
Japanese Indigo Varieties
Japanese indigo is an annual plant with numerous varieties. Sourcing some of the less common varieties can be challenging. The plants are often classified by leaf shape. Leaves range from round and broad to long and thin. According to indigo dyeing expert John Marshall, rounder-leaf varieties offer superior color (2018). Aside from unnamed long-leaf types, some other varieties include:
- Round or broadleaf type: ‘Maruba’
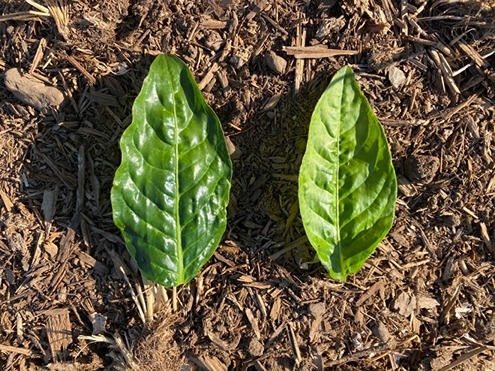
- Intermediate types: ‘Chijimiba’ (crinkle-leaf type) and ‘Senbon’ (Figure 1) and ‘Kojoko’
Most varieties thrive in the temperate environments found in much of Utah but may exhibit stress in intense heat.

Growing Japanese Indigo
Soil
Japanese indigo is not drought tolerant and grows best in well-drained, neutral-pH soil (Wenner, 2017). Most soils in Utah should be able to sustain Japanese indigo growth.
Soil Preparation
Choose a site in your garden that receives full sun but with some afternoon shade, if possible. Before planting, determine fertilizer needs with a soil test and follow the recommendations from the test report. If fertilizer applications are needed, mix the fertilizer into the top 6 inches of soil. If you fertilize with compost, apply no more than 1 inch of well-composted organic matter.
Plants
Japanese indigo can be grown from seed or transplants. If direct seeding into the garden, soil temperature should be above 50 F (John & Angelini, 2009), with no possible frost danger anticipated. Soaking seeds for 12–24 hours before sowing may help germination. Plant seeds 1/8-inch to 1/4-inch deep. For an earlier harvest, you can start transplants 5-6 weeks before your area's last spring frost date. Transplants can be started in individual-celled containers or densely broadcast (approximately one seed per 1/4 inch) in a flat with a seed starting mix (Wenner, 2017). Supplemental bottom heat can also aid in germination. Seedlings should have approximately three to four leaves and an established root system before transplanting outdoors. Ensure seedlings are hardened off for 2 weeks by increasing exposure to outside conditions before transplanting.
Planting and Spacing
Unless you use season-extension techniques, transplant or direct seed after the last frost date. Japanese indigo thrives in full sun, so make sure your garden spot receives at least 6–8 hours of direct sun. More sun exposure can increase the plant's output of indigo pigment precursor (Angelini et al., 2004). However, the authors have observed some stress in the hottest summer periods, even when adequately watered. Transplants grown in broadcast flats can be grouped in three to six plants, which should then be planted about 12–18 inches apart. Larger individual transplants can be planted alone. Row spacing should be approximately 36 inches apart. Japanese indigo readily roots along the stem; burying transplants to their bottom leaves can improve root establishment.
Water
With no taproot and its relatively shallow root system, Japanese indigo does not tolerate drought well (Campeol et al., 2005). Because it is not commonly grown, detailed research into optimized watering amounts and schedules are lacking, especially in Utah’s arid environment. An estimated 1–2 inches of water per week is suggested, with 2 inches likely needed during periods of intense heat. More frequent watering events will prevent plant stress caused by the top layer of soil drying out.
Fertilizer
Add nutrients before planting to satisfy soil nutrient deficiencies (determined by a soil test). Researchers have used approximately 1/2 pound of nitrogen fertilizer (21-0-0) per 100 square feet after the first and second harvests (Angelini et al., 2004; Campeol et al., 2005). If you expect only two harvests, apply no fertilizer after the second harvest.
Mulch
As Japanese indigo does not tolerate drought, use mulch(es) to effectively retain soil moisture and contribute to healthy, vigorous plants while conserving water.
Problems While Growing Japanese Indigo
Weeds
Japanese indigo is relatively fast-growing; thus, weed control is most crucial as the plants are getting established and immediately after a harvest. Once the canopy is established, the crop can adequately suppress weeds though shading (John & Angelini, 2009). Achieve between-row weed control using a thick organic mulch layer or shallow cultivation.

Insects and Diseases
Research trials have shown few major, consistent insect pests or diseases in Japanese indigo. However, some trials in Italy have shown the European corn borer (Ostrinia nubilaris) as an occasional threat (John & Angelini, 2009). The authors have observed generalist pests such as grasshoppers and earwigs on Japanese indigo plants in Utah.
Signs of Stress
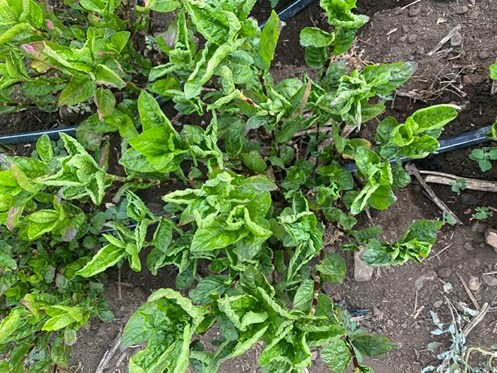
If growing Japanese indigo for use in subsequent dyeing, try to limit plant stress, as this stress will reduce the amount of pigment the plant produces. Japanese indigo can exhibit stress in several ways, including reduced leaf size, light-green-colored leaves, leaf tips turning orange or red, vertically oriented leaves, or leaf curling (Figure 2). These stresses are usually due to a lack of water or nutrients, harsh environmental conditions, or overwatering. Afternoon shade could decrease some of the heat stress associated with the hottest growing times in Utah.
Harvesting Japanese Indigo

Japanese indigo can be harvested multiple times throughout the growing season. Areas with longer growing seasons in Utah may have three or more harvests, depending on harvest frequency. Areas with shorter growing seasons will likely only get two harvests. Initial harvest is recommended when the plants are 1–2 feet tall to ensure a healthy root system that will encourage regrowth after the first cutting (Wenner, 2017). Subsequent harvests can occur approximately every 4–6 weeks.
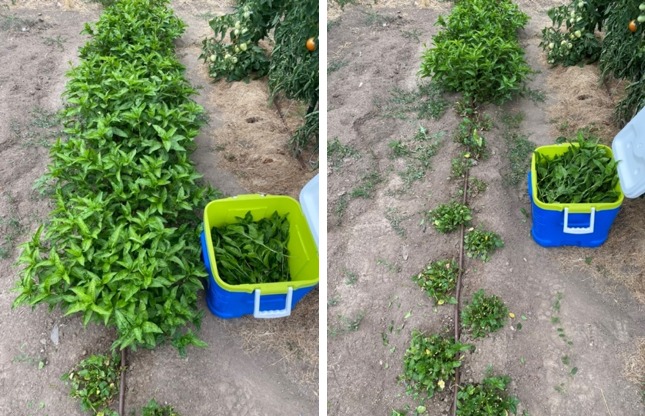
To harvest, cut the plant stems using a sharp pair of garden sheers, knife, sickle, or handheld hedge trimmer, leaving several nodes on each stem from which the plant will regrow (Figure 3). If harvesting for the last time, it is quicker to cut the plant at soil level rather than trim individual stems. Harvesting is best done in the morning before the plant experiences water loss due to heat stress. The fresh leaves can be stripped and used immediately for dyeing or dried for future use (much less common for small-scale growers). Alternatively, the fresh stems and leaves can be submerged in a water bath and fermented to extract the indigo pigment.
Uses
Japanese indigo is one of several plants that contain indican, the chemical precursor to the indigo pigment, which is used as a natural dye. Various methods exist for extracting indigo, and many more for dyeing.
Resources
Many resources for extraction and dyeing with indigo are available. * Some resources include:
- Utah State University (USU) Extension fact sheets A Home Dyer’s Garden II: Extracting Pigment From Japanese Indigo, and A Home Dyer’s Garden III: Dyeing With Japanese Indigo
- Fibershed’s The Production of Indigo Dye From Plants (Wenner, 2017)
- Singing the Blues, Soulful Dyeing for All Eternity by John Marshall (purchase)
- Natural Dye Recipes by Stony Creek Colors
- Indigo Instructions by Botanical Colors
- Maiwa’s How to Dye With Indigo
* Inclusion of a resource does not indicate an endorsement, nor does noninclusion indicate disapproval.
Photo Credits
The banner photo, Japanese Indigo (Persicaria tinctoria), is by Mike Gibson (CC BY-NC), iNaturalist Network. All other photos were provided by the authors.
References
- Angelini, L. G., Tozzi, S., & Di Nasso, N. N. (2004). Environmental factors affecting productivity, indicant content, and indigo yield in Polygonum tincotrium Ait., a subtropical crop grown under temperate conditions. Journal of Agricultural and Food Chemistry, 52(25), 7541–7547.
https://pubs.acs.org/doi/full/10.1021/jf040312b?casa_token=uXoSOEc3wkIAAAAA%3ADpxmCDhzIMy7UADq5gF7B134dw-Qnt8Vhb-hIpsX4-Yt0vMuCd6YAywLxXi7jKDI4fyPGKS2tcBq6U2Feg - Campeol, E., Angelini, L. G., Tozzi, S., & Bertolacci, M. (2005). Seasonal variation of indigo precursors in Isatis tinctoria L. and Polygonum tinctorium Ait. As affected by water deficit. Environmental and Experimental Botany, 58(1–3), 223–233.
https://doi.org/10.1016/j.envexpbot.2005.09.006 - John, P., & Angelini, L. G. (2009). Indigo – Agricultural Aspects. In T. Bechtold & R. Mussak (Eds.), Handbook of natural colorants (1st ed., pp. 75–103). Wiley. DOI:10.1002/9780470744970
- Marshall, J. (2018). Singing the blues, soulful dyeing for all eternity. St. Titus Press.
- Wenner, N. (2017). Indigo planting and harvesting. Fibershed. https://fibershed.org/wp-content/uploads/2018/01/indigo-planting-harvesting-nov2017.pdf
October 2024
Utah State University Extension
Peer-reviewed fact sheet
Authors
Wesley Crump,1 Toree Park,2 and Elizabeth Cohen1
1USU Extension Assistant Professor, Wasatch and Summit Counties
2Undergraduate Intern
Related Research


