How to Grow Grapes: Trellising and Training Basics
Grapes are a wonderful addition to the home garden. With proper care and pruning they are longlived and productive plants. This fact sheet discusses basic pruning information and introduces two common training methods suitable for the Utah home garden. There are many different types of training systems used for grape production throughout the world. The best system for your grape vine depends on the cultivar grown, the climate, soil fertility, and personal preference. This fact sheet details two common systems, the 4-cane single-trunk Kniffin system (cane pruned) and bilateral high cordon (spur pruned). Both systems work well for Utah home growers. Other grape systems can be used successfully, but for simplicity only these two systems are discussed here.
Planning is one of the most important steps for successfully growing grapes. It can be tempting to simply buy a grape vine and plant it somewhere in the yard with visions of delicious grapes in your future. However, without attention to detail your grape vine may not be very fruitful or long lasting. First, familiarize yourself with what is needed for grape vine management as well as planting basics. The companion fact sheet Grape Vine Management is a helpful resource for understanding what is needed for success. Next, select the grape variety you would like to grow, paying attention to your climate as well as your desired use of the fruit. See the companion fact sheet Grape Varieties for Utah for a list of varieties that can be grown in Utah. Once you know what type of grape you will be planting and have selected a suitable place on your property, it is time to consider your trellising system and how you will train your grape vine.
Pest Control
Trellis Construction
For most training systems, grape vines must have support. This can be in the form of a trellis, arbor, or possibly a fence. However, it is important to consider the challenges of pruning when selecting the type of support to use. Chain-link or similar styled fence can present unnecessary challenges as the canes become intertwined in the fencing material making them particularly difficult to remove during pruning. There are many ways to trellis grapes. It is best to choose and construct your trellis before planting. Grape trellises are typically either single posts in a line connected by one to four lines of wire (Fig. 1) or posts with a cross bar at the top with two to four lines of wire running between the horizontal cross bars.
Trellis posts should be treated wood (metal posts will also work, but wire attachment is more difficult) and need to be long enough to be firmly anchored and still leave around 6 feet above the ground. Place inline posts about 20 to 25 feet apart. Use heavy galvanized wire (No. 9 or 10 gauge, high tensile) to support the weight of the vine. The number of wires you use will vary by the training system. Pound fencing staples into the windward side of the posts at the desired heights, leaving a space large enough to allow the wire to pass through. Thread the wire through the staples, making sure the wire can still move side to side. Using a turnbuckle or similar device to attach the wire to the post at one end can allow for adjusting the tension of the wire. See Fig. 1 for an example trellis system. Braces are used at the end of the trellis to provide support and anchorage. Note in this example that end braces are constructed by placing the last two posts closer together with a cross bar between them and twisted wire running diagonally to reinforce the brace. If more than one row is desired, leave 10 to 12 feet between rows to facilitate harvest and maintenance. The distance between plants in a row depends on variety and trellising method, and can range from 6 to 12 feet.
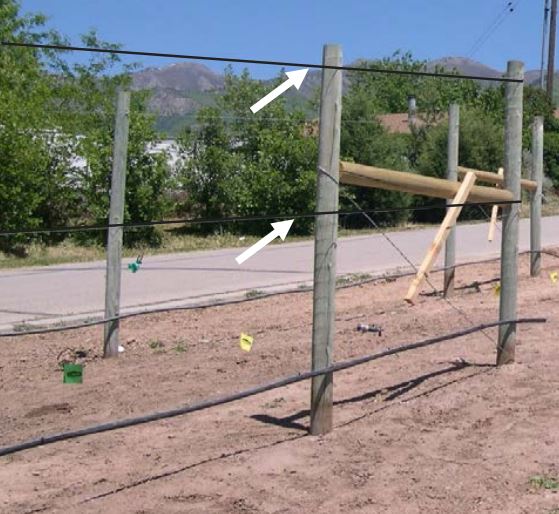
Fig. 1. A 2-wire vertical trellis suitable for the Kniffen training system, with wires (white arrows) at 36 and 60 inches
above ground level. This view shows the end braces with cross bar and diagonal tensioned wire. A drip irrigation
line is suspended approximately 1 foot above the ground.
Terminology
A basic understanding of grape vine structure and terminology is helpful for understanding pruning and training. The appropriately maintained grape vine consists of both permanent and seasonal wood. The trunk, also called the stem, is permanent wood. A cordon is semi-permanent wood that is trained horizontally along the trellis wire. Succulent new growth arising from a bud on older wood is called a shoot. After the shoot drops its leaves in the fall it is called a cane. A spur is a cane that has been pruned back to one to five buds. The top of the trunk where the vine transitions to cordon, spurs, or canes is called the head. On each shoot or cane there are buds that form at the base of each leaf that will produce the leaves, shoots, and flowers the following season.
Pruning
Fruiting shoots grow from 1-year old dormant buds. Pruning is done to replace the fruiting wood each year. Grape pruning requires removal of between 80 and 90% of the canes each year. A fully mature, healthy vine can support a total maximum of 40 shoots. Younger vines will need to have fewer shoots until they reach maturity. Limiting the number of shoots is important for good cluster size, root balance, and preparation for winter. Grape pruning is done in one of two ways depending on the variety and training system: cane pruning or spur pruning. In general, American type grapes and many hybrids should be cane pruned because their basal buds are typically only vegetative (leaves but no fruit). This means if you are spur pruning them you would be cutting off the buds that are most likely to produce fruit. European grapes can be cane or spur pruned. If you are not sure which pruning method would be better for your variety, it is best to use cane pruning. Each of the two methods are described below.
Cane Pruning Overview
In a cane pruned system, the trunk (permanent wood) is kept each year, along with fruiting canes originating from the trunk. After a cane produces fruit for 1 year, the majority of the cane is removed. A new fruiting cane and a renewal spur, both originating close to the trunk, are kept for regrowth of next year’s fruiting cane. Cane pruning is a good option for cold climates. There are many different cane-pruned systems; the 4-cane single-trunk kniffin system described below is relatively simple and has been used successfully in Utah.
Spur Pruning Overview
In a spur pruned system, the permanent trunk and semi-permanent cordons are left from year to year. Along each cordon, multiple canes grow from spurs (two to three buds) spaced every 4 to 6 inches along the cordon. One common spur-pruned system, a bi-lateral high cordon, is detailed below.
Cane Pruning: 4-Cane Single-Trunk Kniffin
This system needs two strands of wire, one attached to the trellis posts at 36 to 40 inches above the ground and another at the top of the post (60 to 72 inches). By each newly planted vine, secure a garden stake or pole vertically to the bottom and top wire. See Fig. 4 for a visual illustration of this training method.
Trunk Establishment
In the weeks following planting, several new shoots will develop. Select the strongest shoot to keep (this will become the trunk) and remove all other shoots so the vine directs all of its growth into the selected trunk. Loosely tie the selected shoot to a vertical stake that has been secured to the trellis wire. Once it grows a few inches past the lower trellis wire, pinch back the shoot tip to induce branching, leaving two buds above the wire. Several shoots near the top of the cane will develop. Select three shoots to keep and loosely secure the lower two horizontally to the wire, growing in opposite directions (see Fig. 4), with the third positioned vertically toward the second wire. This new growth will need to be secured to the horizontal wires every couple of weeks throughout the growing season. Remove all other shoots originating from the trunk as they appear. Timing of pinching back the vertical trunk at the second wire depends on when the branch reaches the top wire. If the vertical shoot reaches the top trellis wire late in the first growing season, wait to top the shoot until February or March in the dormant season. If the shoot does not grow to the top wire by the dormant season, continue training the cane to the top trellis wire in the second season. If any fruit clusters develop during the establishment year(s), remove them to allow the grape plant to develop a good root system.
Cane Establishment
Once the trunk is established and the four selected canes have been secured to the horizontal wires, the first dormant cane pruning should take place. Prune at the end of February or the beginning of March. On the bottom two canes, count out from the trunk to four or six buds and prune off the remainder of the cane. On the top two canes, leave only three to five buds on each cane. During the following growing season, depending on the variety and vigor of the grape vine, flowers may develop. At this point, you can allow them to develop into fruit, but if more than one flower cluster forms per shoot, remove the bottom cluster before bloom. Do not do any summer pruning. During the second dormant season during cane establishment, keep one shoot from the base of each cane as new fruiting wood and prune one shoot back to two to three buds for a renewal spur (Fig. 2). Renewal spurs will grow the canes for next year’s production (Fig. 3). Tip each fruiting cane back to 10 or fewer buds, depending on the vigor of the plant. Canes differ in fruitfulness. When selecting which canes to keep, look for ones that are pencil width in diameter, grew in the light, and do not have abnormally long spaces between buds.
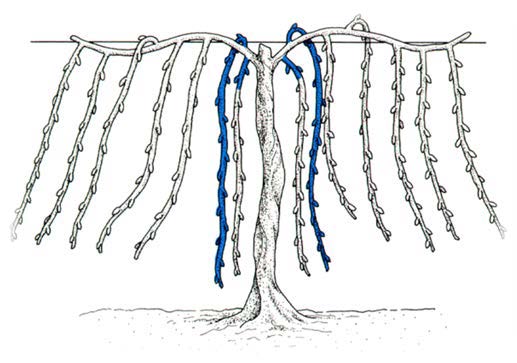
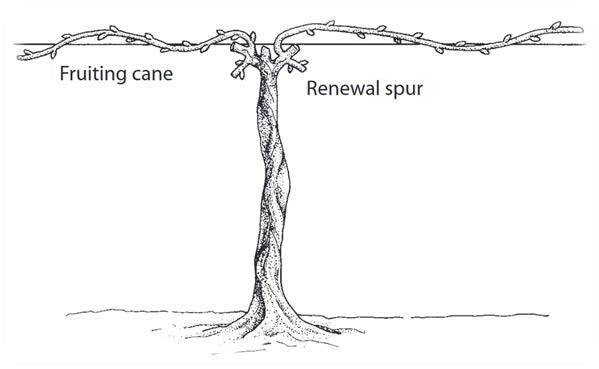
Fig. 2. Image only shows one wire, the same pruning should be repeated for both wires in the 4-cane single trunk kniffin system. Before (left) and after (right) pruning during the second dormant season of cane establishment. Shading indicates wood that will be kept for the next season with the replacement cane attached to the wire for the following season. Images used with permission from Oregon State University Extension Service.
Fully Established
The renewal spurs left in the previous year will have grown canes from the two buds that were left. Choose the better of the two canes and prune it back to 10 buds to keep as next year’s fruiting cane. Prune the other cane back to a two-bud renewal spur. Remove last year’s fruiting cane. If the renewal spur did not produce a satisfactory replacement cane, one of the base shoots on last year’s fruiting cane can be selected instead. Remember, a fully mature, healthy grape plant should be able to support a maximum total of 40 buds. A classic mistake of many homeowners is to leave more buds than this because removing so much wood each year is intimidating. Stick to the plan! Leaving more than 40 buds will limit the plant’s ability to build up food reserves and increases the chance of winter injury. It also reduces the quality of the fruit produced.
Cold Climate Adaptation
In areas where spring frosts are common, during pruning growers can choose to leave two canes with one as an “insurance” cane until after spring frosts. In the event one of the canes that was selected is killed by frost and did not make it through the winter, they can prune out the dead one and replace it with the insurance cane. It is important that after the danger of spring frosts have past, you go through and remove any extra insurance canes.
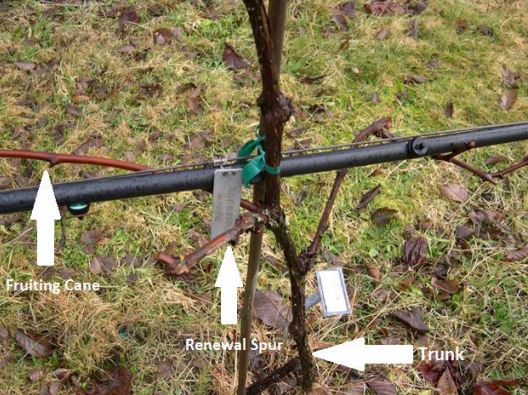
Fig. 3. Renewal spur with two buds next to fruiting cane. This orchard has a drip irrigation system
also attached to the lower wire.
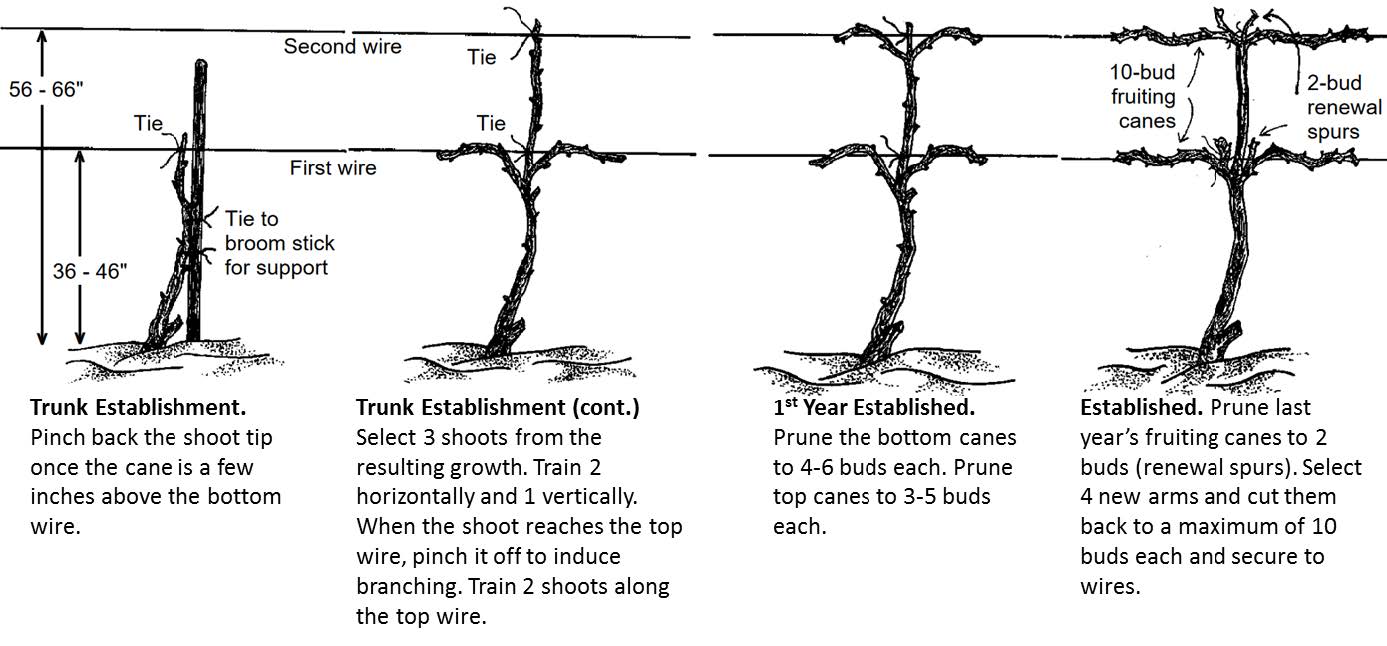
Fig. 4. Grape trained to a 4-Cane Single-Trunk Kniffin system. Image used with permission from the University of Idaho, College of Agriculture.
Spur Pruning: Bi-lateral High Cordon
This training system is well suited for varieties with a trailing or downward growth habit. The very similar bi-lateral low cordon system is better suited for varieties with an upright growth habit. This system uses just one strand of wire at 5 to 6 feet to support the cordons, but may also use “catch” wires to hold the shoots. By each newly planted vine, secure a garden stake or pole vertically to the top wire to use as you train the vine to the wire. See Fig. 5 for a visual illustration of this training method.
Trunk/Cordon Establishment
Follow the same steps as outlined in the cane-pruning, trunk establishment section to establish a trunk that reaches the top wire. Depending on the vigor of the vine and site conditions, it may take more than one growing season to reach the wire. That is fine, simply continue training the vine to the top wire before beginning to establish the cordons. During the dormant season, top the newly grown trunk at the top wire. Remove any canes that may have grown on the trunk and make sure the trunk is securely tied to the stake. In the following growing season, begin establishing the cordons by selecting two shoots that grow near the wire and train them along the wire. Remove any fruit clusters that develop to encourage strong root and shoot development.
First Year Established
Prune back the two canes to 7 to 10 buds each, depending on vigor. Remove any canes that have grown lower on the trunk. During the following growing season, shoots will grow from the buds on the cordons that were trained along the trellis wire. Sometimes, more than one shoot will grow from each bud, with one that is stronger than the other. In the spring, when the longest cane is about 6 inches, remove the shorter canes. This can be done by grasping the extra shoot at the base and carefully snapping it off. Do not allow more than one grape cluster to develop per shoot to prevent over-bearing on the young plant. Removing any extra clusters at bloom works well.
Second Year Established
Begin to establish fruiting spurs by selecting the strongest canes that are in a good position that have grown from the newly established cordon. For most varieties, leave a spur every 4 to 6 inches. Prune back the canes to spurs that have two or three buds. Leave no more than 40 buds per plant (in this case, 10 spurs on each of the two cordons with two buds per spur). At this point the vine should fill its allotted space.
Fully Established
When pruning during the dormant season, strive to maintain a balance between vegetative and reproductive growth. Prune the canes that grow from the spurs back to one to three buds. This section of cane left will become part of the spur and is the 2-year-old wood where the next year’s fruiting wood will grow from. Allow all fruit clusters to develop but continue to thin down to one shoot per node in the spring. Remove any suckers that develop on the trunk.
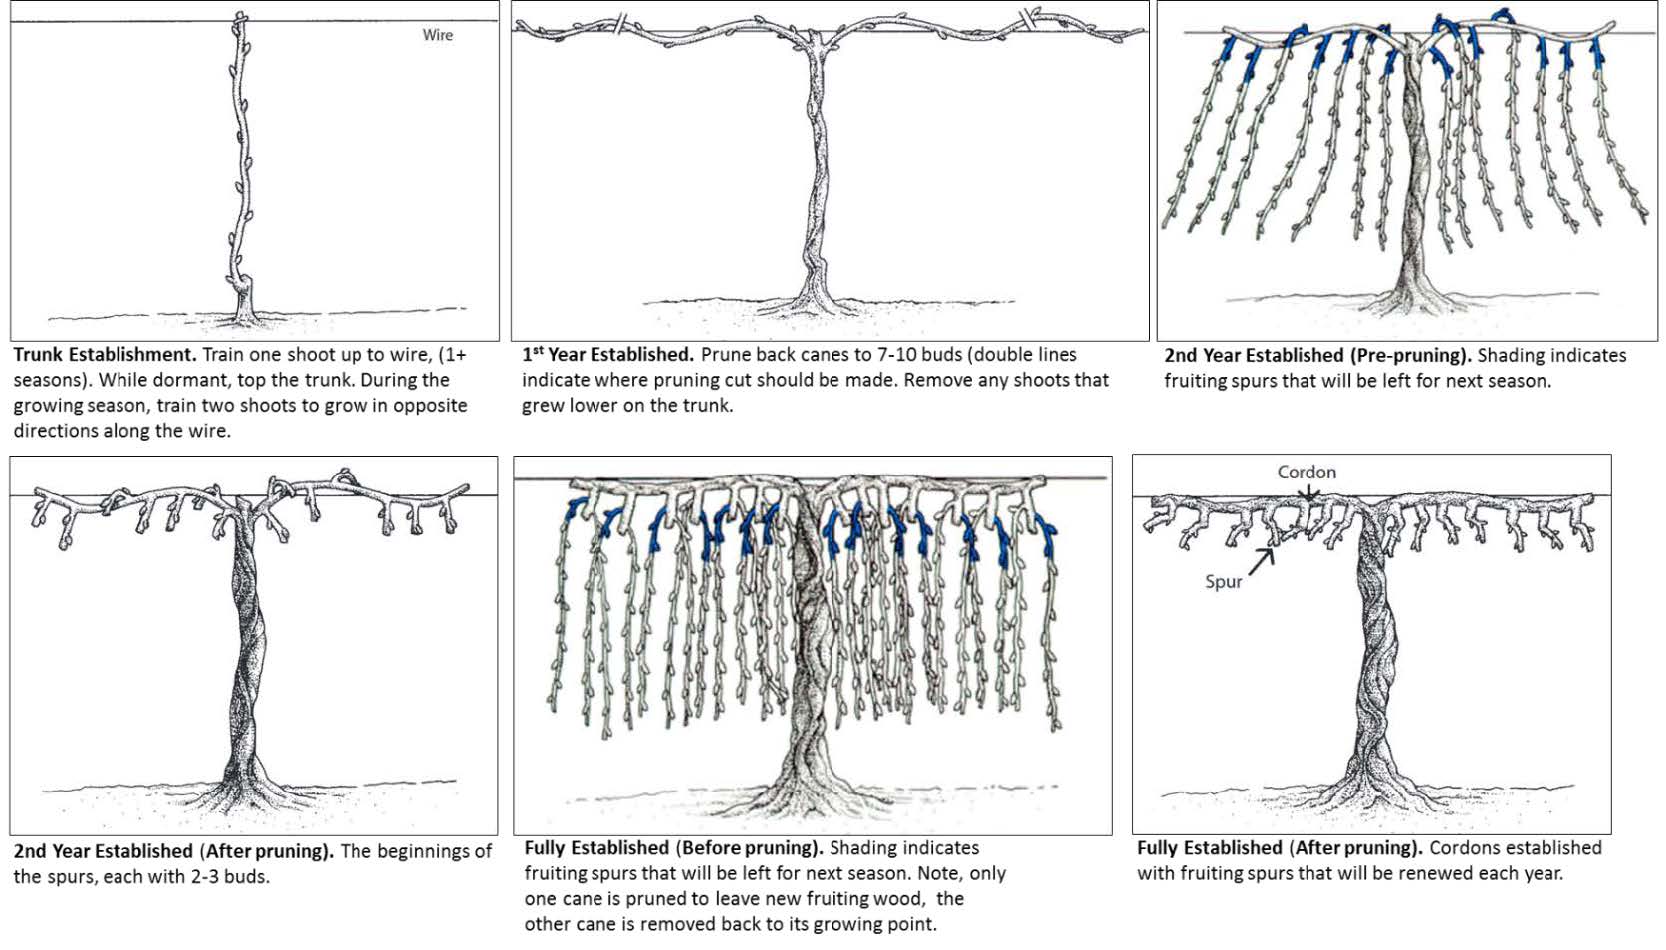
Fig. 5. Grape trained to a bi-lateral cordon, spur pruned. Images used with permission from Oregon State University Extension Service.
When to Pick Grapes
Grape Varieties
References
- Colt, M., E. Fallahi, D. Barney and T. Tindall. 1998. Backyard Grapes. University of Idaho, College of Agriculture.
- Strik, B.C. 2011. Growing table grapes. Oregon State University Extension Service.
- Skinkis, P. 2010. Cane pruning grapevines. Oregon State University Viticulture Extension. https://www.youtube.com/watch?v=mfd2V5 DFDo
- Skinkis, P. 2010. Spur pruning grapevines. Oregon State University Viticulture Extension. https://www.youtube.com/watch?v=um9p1e iGiwI
Utah State University Extension
Peer-reviewed fact sheet
Download PDF
Authors
Tiffany Maughan, Brent Black and Mike Pace
Related Research


