Community Solar Dehydrator Plans
Introduction
As interest in home gardening and self sufficiency surged during the pandemic, many are looking for ways to preserve foods from their newfound harvests. This fact sheet provides an overview of how to build a community solar food dehydrator for food preservation, based on our experience doing so for the community of Moab, Utah. This dehydrator is housed at Youth Garden Project, a nonprofit connecting over 1,000 local youth to local food each year.
Why build a community solar dehydrator?
- Self-sufficiency
- Dehydrated food lasts longer
- Large-scale passive dehydration without electricity
- Decrease food miles and associated carbon footprint
- Project for education about thermal dynamics
- Long-lasting structure
How does the solar dehydrator work?
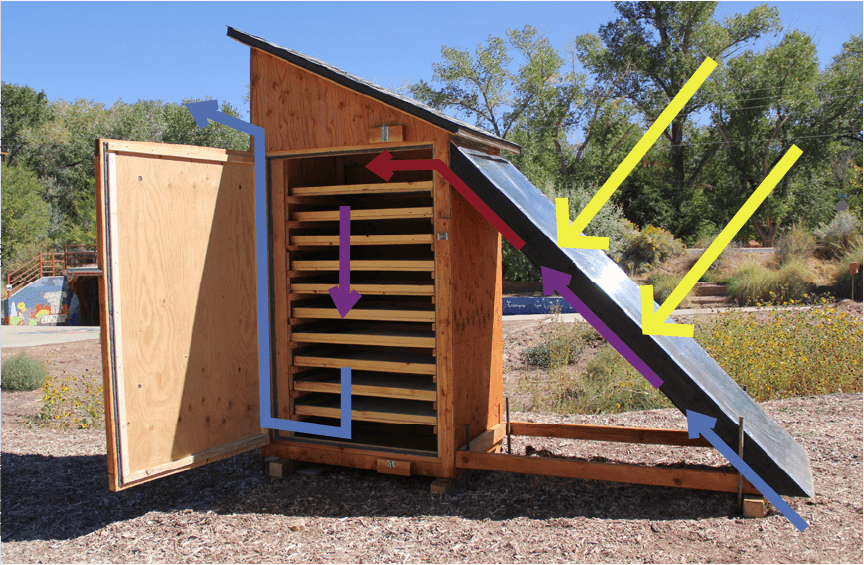
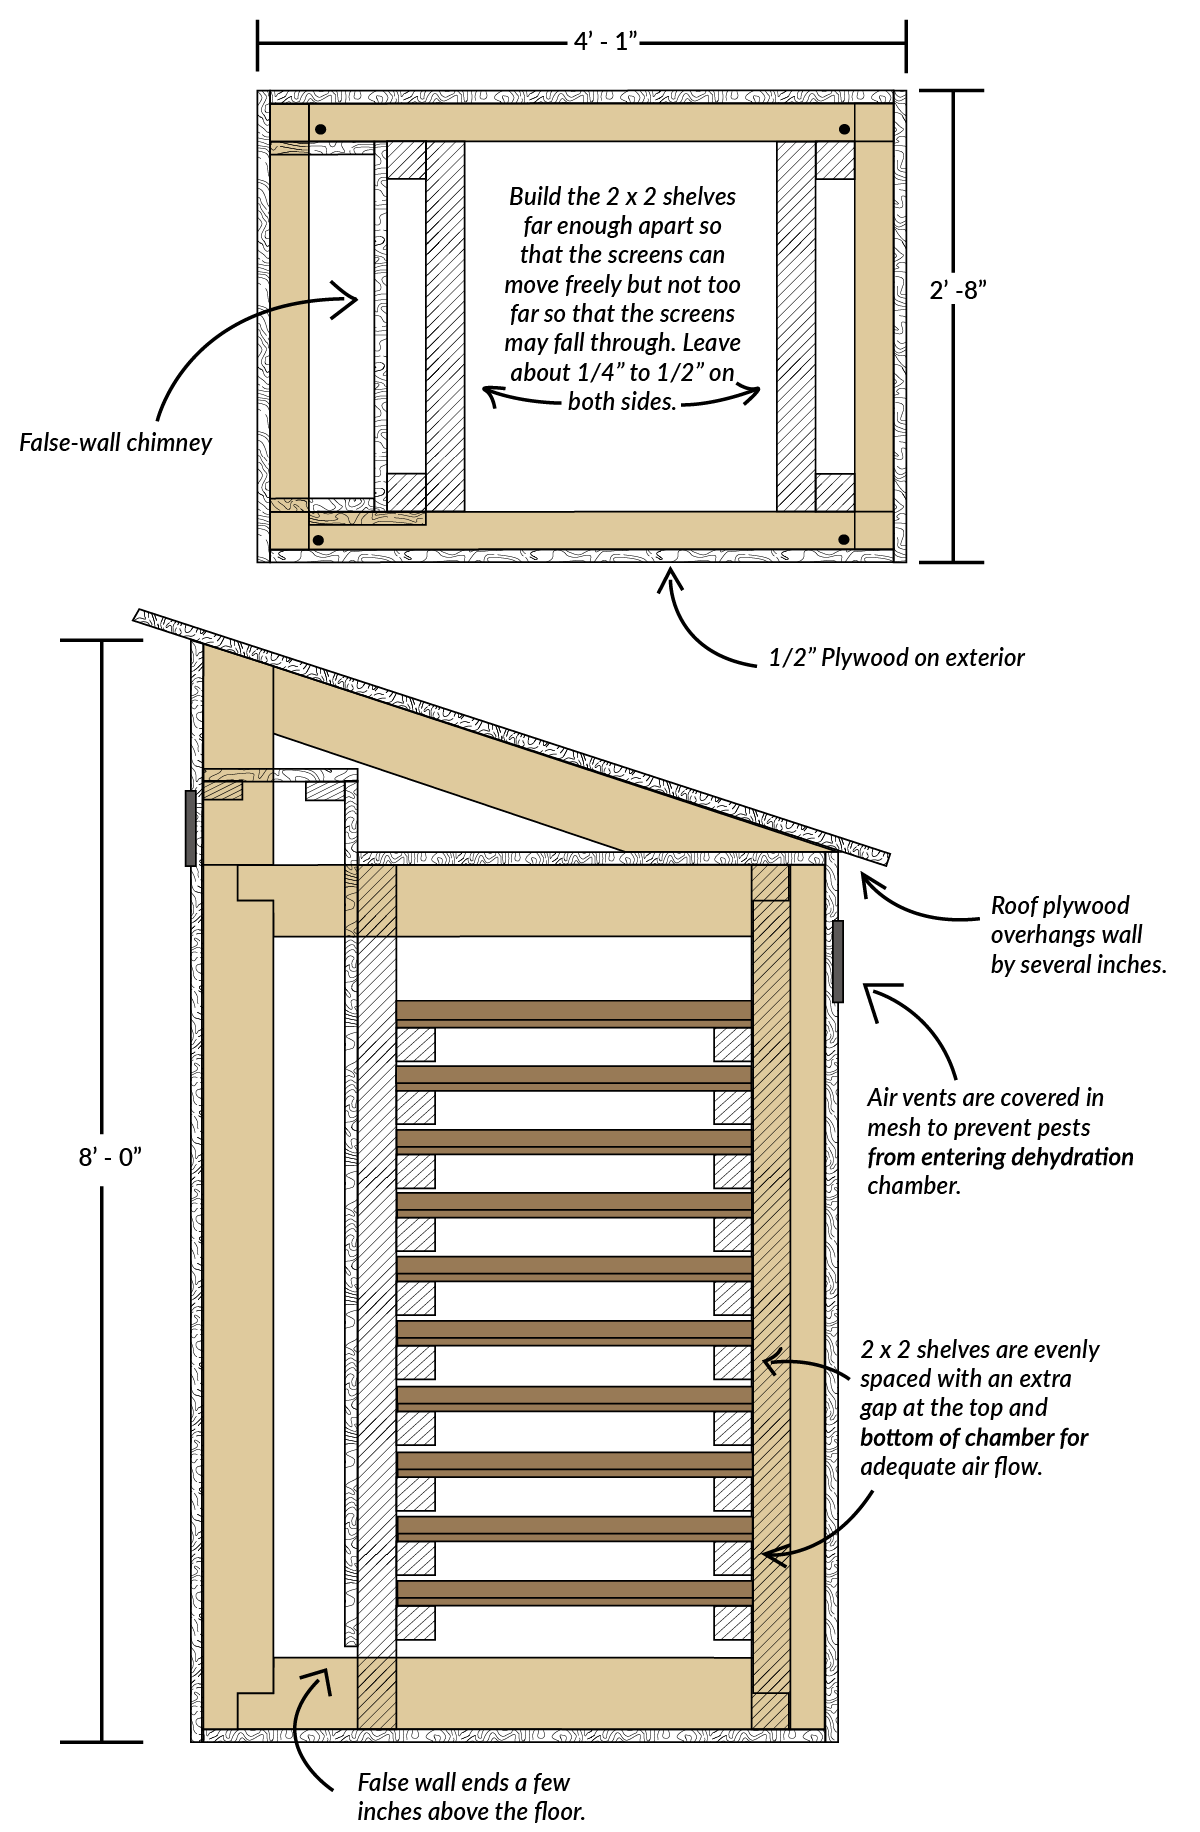
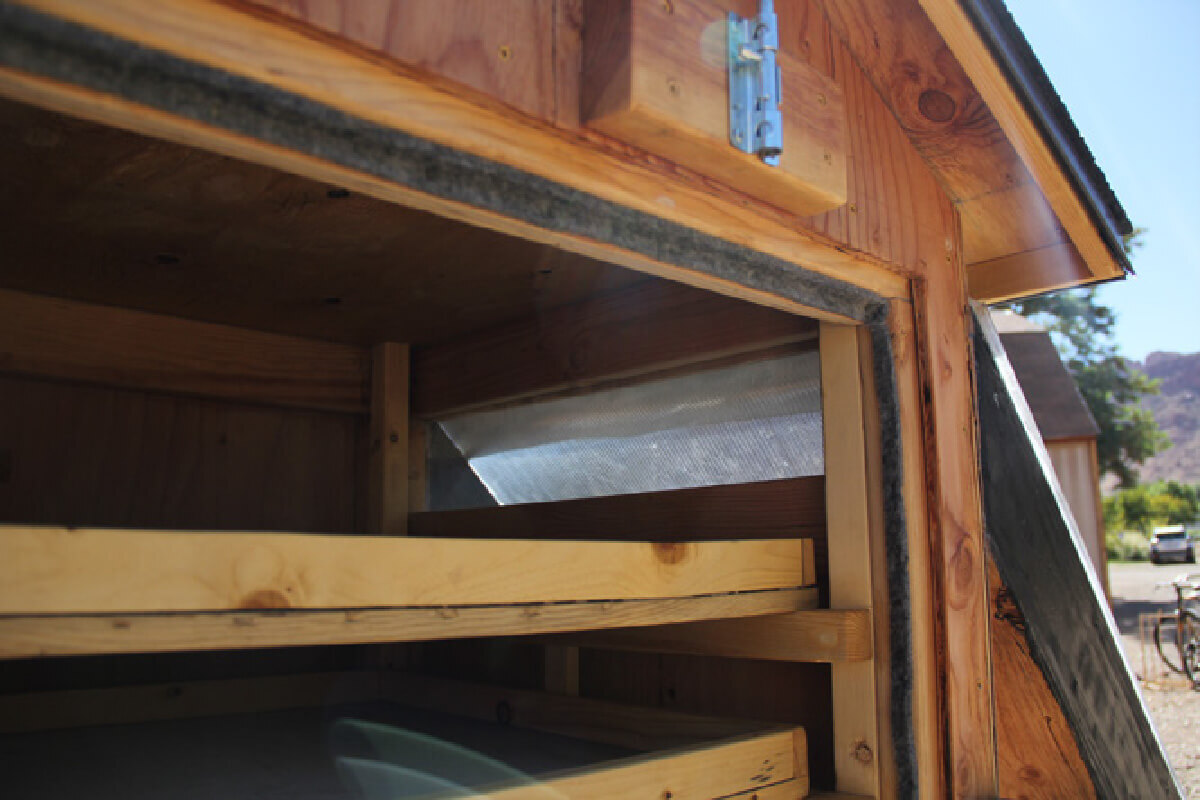
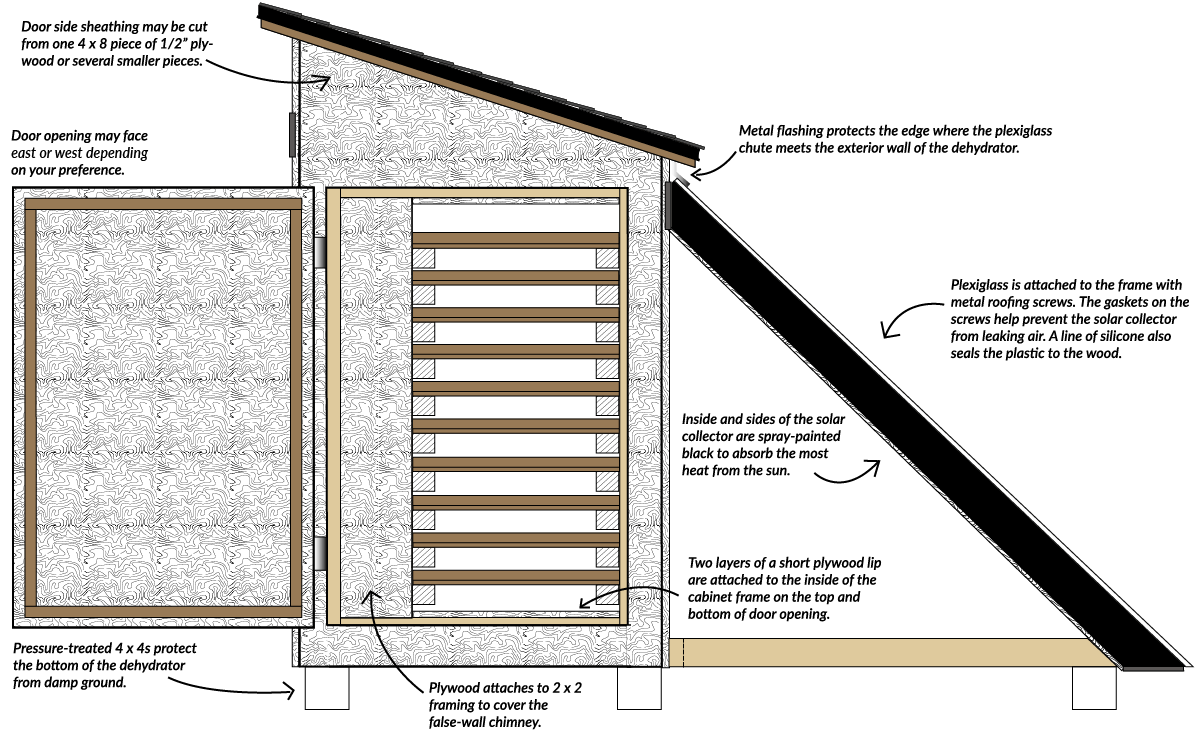
This solar dehydrator model uses a downdraft style (see cover photo). A solar collector on the south side of the dehydrator warms air in a clear chute, the back of which is painted black. As the air in the chute warms, it rises and enters the dehydration chamber. The chamber is filled with trays that are lined with food-safe screen material, and as the air collects moisture from the fruit or vegetables on the trays, it cools and becomes heavier. This heavier air sinks to the bottom of the dehydration chamber where it is sucked out of a false-wall chimney which vents to the north side of the dehydrator. Some smaller dehydrator models are built with two wheels on one side for mobility, but these plans are for building a very heavy dehydrator that would be difficult to move frequently. The dehydrator in these plans was designed for community use, and the project can be adapted to whatever needs suit the builder or the community. The following materials, tools, (Tables 1 and 2) and plans are for an 8-foot-tall dehydrator, with room for 10 2-foot by 3-foot screens.
Table 1: Solar Dehydrator Building Materials
| Door hardware | Quantity | Notes |
|---|---|---|
| Hasp | 1 | This is useful if your dehydrator is in a public place and requires a lock. Otherwise, it is not totally necessary, though it does help with air sealing as well. Another barrel bolt may be used instead. |
| Barrel bolts | 2 | Barrel bolts keep the door closed and air-tight. |
| Handle | 1 | Used for opening the door. |
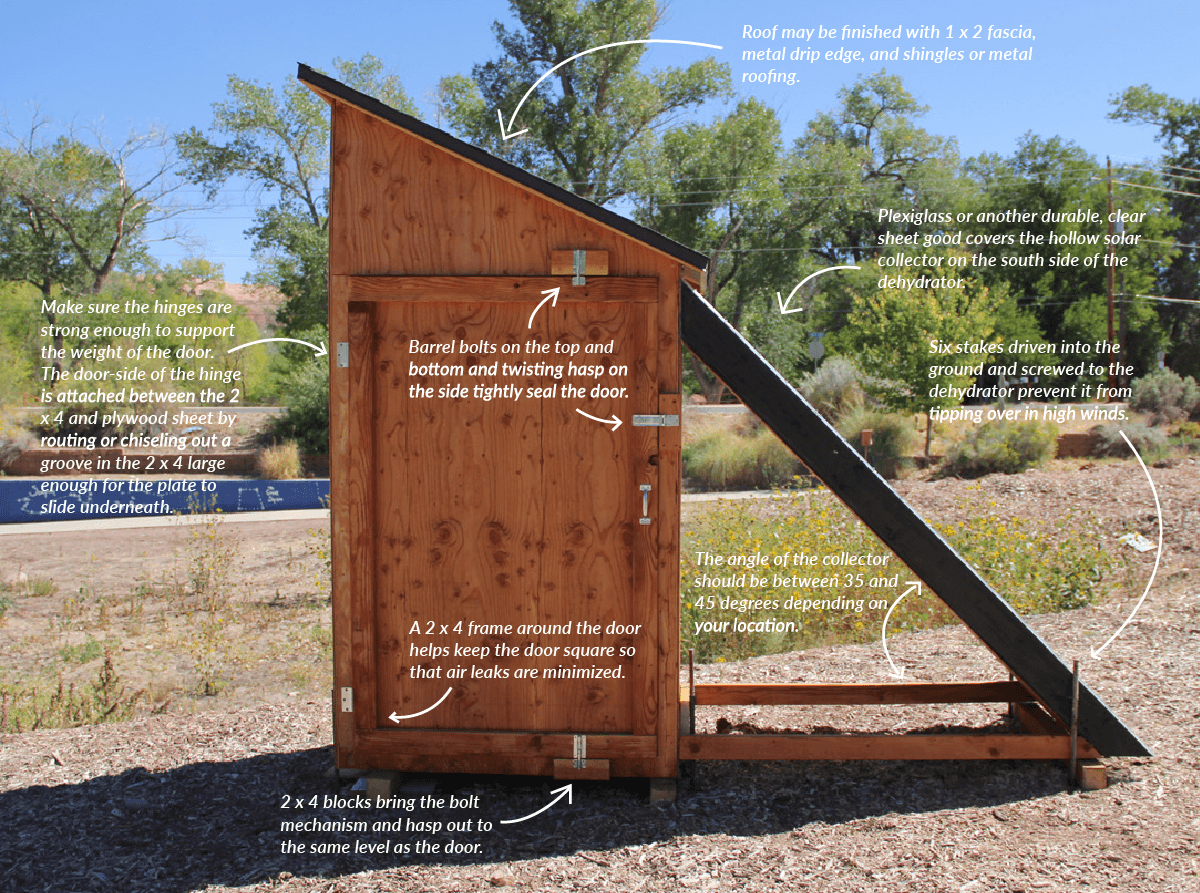
| Door hinges | 2 | Be sure to select hinges that can hold up the heavy weight of the door. |
| Roof material | Quantity | Notes |
|---|---|---|
| Drip edge (8’) | 2 | This allows water to bead away from walls. |
| Asphalt shingles | 1 pack | Metal roofing material is longer lasting, more sustainable, and may be used instead of asphalt shingles. However, shingles are often leftover after roofing projects and are easier to acquire for free, which helps divert a useable product from the landfill. |
| Roofing underlayment/Tar paper (Roughly 5’ x 3 1/2’) | Small roll or scrap | Since the area to be covered is so small, it may be worth it to ask around at construction sites that are roofing to find a scrap of underlayment or tar paper to be used. |
Solar Dehydrator Building Materials
| Lumber or sheet goods | Quantity | Notes |
|---|---|---|
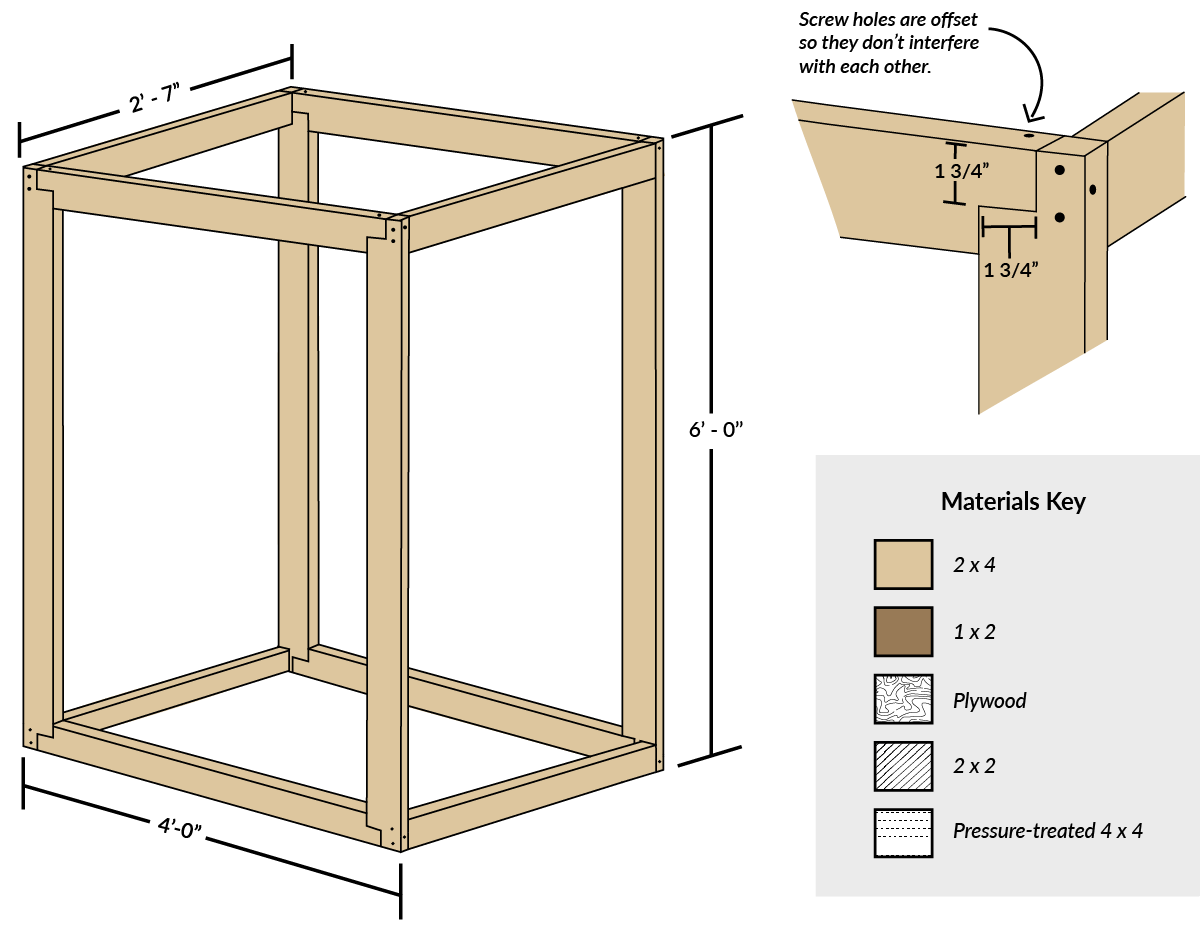
| 2 x 4 (8’) | 12 | Used for the cabinet frame and the exterior of the door. |
| 2 x 2 (8’) | 8 | Used for the shelves that the screens sit on. |
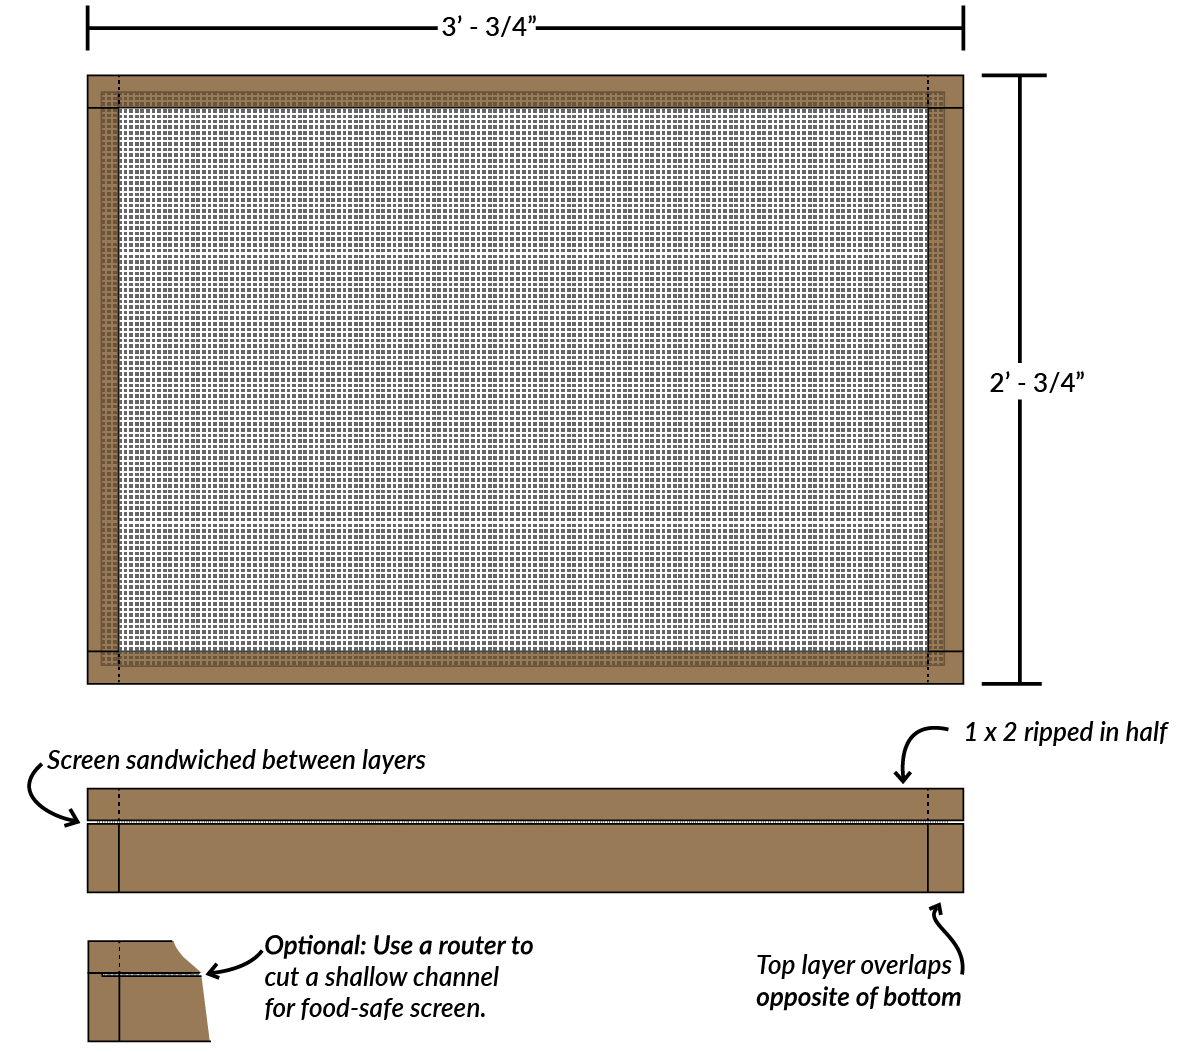
| 1 x 2 (8’) | 33 | 1 x 2 lumber is used for the screens, as fascia boards for the edge of the roof, and framing around the inside of the door. Screens are sandwiched in between a 1 x 2 and another 1 x 2 that has been ripped in half with a table saw. |
| 2 x 6 (8’) | 2 | Used for the sides of the solar collector. |
| Pressure-treated 4 x 4 (8’) | 1 | Pressure-treated wood should be used where the wood contacts the ground to slow deterioration. |
| 4 x 8 plywood (1/2”) | 7 | Thicker plywood may be used but is more expensive. Thinner plywood will be more likely to warp when exposed to the elements for long periods. Plywood is recommended over OSB for weather resistance and lower levels of formaldehyde. |
| Plexiglass sheet 4’ x 8’ | 1 | Plexiglass, acrylic, twinwall polycarbonate or any other clear, durable material may be used for the top of the solar collector. |
| Fasteners | Quantity | Notes |
|---|---|---|
| Finish brad nails (18-gauge, 1 1/4”) | 500-piece package | Brad nails and narrow crown staples are used to assemble the screens. |
| Narrow crown staples (18-gauge, 3/4”) | 500-piece package | Used for assembly. |
| Deck screws (1 lb., 3 1/2”) | 2 | Screws (3 1/2”) are used to attach cabinetry framing together. |
| Deck screws (1 lb., 1 5/8”) | 2 | Screws (1 5/8”) are used for attaching plywood to the cabinetry frame. Alternatively, staples and glue may be used for this purpose. Screws were used for ease of fixing mistakes if there were any. Longer screws will be needed if the thickness of the plywood is increased. |
| Deck screws (1 lb., 2”) | 1 | Screws (1 1/2”) are used to attach 2 x 2 shelf rails to each other and to the cabinet frame. |
| Metal roofing screws (1 lb., 1”) | 1 | Roofing screws and silicone are used to attach plexiglass to the 2 x 4 frame of the solar collector. The rubber gaskets on the roofing screws help prevent air leaks. If only silicone is used to attach the plexiglass to the frame, expansion and contraction during heating and cooling will cause the plexiglass to pop off. |
| Roofing nails (1 lb., 1”) | 1 | These nails are used to attach the drip edge and shingles to the roof. If you have access to a roofing nailer, it will be easier to use a roll of collated roofing nails. Otherwise, hand drive the roofing nails according to the shingle manufacturer specifications. |
| Metal stakes | 6 | Stakes were pounded into the ground and screwed into the frame of the dehydrator to prevent it from tipping over in high winds. Take care to screw into the frame and not areas of just plywood to minimize air leaks. |
| Other items | Quantity | Notes |
|---|---|---|
| Silicone sealant tubes | 3 | Two tubes and a little extra was adequate for air sealing. |
| Waterproof wood glue (16 oz.) | 1 | Used for screen building and attaching other surfaces together if using brad nails or staples. |
| Linseed oil (32 oz.) | 1 | We chose to use linseed oil to seal the exterior of the dehydrator against the elements, and 32 ounces was enough with some left over to re-coat in the following year. |
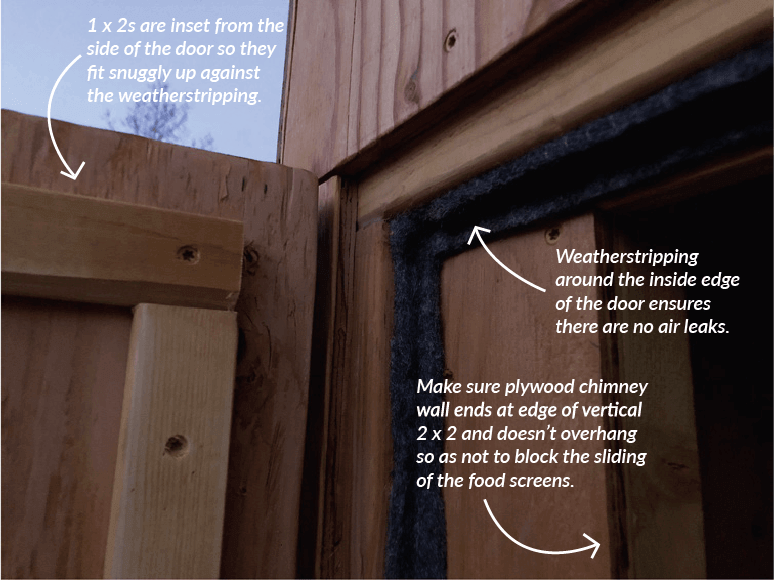
| Weatherstripping | 3 packs | We used felt weatherstripping, nailed on with small nails on both the door jamb and the door, but foam or rubber weatherstripping may also be used. |
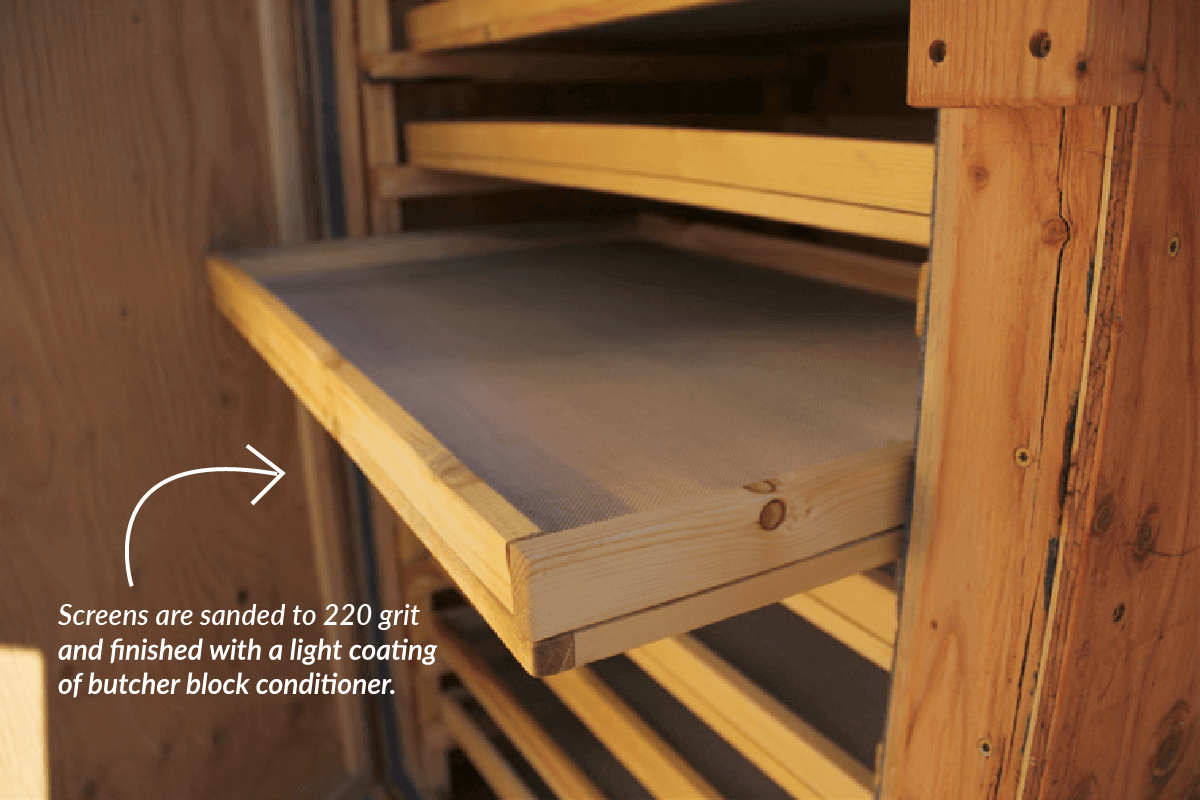
| Butcher block conditioner (12 oz.) | 1 | Used to condition the screens since they will be washed and dried occasionally, and 12 ounces is more than enough to have some on hand for reconditioning. |
| Food-safe screen material (2’ x 3’) | 10 | Use food-safe screen and not simple window screen material available at hardware stores. There are many online companies that sell screens for food applications, so we recommend shopping around. We ordered 20 feet of a 3-foot-wide roll of .018-inch wire diameter stainless steel screen and cut it at 2-foot intervals. |
| Low VOC black paint rated for exterior use | 1 | Apply to back of solar collector chute (wood facing the sun under the plexiglass sheet, to gather heat). |
Table 2: Tools for Building a Solar Dehydrator
| Tools | |
|---|---|
| Drill | Ear plugs, dust mask, and safety glasses |
| Impact driver | Table saw |
| Air compressor & hose | Circular saw and/or miter saw |
| 18-guage brad nailer and staple gun | Jig saw |
| Aviation snips | Chisel |
| Level | Caulk gun |
| Palm sander | Hammer, tape measure, and other hand tools |
| Pain brush and rags | Optional: router, roofing nailer |
Selecting a Location for the Solar Dehydrator
When planning your project, carefully select an area on the property that is convenient for carrying loads of produce and gets plenty of direct sunlight throughout the growing season. Be mindful of any trees, buildings, or landforms that might shade the solar collector. The solar collector should face south to maximize the sun in the Northern Hemisphere. There are several smartphone apps that can be used to see the location of the sun in different parts of the day at different times of year. The dehydrator can be affixed permanently to the ground with pressure-treated 4 x 4 lumber and concrete. Otherwise, it can be placed on horizontal pressure-treated 4 x 4s and staked to the ground to prevent it from tipping over in high winds.
Key Points
- A downdraft dehydrator is intended to be completely airtight in order to operate effectively. We used clear 100% silicone caulk on all seams and corners, often on both the inside and outside; exterior caulk will last longer. Proper air sealing and functioning of the caulk and weatherstripping should be checked at regular intervals once the dehydrator is in use.
- This design is intended to maximize use of 4 x 8 sheets of plywood. The off-cuts from making the north and south walls of the dehydrator can be used to make the back of the solar collector by using 2 x 4 or 1 x 2 lumber to join the seams in the center of the collector.
- Food-safe screen should be used to build the dehydrator screens. Materials that will be exposed to the inside of the dehydrator should also be selected with their relative toxicity in mind, as they will be off-gassing into a chamber intended for food.
- The angle of the solar collector relative to the ground will vary based on your location and the time of year you wish to use the dehydrator. The best angle for solar panels in your latitude will be similar to the best angle for your solar collector. You can find this information online or by consulting local solar installers.
Using the Dehydrator
Using the dehydrator will require flexibility and experimentation based on the time of year, weather, location, thickness, and type of food you wish to dehydrate. Dehydration could take only a few hours for a relatively dry food on a hot, dry day in summer, or may take a few days to a week for a relatively moist food in spring or fall. We recommend taking notes on your experiments to hone your dehydration skills as you try different foods, timing, and methods.
Food safety is an important consideration for any food you wish to dehydrate. Oklahoma State University’s Solar Dehydrator Construction Plans fact sheet states, “Dehydration naturally protects food products but will not inactivate all bacteria, spores, eggs, toxins or chemicals. Cleaning and maintaining clean food products is the best means to producing high-quality, safe, dehydrated foods. Wash and sanitize foods prior to preparation for dehydration. Wash hands thoroughly prior to handling food and frequently during processing. Clean and sanitize all utensils and food contact surfaces prior to use. Keep food products covered and protected from flies and other insects at all times. Store dehydrated foods in airtight containers in a cool place that is not exposed to the sun.” The mesh installed on the exterior air vents of the dehydration chamber and solar collector will help protect your food from pests. You can also visit USU Extension’s Food Safety page for additional food safety information and questions (extension.usu.edu/foodsafety).
Solar Dehydrator Design Plans

Acknowledgments and Summary
We adapted these plans from a solar dehydrator model by the Little Colorado River Plateau Resource Conservation and Development Area, Inc. and the Global Village Institute for Appropriate Technology (Little Colorado River Plateau Conservation and Development Area, n.d.). Please note that these drawings are not to scale. The intended audience of this fact sheet has a basic level of carpentry experience to effectively interpret the plans. Safety should be considered carefully when using hand and power tools, and personal protective equipment (PPE) such as safety glasses and earplugs should be worn when required. These designs worked in our desert southwestern climate for our purposes, and we encourage you to experiment and adjust the plans to discover what will work for you. For alternative solar dehydrator plans, reference Oklahoma State University Extension’s Solar Dehydrator Construction Plans fact sheet (Boswer, 2017). Thank you for helping lead positive change and building a passive solar food dehydrator for your community!
References
- Boswer, T. (2017). Solar dehydrator construction plans. Oklahoma State University Extension, FAPC-207. https://extension.okstate.edu/fact-sheets/solar-dehydrator-construction-plans.html
- Little Colorado River Plateau Resource Conservation and Development Area, Inc. (n.d.). Solar chimney dehydrator. http://www.i4at.org/surv/solarchm.htm
- Utah State University Extension. (n.d.) Food safety. https:// extension.usu.edu/foodsafety/
February 2022
Utah State University Extension
Peer-reviewed fact sheet
Authors
Kate Weigel and Roslynn McCann
Housing Authority of Southeast Utah & Environment and Society

Roslynn McCann
Sustainable Communities Specialist
Environment and Society Dept