
Top 5 Tree Planting Mistakes
Background
Key Takeaways
- Select tree species that match your soil, climate, and available space for maximum tree longevity and benefits.
- Ensure the trunk flare is above soil level to promote strong root development and prevent decay.
- Dig a wide planting hole with rough sides and use only local soil for backfill to encourage strong root growth.
- Inspect trees at the nursery for root structure and cut back circling roots before planting.
- Place a woodchip mulch layer around newly planted trees to protect the trunk from damage and improve soil quality.
Trunk for trunk, larger, older trees provide more benefits to people than smaller trees. Mistakes made at planting time can substantially shorten a tree’s life. The consequences of planting mistakes may show up within a year or two or remain hidden until a tree dies inexplicably years later. In many cases, these planting mistakes are easy to avoid, saving the tree owner substantial money and time.
Homeowners can use this list of five common planting problems to check the quality of work by hired professionals, as instructions for gardeners or landscapers, or as a quick reminder for more experienced tree planters. By making a few simple changes to tree planting, we will all benefit from longer-lived, larger trees gracing our cities and towns.
One caveat: Trees are tough. They want to grow and survive, sometimes succeeding under the most challenging conditions. These are the exceptions. Following the tips in this guide will help make large healthy trees the norm.
Mistake 1: Wrong Tree, Wrong Place
The Problem
Planted in the wrong place, a potentially beautiful tree can become weak, disease-prone, pruned into deformity, or removed entirely. The most common problems with a mismatch between the tree and site are soil, climate, and space.
What to Look For
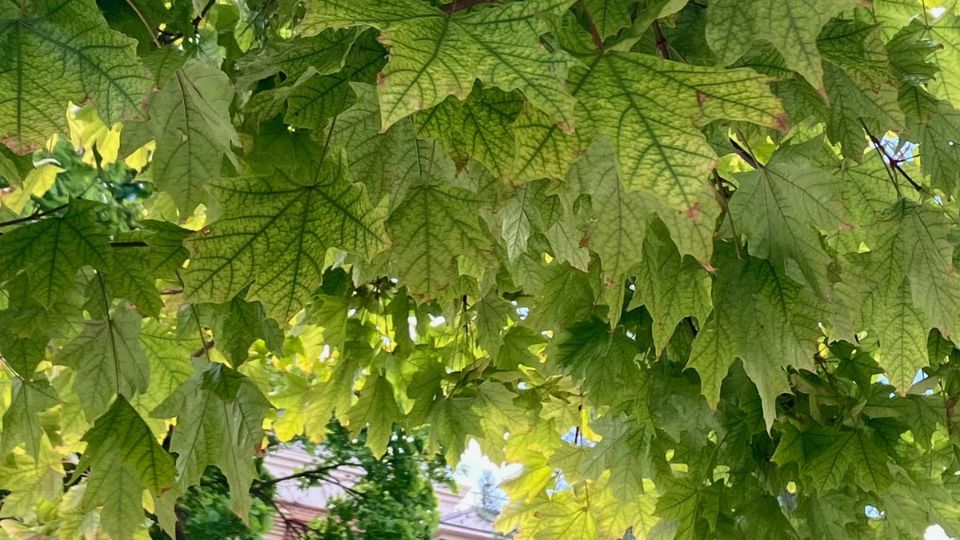
Soil problems show up in the tree as several symptoms. A very common micronutrient deficiency in many Utah trees is iron, due to alkaline soils. Iron chlorosis is identified by the green in leaves fading out to leave dark veins visible (Photo 1). Flood irrigation with secondary water from salty lakes may also increase soil salinity, which can burn tree tissue. River-sourced and well irrigation may have lower salinity, depending on surrounding land use and runoff pollution levels. Water quality should be checked on a property-by-property basis for potential issues.
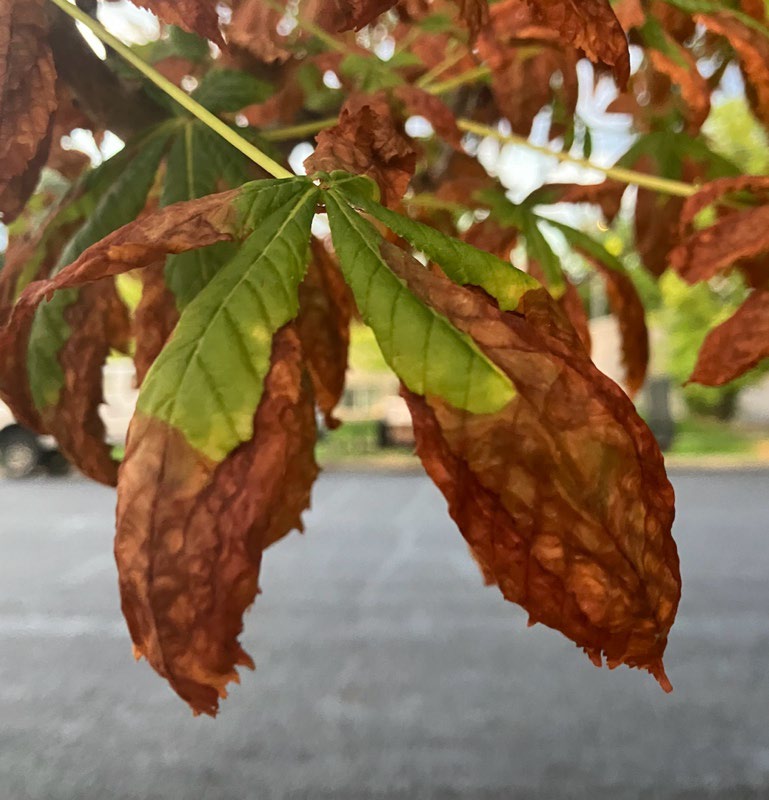
Climate affects tree growth and survival in several ways. Some species will be damaged or even killed by freezing temperatures below their cold hardiness level. Buds and branches can die over winter and late frosts may kill newly emerged leaves in the spring. Species less tolerant of heat will lose leaves or needles during prolonged summer heat (Photo 2).
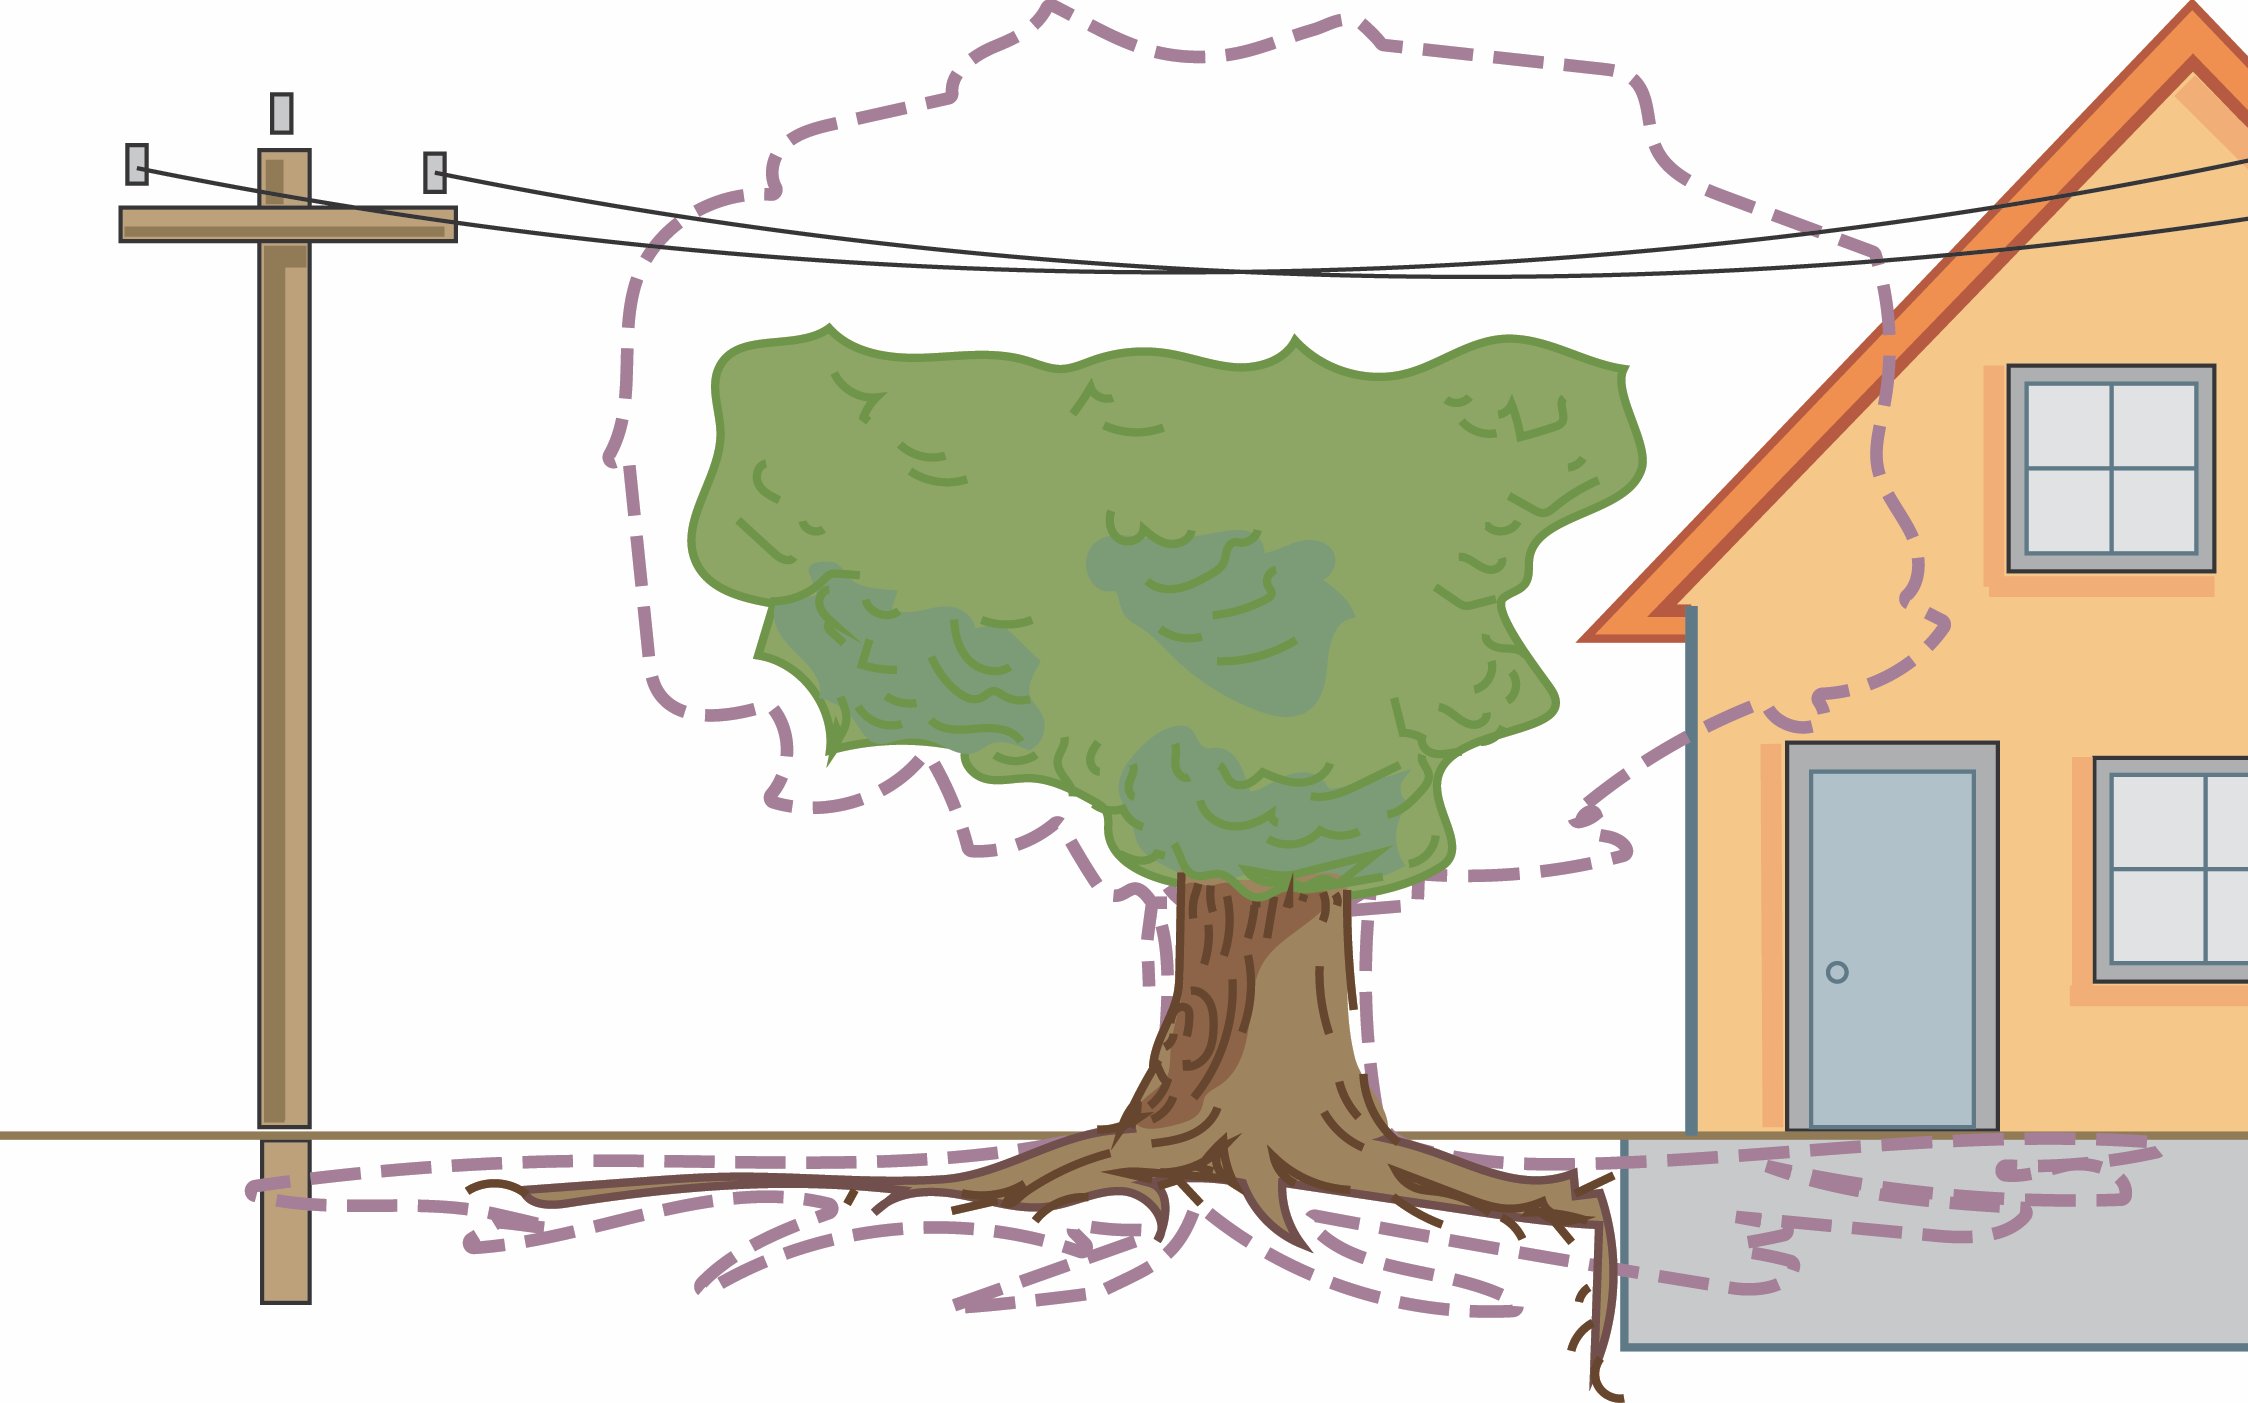
Limited space to grow makes trees ugly (Figure 1). Large trees planted too close to a building or overhead power lines usually get severely pruned to maintain clearance. As a result, the crowns become unbalanced, their form is stunted, and they never reach their full potential at maturity. Trees very close to sidewalks, streets, and driveways are often removed or have their roots severely pruned. Large trees that lose many roots are more likely to eventually fall over or die within a couple of years.
How to Correct
Soil: When planting new trees, test your soil and select a species that is tolerant of any special conditions. Help established trees by improving soil quality with specific amendments that correct the soil problem identified from the soil test. You can flush salts from the soil by saturating it with clean culinary water several times during the growing season.
Climate: Start by finding your hardiness zone in the USDA map or USU weather station network. You may need to adjust the hardiness zone for your property because of microclimate factors, like wind and sun exposure. Pick a species suited to your local climate by asking a professional at a nursery or referring to online tree lists from local organizations, such as Red Butte Garden and Arboretum, USU Extension Tree Browser, or Conservation Garden Park.
Limited space: This is the easiest site problem to prevent for trees. Measure the crown width the tree is expected to reach at maturity for its species. The critical root system typically matches the branch radius. You can plant most medium and large trees 25 feet apart, measured from the center of their trunks. We highly recommend planting all trees at least 10 feet from a building and 5 feet from property boundaries, sidewalks, and other hardscapes.
Mistake 2: Planted Too Deep
The Problem
Trees planted too deep in their hole are more likely to develop weak roots and trunk decay. Sunken trees can grow very slowly or possibly die before establishing (Lim et al. 2025).
What to Look For
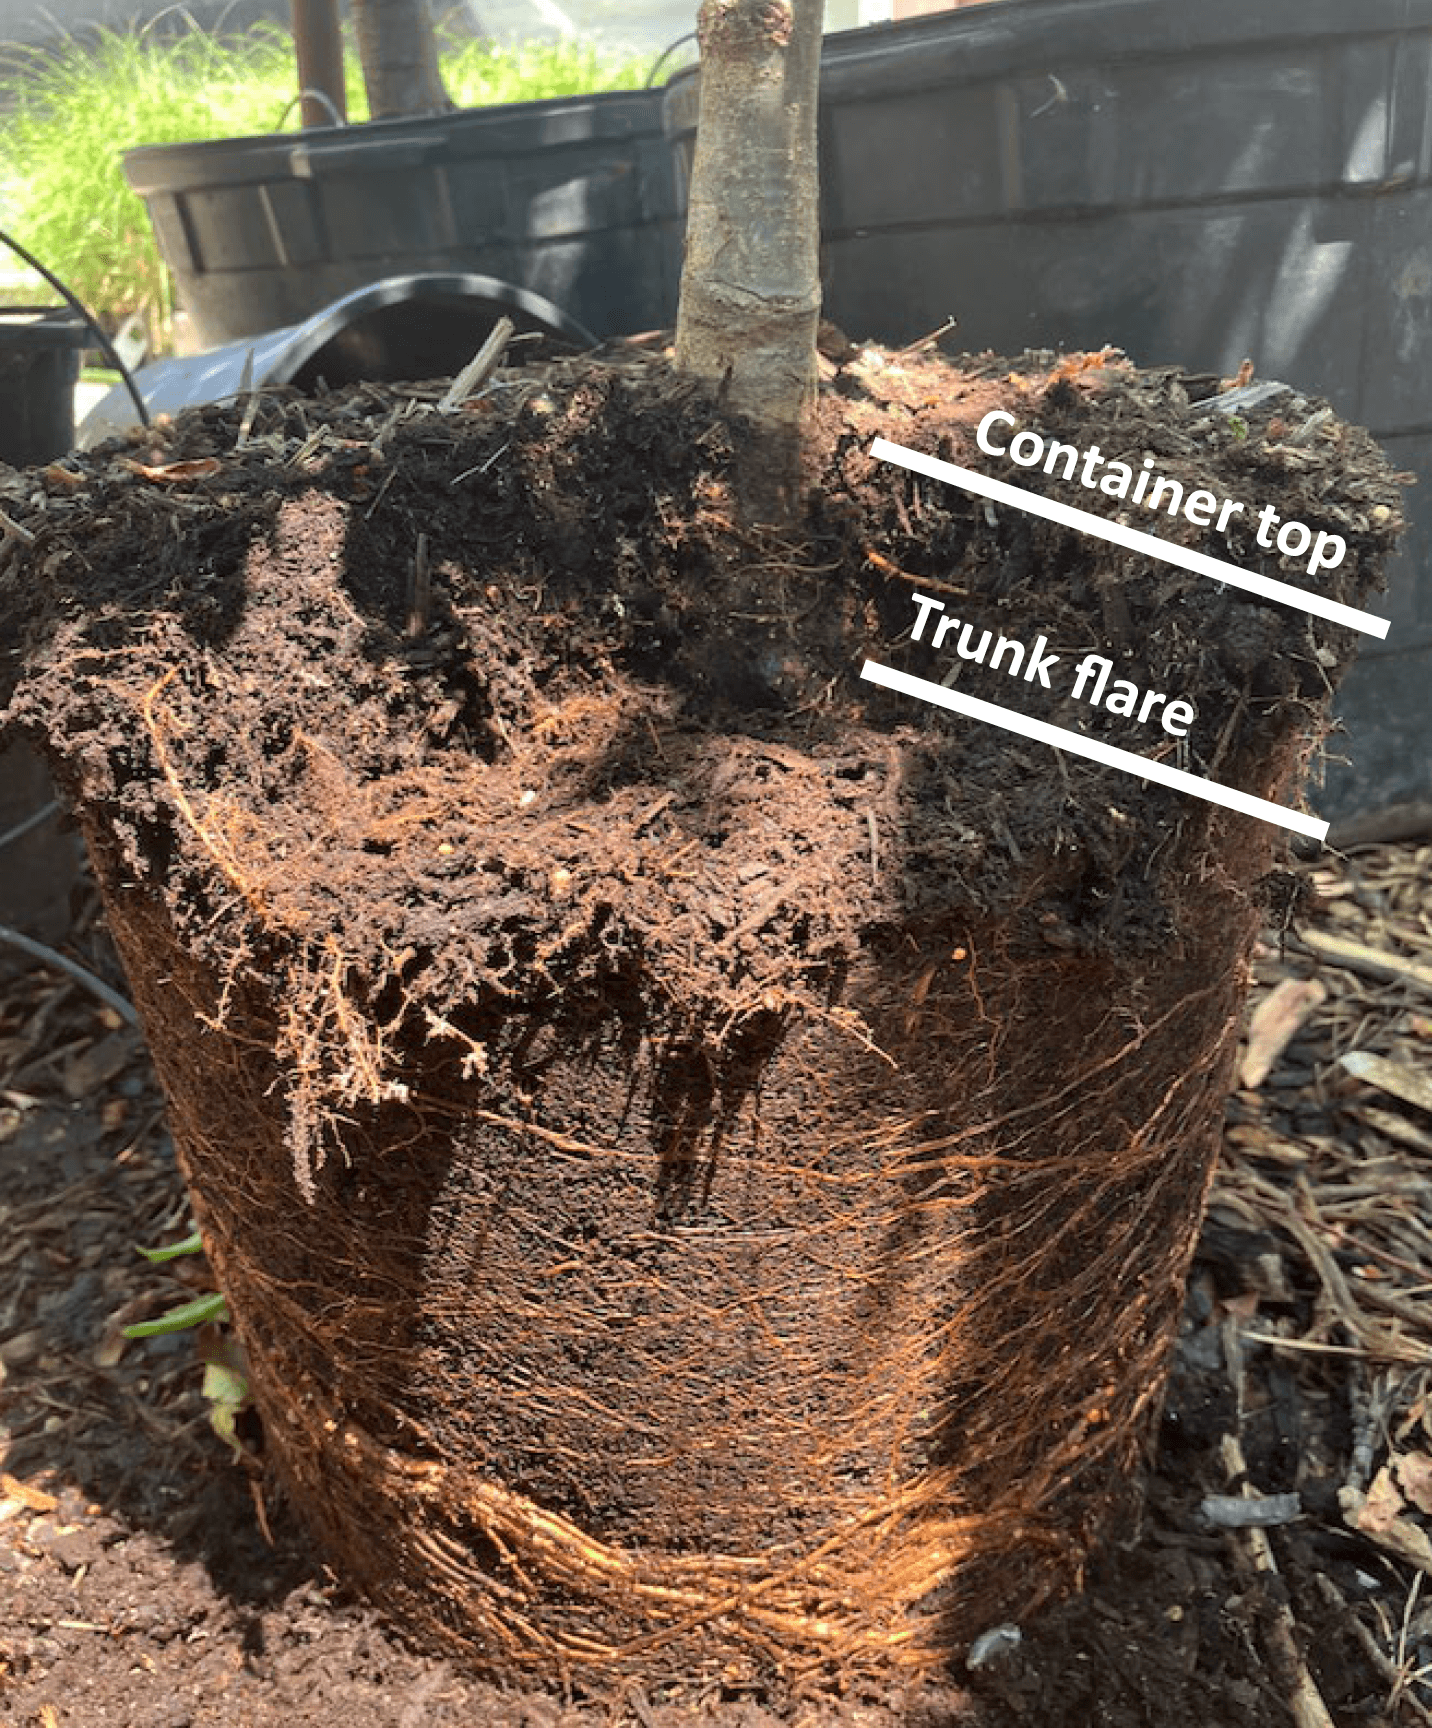
Despite its importance for tree survival, correct planting depth can be very difficult to identify and, consequently, skipped during planting. The trunk flare where the base of the trunk meets the top of the roots should not be below the soil level or finished grade around the planting hole. The trick is finding the true trunk flare. Trees in plastic containers or ball-and-burlap at the nursery often have their true trunk flare buried in potting soil (Photo 3). In response, the young tree grows small roots that are weakly attached to the trunk and not fully developed. If someone else planted your tree for you, it was planted too deep if you can’t see the trunk flare without digging and there are no strong roots just below the soil surface.
How to Correct
For trees recently planted too deep, your best option is to dig them up and replant them correctly. Replanting may take time and effort, but it can add years to the tree’s life. For established trees that cannot be easily replanted, root collar excavation is a good option.
The easiest way to avoid deep planting is to do it correctly before the tree is in the ground. For containerized trees, take the tree out of its container and gently remove all the soil at the base of the trunk until you find the true trunk flare. Measure the root ball depth from the base of the trunk flare to the bottom of the roots. The depth of your planting hole should be the root ball depth minus 1 to 2.5 inches. The tree will slowly settle over time, and the extra 1 to 2.5 inches gives the tree the height to adjust. After your hole depth is correct, walk around the bottom of the hole to slightly compress the area under the tree.
When placing the tree in the planting hole, position it correctly by propping it up from below or have an assistant hold it in place. Add layers of soil to the bottom of the hole and water each layer to help settle them.
Mistake 3: Poor Soil Quality and Site Preparation
The Problem
Most urban soils are not ideal for growing trees. Common issues include compacted soils with low organic matter and limited microorganisms. These conditions slow or inhibit root growth and potentially cause the rest of the tree to grow very slowly, fail to establish, or die prematurely (Day et al., 2010).
What to Look For
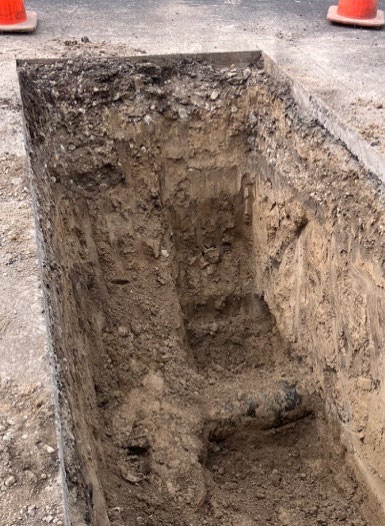
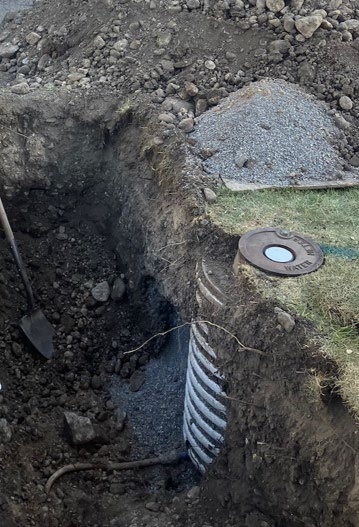
Water often puddles or runs off compacted soil because there are not enough air spaces between soil particles to hold water. Such high-density soils will be heavier and harder to dig than better aerated soils. Dig a small pit or large hole in the planting area about 20 inches deep to get a good look at the soil layers. Compacted soils usually contain less organic matter and appear uniformly gray or pale brown (Photo 4A). Healthier soils with more organic matter and nutrients are darker in color and looser (Photo 4B).
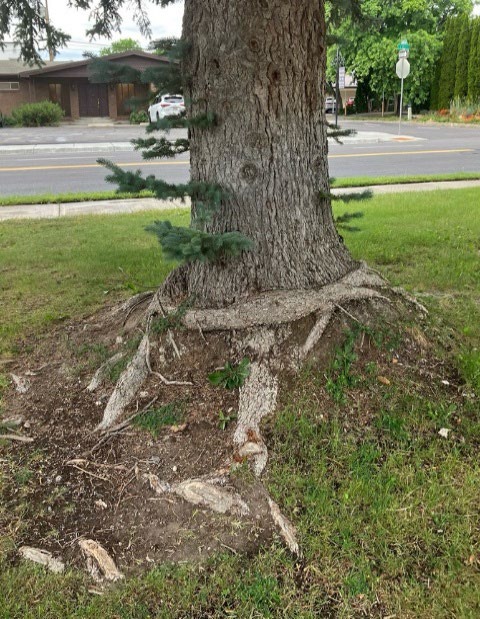
The sharper the contrast between the soil in the planting hole and the soil surrounding the hole, the more troublesome it is for your tree. Tree roots in nutrient-rich, low-density soil will grow normally until they hit the edge of the planting hole and encounter poorer-quality soils. At that point, they may circle around or grow back toward the trunk and develop a weak root system that shortens the tree’s life (Photo 5A). Obvious indicators of a sharp contrast include smooth sides in the planting hole, especially in clay, that act like a container, and adding amendments to the soil when backfilling the hole.
How to Correct
Soften the contrast between the soil in the planting hole and the soil around it by roughing up the sides of the hole. Avoid leaving it glazed and smooth. Give the roots more time to adjust to the native soils by making the hole three times as wide as the root ball of the tree. Healthy tree root systems grow more outward than downward. Use only the site soil to backfill the hole.
Adding a slow-release mulch, such as coarse wood chips, to the surface of the planting area will improve the soil without shocking the roots (Percival et al., 2023). Ideally, extend the mulch ring 1 to 2 feet beyond the planting hole to start improving the soil before the roots get there. For very compacted or low organic soils, first place a 1-inch layer of high-quality organic compost over the planting area before covering it with mulch.
Mistake 4: Poor Root Structure
The Problem
Roots supply a tree its water and nutrients. They also stabilize it during wind events or when the tree is leaning. Young trees with significant root defects that go uncorrected at planting often struggle to survive.
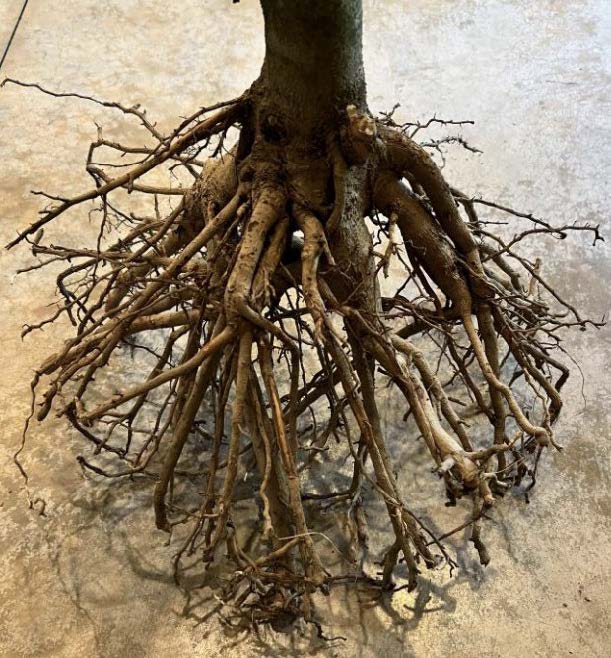
Photo by Jim Barborinas
What to Look For
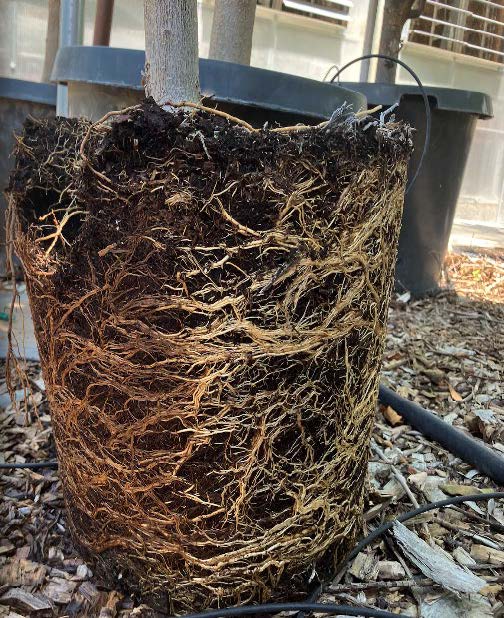
Circling roots in the shape of the container purchased from a nursery are normal. They should be a dense mix of solid primary roots and fine roots with absorbing hairs (Photo 5B). You can correct these when planting.
It is much harder to correct circling roots that previously formed when the tree was in a smaller pot. Container-grown trees are moved from smaller to larger pots at the nursery as they increase in size. When done correctly, nursery workers cut circling roots before placing the tree in a larger pot to encourage outward root growth, like spokes on a wheel (Photo 6). If they skip this step, the tree can develop a cylindrical root system that limits its access to water and nutrients when permanently planted in the ground (Cregg & Johnson, 2025). Look for roots in the shape of a smaller pot in the center of the roots shaped like the larger pot (Photo 7). There is no good solution for this root defect.
You wouldn’t buy a car without test driving it, so why buy a tree without looking at its roots?
Inspect the roots of containerized trees at the nursery by taking the tree out of its pot. Tip the entire tree on its side, then wiggle and slide the pot off the root ball. Directly lifting the tree by the trunk can damage some of the roots. Shake off as much soil as you need to see the root structure.
For ball-and-burlap trees, ask the nursery for a written agreement that you can return your purchase if the root system is defective due to improper nursery production. Inspect the roots when the wire cage and burlap are removed at the planting site. Promptly return the tree if it has root structure issues that cannot be corrected.
Bare root trees offer the advantage of letting you easily see the roots at the nursery. Check for good structure and a reasonable density of fine absorbing roots.
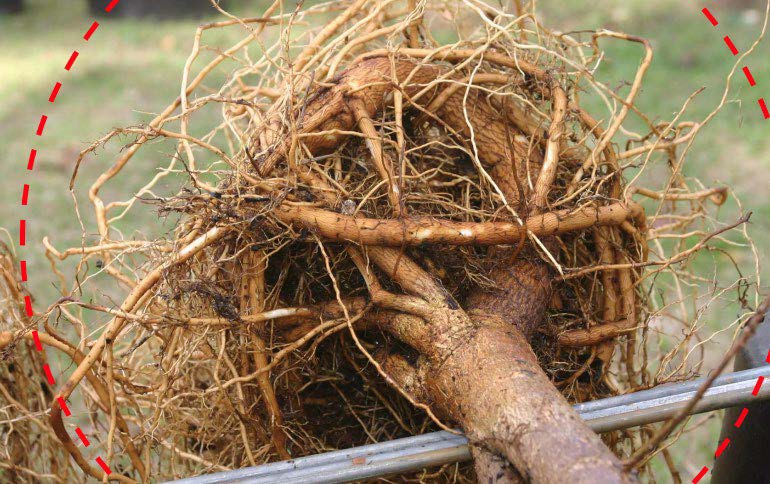
Photo by Ed Gilman
How to Correct
You can correct circling roots formed in a container by cutting them at planting time. After taking the root ball out of the container, gently loosen the outer roots and soil by hand. Prune back curving roots to their origin where they were pointed straight out to the edge of the container. Use hand pruners to cut back curved roots individually or use a saw to shave the outer surface of the entire root ball. An option for smaller trees with mostly finer roots is to slice down the length of the root ball on four sides.
Mistake 5: Too Little or No Mulch
The Problem
Lawn mowers or weed trimmers often injure the trunks of trees surrounded by turf (Photo 8A). Even if the trees survive, the damage can have lasting impacts on their health and performance (Photo 8B). Rocks and other hard surfaces around the trunk reflect sunlight, radiate heat, and may prevent water from reaching the roots. Turf, rocks, and hardscapes contribute almost nothing to the soil quality for the tree. Using a plant-based mulch around the new tree will combat these common establishment challenges.
What to Look For
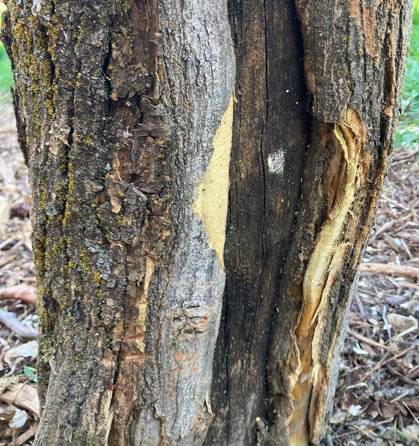
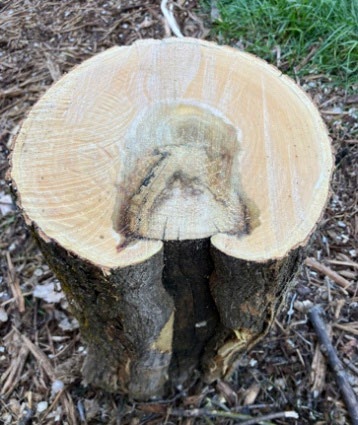
This problem is easy to spot: no mulch ring around a tree! Even if there is mulch, not all types are equally beneficial. Finely shredded bark mulch may function like a sponge and draw moisture out of the soil, potentially to the tree’s detriment. Landscaping fabric, sometimes used under mulch as a weed guard, will prevent most beneficial nutrients released by the mulch from entering the soil. Lower-quality soils with less nutrients and organic matter generally encourage more weedy species. Over time, a mulched planting area without fabric becomes harder for weed species to colonize and easier for you to control.
How to Correct
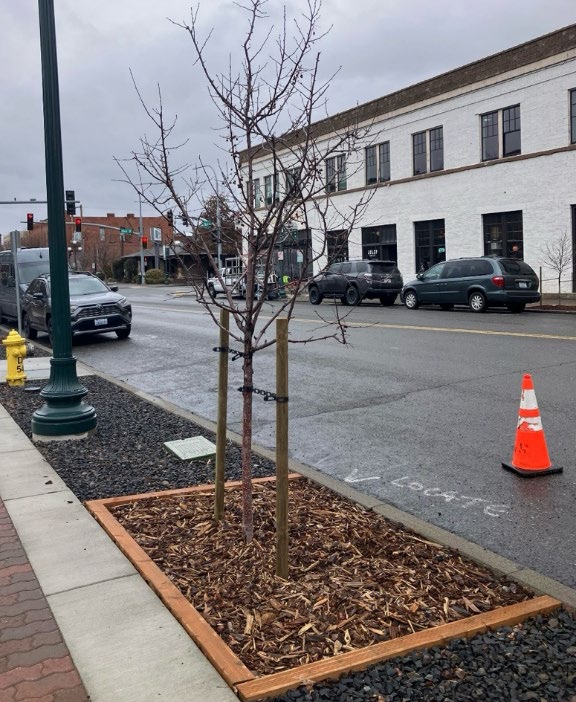
At the time of planting, place a 3- to 4-inch-deep layer of mulch in a 2- to 5-foot radius around the young tree (Photo 9). The wider the mulch ring, the better. Keep the chips a few inches away from the trunk of the tree. Use natural, untreated materials such as coarse wood chips. Heavier materials, including coarse wood chips, are more likely to stay in place in windy conditions or when run over by a lawn mower. If a rock ground cover is necessary, lay down a wood chip mulch layer under the rocks first. Instead of landscape fabric to initially slow weed growth, use layers of newspaper in the sheet composting technique.
Other Considerations
While this list of five issues covers the most common problems to avoid during tree planting, it is not all-inclusive. Urban tree survival in the first 5 years after planting depends on several other factors, such as sufficient water or the excess application of chemical fertilizers.
Acknowledgments
All photos and images copyright of the authors unless otherwise noted. The authors did not use generative AI in creating this content, and it is solely the authors’ work.
References
Cregg, B., & Johnson, R. (2025). Physiology and root development of container-grown urban trees in response to root-shaving, root-washing, and root-slicing at planting. Urban Forestry & Urban Greening, 112, 128925.
Day, S., Wiseman, P. E., Dickinson, S. B., & Harris, J. R. (2010). Tree root ecology in the urban environment and implications for a sustainable rhizosphere. Arboriculture & Urban Forestry, 36, 193–205.
Lim, J., Allen, K. S., Powning, C. B., & Harper, R. W. (2025). Impact of planting depth on urban tree health and survival. Forests, 16, 1788.
Percival, G. C., Graham, S., & Franklin, E. (2023). The influence of soil decompaction and amendments on soil quality. Arboriculture & Urban Forestry, 49, 179–189.

October 2026
Utah State University Extension
Peer-reviewed fact sheet
Authors
Miles Becker, USU Extension Urban Forestry Specialist, and Daniel Allen, Board Certified Master Arborist

Miles Becker
Urban Forestry Extension Specialist Assistant Professor
Wildland Resources
Related Research
Are Organic Matter Soil Amendments Created Equal?
Each class of material has specific characteristics and management issues when it comes to using it as a soil amendment.
Backyard Composting in Utah
The benefits of using compost as a soil amendment include increasing soil tilth, fertility, water holding capacity, aeration, and drainage.
Gardening in Sandy Soils
Learn the basics of clay, silt and sand soils with an emphasis on gardening in soils with high sand content. Get tips for gardening tips for managing sandy soils, and the types of plants that grow best in sandy soils.
It's All About Soil Structure!
The single best soil amendment—the one that provides desirable benefits regardless of the soil one applies it to—is organic matter.

Policies and Programs for Water-Wise Residential Landscaping in Utah
Water-wise landscaping is the practice of using plants in a landscape that are adapted to local conditions and only need small amounts of water. Converting yards to water-wise landscaping conserves water and is a climate adaptation action residents can ta
Preparing and Improving Garden Soil
A great garden starts with healthy soil. In Utah, there are unique considerations for creating and maintaining healthy soils.