004 - Pruning Landscape Trees: An Overview
What Is Pruning?
Pruning is the purposeful removal of plant parts. Its use is preferred to less precise terms like trimming. This fact sheet deals mainly with pruning of branches on ornamental trees. It does not cover pruning of fruit trees for fruit production, shearing or other intensive crown shaping practices, or root pruning.
Why Prune?
Reasons for pruning landscape trees generally fit into three closely-related categories: health, hazard, and form. Step back and reconsider if you find yourself pruning off healthy, non-hazardous branches on a tree with good form.
Health
Pruning for tree health includes removal of insect or disease infested branches, broken or dead branches, crowded branches, and branches or portions of trunks with included bark. Pruning to “open-up” a tree’s crown to encourage light penetration or air movement generally is not needed.
Hazard
Pruning to reduce hazard to people or property includes removal of dead and decaying branches; branches that interfere with sight lines or travel along streets, driveways, or sidewalks; branches that rub against structures; thorny or spiny branches that might cause injury, and pruning for utility line clearance. Healthy, strong, properly attached branches that overhang a building do not usually pose an unreasonable safety risk and do not necessarily need to be removed.
Form
Pruning for tree form or shape involves removal of certain branches and leaving others to direct growth toward and away from certain areas. Pollarding, crown raising, and topiary all are examples of pruning for form
When to Prune
Time of Year
Pruning can be done at any time of year with special care and knowledge, but certain times are better than others. Pruning is best done in winter or early spring before buds swell when tree energy reserves are high and the tree is dormant. Though certain trees, such as birches, maples, and walnuts, may exude sap or “bleed” when pruned at this time of year, this is not a problem and stops within a few days. During the spring growth period bark is tender and easily damaged and pruning must be done very carefully. In fall pruning wounds may be more easily infected with decay microorganisms. Though summer pruning can be done, considerable dieback may occur at the edges of summer pruning wounds, possibly due to drying of the living tissues at wound edges. Quickly wrapping such wounds with white plastic sheeting can reduce this dieback.
Time of Life
At planting time only prune branches that are dead, broken, or that have insect or disease problems. Otherwise, prune early in a branch or tree’s life to avoid pruning large branches or letting serious problems develop. For maintenance pruning on established trees try to prune branches before they exceed 2 inches in diameter.
Pruning Severity
Avoid pruning off more than 20 to 25% of a tree’s leaf area in any year. Pruning stresses trees because pruning wound repair requires energy from food while pruning removes leaves that make food and wood that stores food. Younger and more vigorous trees can stand heavier pruning than mature or stressed trees. If heavy pruning is unavoidable, remove branches over two or more years to reduce stress.
Pruning Tools
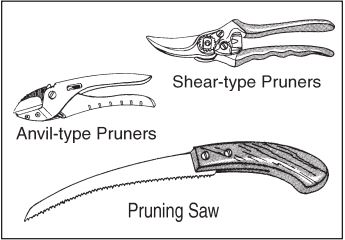
Some examples of pruning tools.
Sharp, well-maintained tools make cleaner cuts and are safer than dull tools. Use shear-type hand pruners for small twigs (sometimes called bypass pruners; anvil-type pruners cause slightly more injury than shear-type), loppers for small branches, and pruning saws for branches up to 3 or 4 inches in diameter. Good pruning saws have thin curved blades and teeth that are angled back to cut mainly as you pull rather than push. Chainsaws should only be used for large branch removal. Bow saws are not suitable for pruning since their blade wanders and the handle gets in the way. Sterilization of tool blades between cuts (with alcohol or bleach) often is recommended to avoid spreading disease, but researchers have shown that most quick sterilization techniques are not effective.
Pruning Techniques
Safety
Removing large branches or cutting down entire trees is dangerous. Call in an insured, well-trained professional arborist (preferably certified by the International Society of Arboriculture) if you are unsure of your abilities or if climbing is involved. Pruning near utility lines should only be done by certified line clearance professionals — call your electric company.
Where to Cut: Natural Target Pruning
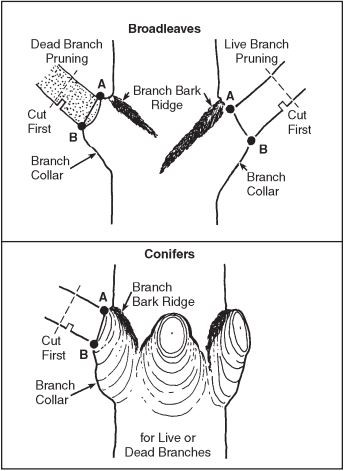
Natural target pruning of dead and live branches; broadleaves (top) and conifers (bottom). Final cuts should be from A to B.
Good pruning involves removing as much of the branch as possible without leaving a stub or flush cutting. Good pruning cuts are called natural target cuts by arborists, who use two targets on the tree to show them where to make the cut. These targets are the branch bark ridge (BBR) and the branch collar. The BBR is an area of excess bark that accumulates where two branches meet. It extends down the branch or trunk on either side of the branch crotch. The branch collar is (typically) a swollen, wrinkled area at the branch base where branch and trunk (or branch and branch) tissues come together.
A natural target cut leaves the BBR and branch collar on the tree without leaving a stub. Such a cut passes just outside the BBR on top and usually slants out and down, leaving a bump but no stub (from A to B on diagram). Sometimes the swollen branch collar extends all the way around the branch base and the resulting cut is more vertical. Though the “targets” usually are easy to see on most broadleaved trees, some trees like sycamore constantly lose bark and don’t accumulate a BBR. Conifers also may not accumulate a typical BBR. In both cases, just cut outside any swollen or wrinkled branch collar.
Wound Closure
Natural target cuts start to seal over quickly as woundwood, sometimes called callus, forms at the wound edges (callus forms first and becomes woundwood as it matures and becomes woody). Woundwood usually forms in a continuous ring around a natural target cut, eventually sealing over the wound as it grows together. Gaps in the woundwood at the top and/or bottom indicate flush-cuts, cuts that were made too close to the stem (see below). Though such wounds may eventually seal, they have a greater chance for dieback, decay, and crack formation than natural target cuts. The term “seal,” rather than “heal,” is used to describe tree wound closure, since the wound still exists inside the tree even after it no longer shows on the outside.
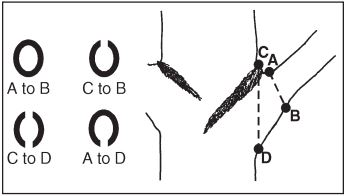
Woundwood patterns around a natural target cut (A-B), versus cuts made too close at the top (C-B), bottom (A-D), or top and bottom (C-D).
Pruning Dead Branches
Shortly after a branch dies a swollen ring of woundwood starts to form around its base. A branch protection zone also forms in the wood at the branch base. This zone contains chemicals that help the tree resist microbial attack. Cut off dead branches just outside the live woundwood without leaving a stub (see broadleaved diagram on page 2). Promptly remove large dead branches since they pose significant hazards.
Pruning Large Branches and Narrow Angles
Remove large branches with a three step cut: an undercut one-third of the way up through the branch one or two feet out from the trunk (to prevent bark stripping), a top cut directly into or slightly outside of the undercut to remove most of the branch weight, and a final natural target cut that removes the stub. Final cuts can be made from the bottom up to the crotch (B to A in the previous diagrams) if the branch angle is tight and tools won’t fit in the crotch.
Pruning Leaders or Co-dominant Stems
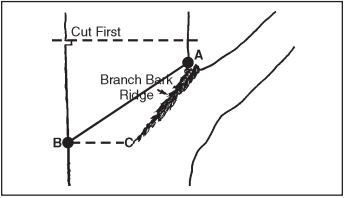
Natural target pruning of a leader. Final cut from A to B with B straight across from bottom of BBR (C). Remaining branch is healthy and at least 1/3 the diameter of leader being removed.
Pruning to remove a leader or main stem sometimes is called crown reduction. A leader can be pruned off where another branch is attached if the remaining branch is healthy and vigorous and at least 1/3 the diameter of the leader to be removed (so a 6” leader could be removed at a 2” branch). Also, no more than about one-quarter of the foliage should be removed from the branch that is being shortened. The final pruning cut should be on the other side of the BBR sloping out and down with the bottom of the cut straight across from the bottom of the BBR. As before, the BBR remains on the tree and no stub is formed. Co-dominant stems (stems nearly equal in size) are pruned similarly.
Included Bark
Sometimes the bark where two branches meet turns in instead of out, forming a seam of included bark inside the tree instead of a BBR. Areas of included bark often die and become decayed. These areas are naturally weaker than branch attachments with normal BBRs. Included bark is especially common on certain species or cultivars, like Bradford pear and littleleaf European linden, but can be found on any tree. It also is more common where branches attach to one another at a very narrow angle, but can occur with wide attachment angles. Avoid purchasing trees with included bark.
Don’t prune off all branches with included bark (on some trees nothing would be left), but watch for signs of dieback or cracks extending down from the crotch below the bark seam. Remove a branch that has included bark by cutting from the open crotch down and out (or cut up to the crotch). This actually leaves a small stub on or in the tree, but cutting farther down may cause serious trunk wounds.
Wound Care
Wound Dressings
Pruning wounds and other tree wounds should be left open to the air, with no covering or dressing (see exception below). Though various paints, shellacs, and tar-like materials are available for treating wounds, none have been shown to slow or prevent decay or promote wound healing or sealing. In fact, research Woundwood patterns around a natural target cut (A-B), versus cuts made too close at the top (C-B), bottom (A-D), or top and bottom (C-D). Natural target pruning of a leader. Final cut from A to B with B straight across from bottom of BBR (C). Remaining branch is healthy and at least 1/3 the diameter of leader being removed. Utah State University Extension is an affirmative action/equal employment opportunity employer and educational organization. We offer our programs to persons regardless of race, color, national origin, sex, religion, age, or disability. Issued in furtherance of Cooperative Extension work, Acts of May 8 and June 30, 1914, in cooperation with the U.S. Department of Agriculture, Robert L. Gilliland, Vice-President and Director, Cooperative Extension Service, Utah State University, Logan, Utah. Published June 1998. has shown that such dressings can actually promote decay by keeping the wound protected and moist — perfect conditions for the growth of decay microorganisms.
An exception is the use of white polyethylene sheeting to wrap wounds made in summer when conditions are hot and dry. Recent research has shown that wrapping wounds with such sheeting (preferably within minutes of pruning) results in less dieback and better healing than with unwrapped wounds. Wrapping can be held on the tree with tape and can be removed in two or three weeks.
Scribing and Wound Shaping
In the past it has been thought that wounds needed to be shaped or scribed to promote healing. Researchers have found, however, that scribing simply makes wounds larger and is not needed. Wounds from natural target pruning usually heal well on their own. Always remove any loose bark or pieces of wood that stick out from a wound.
Topping
Trees should never be topped. Topping or rounding-over is the removal of branches without regard to where other branches attach, usually leaving stubs. Topping is done to gain clearance from an obstruction or to reduce a tree’s height or crown spread. Sometimes cuts are made where a branch is attached, but the remaining branch is too small or weak to assume dominance. Quick regrowth, combined with decay in the stubs, leads to poor tree health and potential hazards. Unfortunately, there is no longterm way to keep a tree small and healthy if it is naturally large.
An Alternative to Topping: Directional Pruning
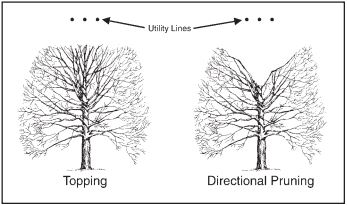
Topping (left) leaves many stubs that encourage decay and sprouting. Directional pruning (right) minimizes sprouting and decay using natural target pruning.
Directional pruning is the removal of branches with natural target cuts to guide growth away from certain locations. It is commonly used to keep branches out of utility lines without topping, but it is useful in many other circumstances. Just start at the tip of the branch to be removed and follow it back to where it meets another healthy branch that can remain on the tree and that is large enough to assume dominance (at least 1/3 the diameter of the branch to be removed). Remove unwanted branches with natural target cuts as described earlier
For More Information
Contact the Utah Community Forest Council (UCFC), P.O. Box 961, Salt Lake City, UT 84110-0961, for a copy of the booklet Utah Shade Tree Pruning Standards, or for other community forestry information. Other pruning related publications available through the UCFC include:
- Harris, Richard W. 1992. Arboriculture: Integrated Management of Landscape Trees, Shrubs, and Vines. Prentice Hall, Englewood Cliffs, NJ. 674 pp.
- Shigo, Alex L. 1986. A New Tree Biology. Shigo and Trees, Associates, Durham, NH. 618 pp.
- Shigo, Alex L. 1991. Modern Arboriculture. Shigo and Trees, Associates, Durham, NH. 424 pp.
The National Arbor Day Foundation’s Tree City USA Bulletin Number 1, How to Prune Young Shade Trees, contains valuable information about pruning and tree care (NADF, 100 Arbor Avenue, Nebraska City, NE 68410).
Acknowledgments
The Utah Division of Forestry, Fire & State Lands (FF&SL) provided partial support for the production of this fact sheet. I also thank the Utah Community Forest Council and USDA Forest Service State and Private Forestry for their support. Several of the drawings are adapted from the brochure Homeowner’s Guide for Beautiful, Safe, and Healthy Trees from the USDA-Forest Service Northeastern Forest Experiment Station. Finally, I thank Tony Dietz and Brook Lee of FF&SL, Randy Miller of Utah Power, and Marita Tewes of Red Butte Garden and Arboretum for their careful review of this fact sheet.
Published June 1998.