Manure and Wastewater Sampling Guide
Why Sample Manure and Wastewater?
Manure and wastewater are valuable resources that can reduce fertilizer needs and help improve soil and your bottom line. Sampling and testing of manure and wastewater is needed so one can apply the manure and nutrients appropriately. There are also Animal Feeding Operation (AFO)/Concentrated Animal Feeding Operation (CAFO) regulations that require manure and wastewater testing.
Over-applying nutrients can contaminate the groundwater, which when consumed by children, can lead to blue baby syndrome and childhood cancers. It also increases the risk of nutrients being transported to surface waters, which can result in algae growth and fish kills. Manure and wastewater testing identifies the nutrient concentration and helps one determine appropriate application rates.
What to Sample?
A standard manure sample analysis includes moisture, pH, salinity (EC), and elemental composition for many of the essential nutrients (e.g., N, P, K, Ca, Mg, Na, and S). Moisture percentage and nitrogen (N) and phosphorus (P) composition are needed to determine the proper manure application rate and meet the requirements of a nutrient management plan (Martin & Beegle, 2014; Modderman, 2021). Testing for ammonium-N (NH4-N) is recommended as it provides N availability information and insight on how to best handle your manure.
Nitrogen
- Manure contains both inorganic N (plant-available) and organic N (not readily plant-available). Together these are called Total N. Both elemental composition and Kjeldahl analyses determine Total N.
- Available N in manure is primarily NH4-N. The percentage of N that is available varies considerably based on the type of manure (e.g., dairy, poultry, etc.).
- Manure N can vary greatly (50% or more) from book values or general guidelines (Wilson, 2021; Ni & Lim, 2022). Testing for NH4-N is recommended to prevent over- or under-applying N.
Phosphorus
- AFO/CAFO regulations require testing of the manure and soil for N and P. Manure application rates are limited when soil test P levels are above 50 ppm.
Carbon to Nitrogen Ratio
- This is useful for manures that have a lot of bedding. Manures/composts with a C:N ratio >35 (Brust, 1991) temporarily tie up the N so it is not immediately available after application.
pH and EC
- Manure pH and EC can affect the pH and salinity of the soil, respectively. Limited manure application rates may be warranted for some soils to avoid salinity problems.
When to Sample?
Sampling and analysis should occur as close to land application time as possible. The nutrient concentration in manure and wastewater can change over time due to runoff, leaching, and changes in moisture percentage. Nitrogen can also be lost due to volatilization.
There are two primary approaches for when to sample.
- Just prior to land application. Take samples two to three weeks prior to land application, if possible. The goal is to have the sample results back just in time to determine the appropriate land application rate. When using this method, check with the laboratory to see what their turn-around time is. Your sampling date should allow enough time to get your results prior to land application.
- At the time of land application. This method works when the manure being applied is providing only a portion of the nutrients needed or when one has a history of manure application and the manure values tend to remain fairly constant from one year to the next. If using this method, sample manure as it is being applied, then immediately send the sample for analysis. Use results to determine additional fertilizer needs.
How to Sample?
Nutrients can vary greatly within a manure pile or holding area. The amount and type of bedding in manure or wastewater can greatly influence the nutrient content. When sampling manure and wastewater, it is important to obtain a representative sample to not over- or under-apply manure. Sampling procedures vary depending on the type, or form, of manure or wastewater.
Manure comes in many forms: (1) solid; (2) semi-solid; (3) slurry; and (4) liquid. The amount of solids present affects the manure handling systems and how you sample (Table 1; McEnany et al., 2021).
Table 1
Manure Forms
| Form | Solid | Semi-Solid | Slurry | Liquid |
|---|---|---|---|---|
| % Solids | >20% | 10%–20% | 4%–10% | <4% |
| Handling considerations | - |
|
|
- |
Manure Sampling Methods
The manure and wastewater sampling methods presented in this guide are listed below. Full sampling procedure information follows.
I. Solid Manures
A. Manure Stockpiles
- Sampling Prior to Application
- Sampling When Loading
- Sampling When Spreading
B. Compost Piles
- Sampling Prior to Application
C. Poultry Litter
- Sampling In-House Prior to Application – Point Method
- Sampling In-House Prior to Application – Trench Method
- Sampling During Cleanout
II. Liquid Manures
A. Lagoons and Storage Tanks – Agitated (When Emptying to Minimum Volume)
- Sampling Prior to Application – Directly From Pit or Lagoon
- Sampling During Loading
- Sampling During Spreading
B. Lagoons and Storage Tanks – Not Agitated (To Reduce Lagoon Level)
- Sampling Prior to Application – Directly From Pit or Lagoon
III. Slurries
A. Confined Pit
- Sampling Prior to Application
- Sampling During Loading
B. Aboveground Tanks or Storage Structures
- Sampling Prior to Application
- Sampling During Loading
C. Slurry Lagoons and Holding Ponds
- Sampling Prior to Application
- Sampling During Loading
Solid Manures
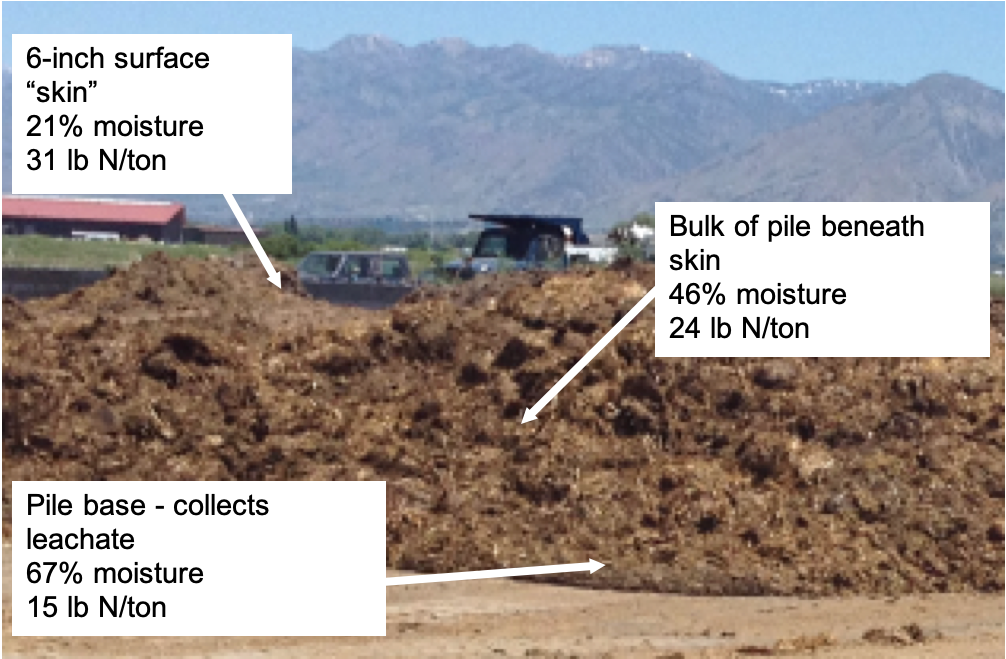
Photo: Rhonda Miller
A. Manure Stockpiles
1. Sampling Prior to Application
Sampling directly from a manure stockpile is generally not recommended as it is very difficult to get a good representative sample (Wortman et al., 2014). Manure stockpiles have a lot of variability with the outside typically being dry and forming a “skin” whereas the bottom of the pile is often wet and has a lot of leachate (Figure 1).
When sampling directly from a manure stockpile, it is very important that many subsamples are taken.
| Preparation | |
|---|---|
| Equipment needed |
|
| Collection setup and guidelines |
|
| Sampling collection | |
| Sampling procedure |
Step 1. Remove the crust. |
| Handling |
|
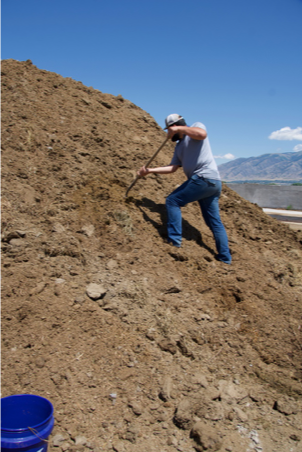
Photo: Rhonda Miller
Photo: Rhonda Miller
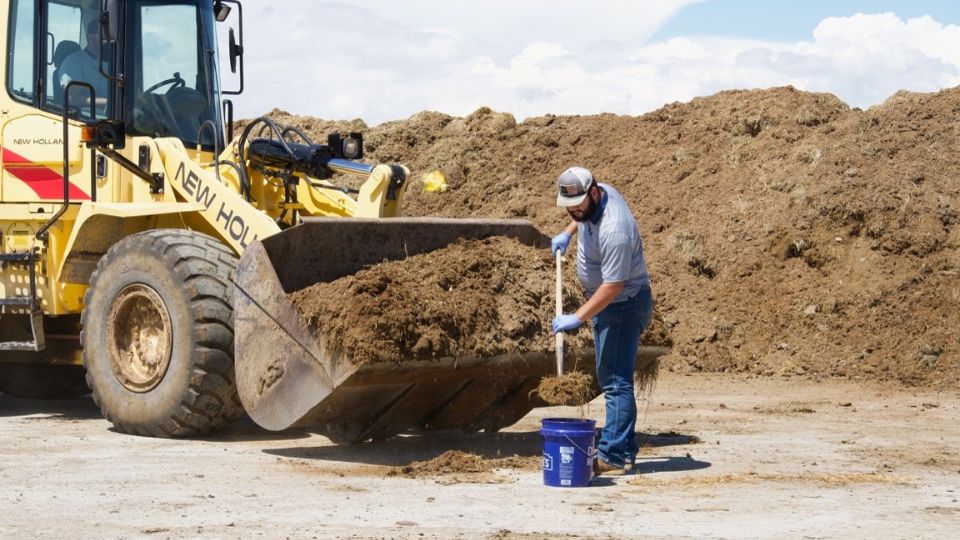
2. Sampling When Loading
Sampling during loadout (Figure 3) is relatively easy and benefits from some additional mixing of the manure pile as the pile is loaded. It is important that the samples are collected throughout the loading process.
| Preparation | |
|---|---|
| Equipment needed |
|
| Collection setup and guidelines |
|
| Sampling collection | |
| Sampling procedure |
Step 1. Pull 10–12 samples from loader bucket throughout loadout. |
| Handling |
|
3. Sampling When Spreading
Sampling during spreading is done by placing tarps out in the field (Figure 4). One can also verify the amount of manure being applied when using this method.
| Preparation | |
|---|---|
| Equipment needed |
|
| Collection setup and guidelines |
|
| Sampling collection | |
| Sampling procedure |
Step 1. Spread and fasten tarps (8–12).
Step 4. Place subsamples in a clean plastic bucket. |
| Handling |
|
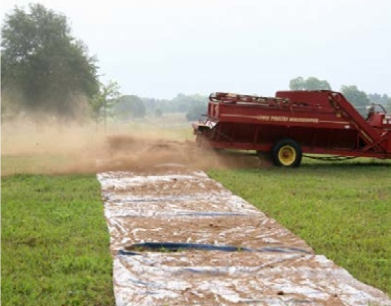
Photo: Livestock and Poultry Environmental Learning Community (LPELC.org)
B. Compost Piles
1. Sampling Prior to Application
Compost piles are sampled like a solid manure stockpile. Since the compost should have been mixed several times during the composting process, fewer subsamples are required. If you are using a cold compost process with very little turning, then more subsamples should be taken.
| Preparation | |
|---|---|
| Equipment needed |
|
| Collection setup and guidelines |
|
| Sampling collection | |
| Sampling procedure |
Step 1. Remove the crust. |
| Handling |
|
C. Poultry Litter
There are two methods for sampling in-house prior to application or cleanout: (1) the point method; and (2) the trench method (Zhang & Hamilton, 2017; Lory & Fulhage, 1999; Coffey et al., 2000). Sampling in-house prior to application or cleanout is generally not recommended as it is difficult to get a good representative sample. Sampling during cleanout is the preferred method.
1. Sampling In-House Prior to Application – Point Method
| Preparation | |
|---|---|
| Equipment needed |
|
| Collection setup and guidelines |
|
| Sampling collection | |
| Sampling procedure |
Step 1. Take a uniform 1-inch slice as a subsample. |
| Handling |
|
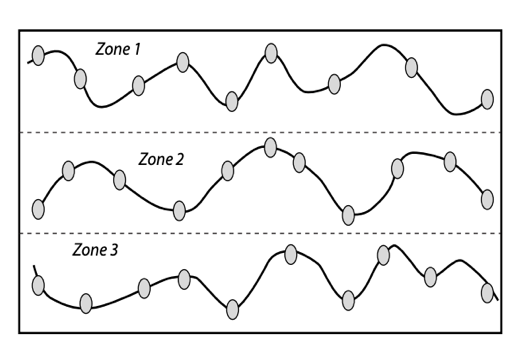
Photo: University of Kentucky Extension, Pub. ID-148
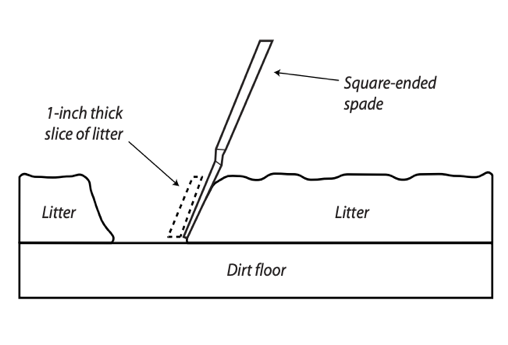
Photo: University of Kentucky Extension, Pub. ID-148
2. Sampling In-House Prior to Application – Trench Method
| Preparation | |
|---|---|
| Equipment needed |
|
| Collection setup and guidelines |
|
| Sampling collection | |
| Sampling procedure |
Step 1. Dig the trench and fill the wheelbarrow 2/3 full. |
| Handling |
|
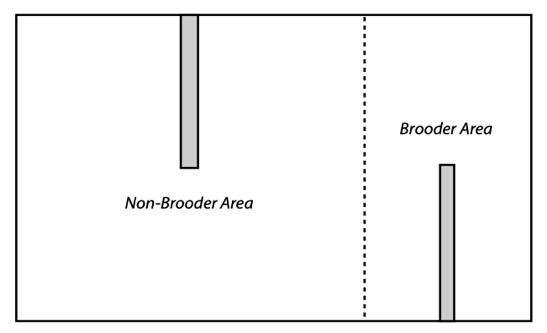
Photo: University of Kentucky Extension, Pub. ID-148
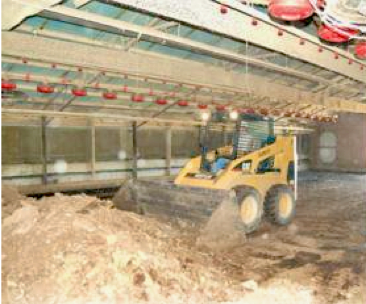
Photo: LPELC.org
3. Sampling During Cleanout
| Preparation | |
|---|---|
| Equipment needed |
|
| Collection setup and guidelines |
|
| Sampling collection | |
| Sampling procedure |
Step 1. Remove the crust. |
| Handling |
|
Liquid Manure (Wastewater)
Liquid manure (<4% solids) is often stored in lagoons but may also be stored in aboveground tanks or concrete structures. Liquid manure will exhibit stratification of solids and nutrients with ~90% of the N being in the top liquid portion, and ~90% of the P being in the settled solids.
When emptying a storage tank or lagoon (to its minimum volume), the liquid wastewater should be agitated before emptying. At times, when additional storage space is needed in the lagoon or storage tank, only a small portion of the wastewater is removed to gain extra storage capacity. In these cases, the wastewater is typically not agitated before wastewater removal.
A. Lagoons and Storage Tanks – Agitated (When Emptying to Minimum Volume)
A storage tank or lagoon that is being emptied to its minimum volume should be well agitated (2–4 hours) prior to sampling. After the liquid manure is fully agitated, one can sample directly from the lagoon or pit (prior to application), or sample during loading or application.
1. Sampling Prior to Application – Directly From Pit or Lagoon
| Preparation | |
|---|---|
| Equipment needed |
|
| Collection setup and guidelines |
|
| Sampling collection | |
| Sampling procedure |
Step 1. Collect 10–12 subsamples from around the lagoon or storage tank. |
| Handling |
|
2. Sampling During Loading
| Preparation | |
|---|---|
| Equipment needed |
|
| Collection setup and guidelines |
|
| Sampling collection | |
| Sampling procedure |
Step 1. Collect 10–12 subsamples during the course of pump-out (Figure 10). |
| Handling |
|
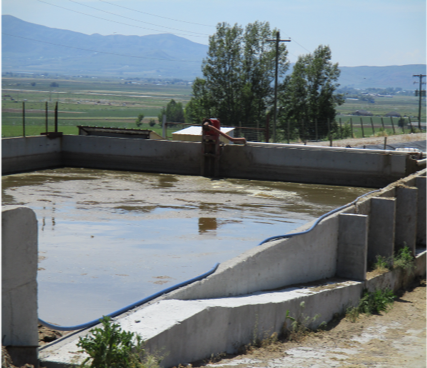
Photo: Rhonda Miller
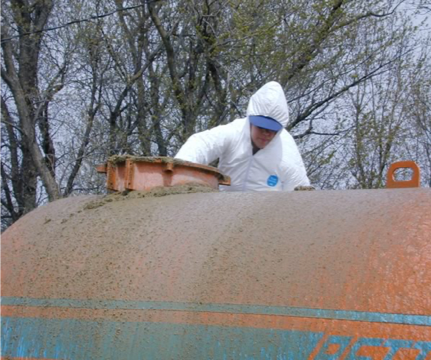
Photo: John Sawyer, Iowa State University Fertility Extension
3. Sampling During Spreading
| Preparation | |
|---|---|
| Equipment needed |
|
| Collection setup and guidelines |
|
| Sampling collection | |
| Sampling procedure |
Step 1. Collect and place 8–12 subsamples in a clean plastic bucket. Note: If the pit has not been well agitated, separate composite samples should be collected for upper, middle, and lower layers of the pit, noting the application location in the field. |
| Handling |
|
B. Lagoons and Storage Tanks – Not Agitated (Pumping to Reduce Lagoon Level)
The lagoon is typically not agitated when removing only a small portion of the lagoon effluent to reduce the lagoon level. Due to stratification of the nutrients in the lagoon, only the top portion of the lagoon is sampled.
1. Sampling Prior to Application – Directly From Pit or Lagoon
| Preparation | |
|---|---|
| Equipment needed |
|
| Collection setup and guidelines |
|
| Sampling collection | |
| Sampling procedure |
Step 1. Collect 10–12 subsamples around the lagoon or storage tank. |
| Handling |
|
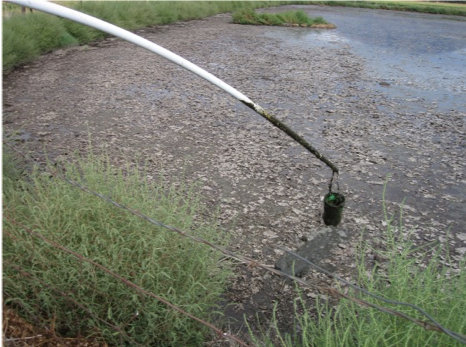
Photo: Rhonda Miller
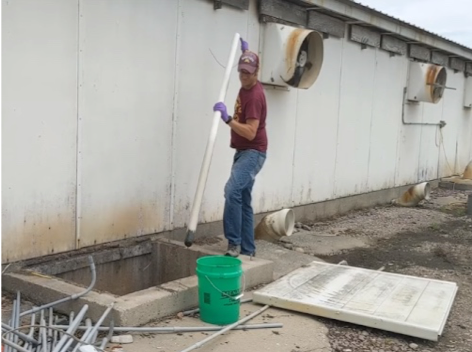
Photo: Melissa Wilson, University of Minnesota Extension
Slurries
Slurries (4%–10% solids) are primarily generated in systems where little or no bedding is added to the manure. Slurries are often stored in pits beneath the livestock housing but can also be stored in aboveground storage tanks or ponds. Slurries behave as liquids with the solids settling and the nutrients stratifying into layers. Slurries are often agitated prior to sampling.
Manure storage in confined settings can be very dangerous—especially during agitation. The hydrogen sulfide present can easily overtake people. Extreme care should be taken when working with manure in confined settings. Adequate ventilation is imperative. Two people should always be present. If there are problems, the second person should call for help, not try to help the first person unless they have appropriate safety gear, such as a self-contained breathing apparatus.
A. Confined Pit
1. Sampling Prior to Application
Sampling in confined pits is done using column samplers (Figure 12) (Coffey et al., 2000; Wilson & Cortus, 2020). The pit can be either agitated or non-agitated.
| Preparation | |
|---|---|
| Equipment needed |
|
| Collection setup and guidelines |
|
| Sampling collection | |
| Sampling procedure |
Step 1. Collect 10–12 subsamples from different locations throughout the pit. |
| Handling |
|
| Video |
Sampling a Liquid Manure Storage Pit for Nutrient Analysis This video from the University of Minnesota Extension shows how to construct and use a column sampler in a confined pit. |
2. Sampling During Loading
| Preparation | |
|---|---|
| Equipment needed |
|
| Collection setup and guidelines |
|
| Sampling collection | |
| Sampling procedure |
Step 1. Collect 10–12 subsamples over the course of pump-out. |
| Handling |
|
B. Aboveground Tanks or Storage Structures
1. Sampling Prior to Application
Aboveground tanks or storage structures should be agitated prior to sampling.
| Preparation | |
|---|---|
| Equipment needed |
|
| Collection setup and guidelines |
|
| Sampling collection | |
| Sampling procedure |
Step 1. Collect 10–12 subsamples from different locations and depths. |
| Handling |
|
2. Sampling During Loading
| Preparation | |
|---|---|
| Equipment needed |
|
| Collection setup and guidelines |
|
| Sampling collection | |
| Sampling procedure |
Step 1. Collect 10–12 subsamples around the lagoon or storage tank. |
| Handling |
|
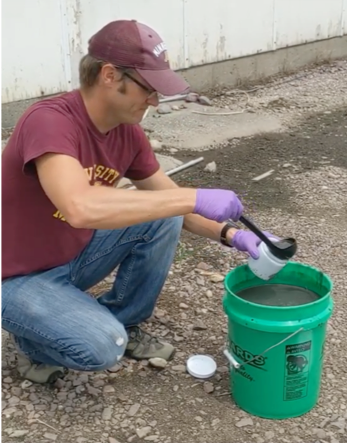
Photo: Melissa Wilson, University of Minnesota Extension
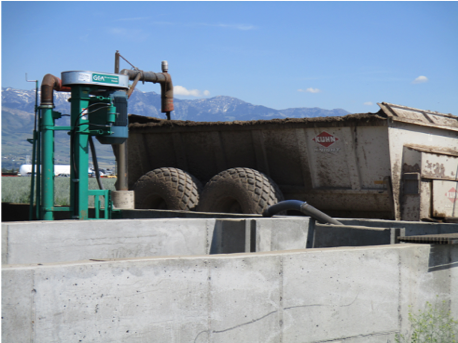
Photo: Rhonda Miller
C. Slurry Lagoons and Holding Ponds
1. Sampling Prior to Application
Slurry lagoons and holding ponds should be agitated prior to sampling.
| Preparation | |
|---|---|
| Equipment needed |
|
| Collection setup and guidelines |
|
| Sampling collection | |
| Sampling procedure |
Step 1. Collect 10–12 subsamples around the lagoon or storage tank. |
| Handling |
|
2. Sampling During Loading
| Preparation | |
|---|---|
| Equipment needed |
|
| Collection setup and guidelines |
|
| Sampling collection | |
| Sampling procedure |
Step 1. Collect 10–12 subsamples over the course of pump-out. |
| Handling |
|
Testing at Analytical Laboratories
Selecting a Lab
To ensure accurate results and unbiased recommendations, it is a good practice to send your sample to a certified lab. The North American Proficiency Testing Program for Agricultural Labs (NAPT) and the Manure Analysis Program (MAP) are two of the more common certifications.
Shipping Your Sample
Manure and wastewater samples being tested for N should be kept cold from the time of collection until they arrive at the testing laboratory. Nitrogen rapidly changes form and can be lost due to volatilization. Keeping the samples cold slows down the microbes that convert the N from one form to another.
It is important that samples be shipped immediately with no more than a two-day delivery time. For best results, samples should be kept cold while shipping. Plan to have the sample arrive when the laboratory is open so that it can be kept cold and processed appropriately. Samples should typically be shipped early in the week, not before a holiday or weekend.
Each lab will have its own specifications for containers and sample size. Some labs will provide containers. Be sure to check the specific requirements before collecting and sending a sample. The following sample sizes and container requirements are for the USU Analytical Laboratories (USUAL).
A. Solids
| Item | Specifications |
|---|---|
| Sample | Obtain a good, representative composite sample as outlined in Section 1, Solid Manure. |
| Sample size | By weight 0.5 pounds, 1–2 pints by volume |
| Container | Use two heavy-duty sealable plastic bags. |
| Handling |
|
| Shipping |
|
B. Liquids and Slurries
| Item | Specifications |
|---|---|
| Sample | Obtain a good, representative composite sample as outlined in Section 2, Liquid Manure, and Section 3, Slurries. |
| Sample size | 1 pint |
| Container | Use a clean plastic container 16 ounces or larger with screw-type lid. Plastic bag. No glass containers. |
| Handling |
|
| Shipping |
|
References
-
Brust, G. E. (2019). Chapter 9 – Management strategies for organic vegetable fertility. In Biswas, D. & Micallef, S. A. (Eds.), Safety and practice for organic food (pp.193–197). Academic Press. doi: 10.1016/B978-0-12-812060-6.00009-X.
-
Coffey, R. D., Parker, G. R., Laurent, K. M., & Overhults, D. (2000). Sampling animal manure. University of Kentucky Cooperative Extension Service. https://afs.ca.uky.edu/files/sampling_animal_manure.pdf
-
McEnany, M., Andersen, D., Rieck-Hinz, A., Lorimor, J., Richard, T., & Kohl, K. (2021). How to sample manure for nutrient analysis [AE 3550]. Iowa State University Extension. https://store.extension.iastate.edu/product/5059
-
Lory, J., & Fulhage, C. (1999). Sampling poultry litter for nutrient testing [G9340]. University of Missouri Extension. https://extension.missouri.edu/media/wysiwyg/Extensiondata/Pub/pdf/agguides/soils/g09340.pdf
-
Martin, J., & D. Beegle. (2014). Manure sampling for nutrient management planning [Agronomy facts 69]. PennState Extension. https://extension.psu.edu/manure-sampling-for-nutrient-management-planning
-
Modderman, C. (2021). Manure sampling and nutrient analysis. University of Minnesota Extension. https://extension.umn.edu/manure-management/manure-sampling-and-nutrient-analysis
-
Ni, J. & Lim, T. (2022). Manure characteristics, testing, and sampling [ABE-166-W]. Purdue University Extension. https://extension.purdue.edu/extmedia/ABE/ABE-166-W.pdf
-
Wilson, M. (2021). Manure characteristics. University of Minnesota Extension. https://extension.umn.edu/manure-management/manure-characteristics
-
Wilson, M., & Cortus, S. (2020). How to sample a liquid manure storage pit for nutrient analysis [Video]. University of Minnesota Extension. https://blog-crop-news.extension.umn.edu/2020/10/video-how-to-sample-liquid-manure.html
-
Wortmann, C., Shapiro, C., & Schmidt, A. (2014). Manure testing for nutrient content [Nebguide G1450]. University of Nebraska Extension. https://extensionpubs.unl.edu/search/?keyword=g1450
-
Zhang, H., & Hamilton, D. (2017). Sampling animal manure [PSS-2248]. Oklahoma State University Extension. https://extension.okstate.edu/fact-sheets/sampling-animal-manure.html
November 2023
Utah State University Extension
Peer-reviewed fact sheet
Authors
Rhonda Miller, Cody Zesiger, Kalen Taylor, and Matt Yost