Setting Up and Placing a Hive
Getting your hive set up and your bees installed is an exciting first step for a beekeeper. However, it can also be a confusing and anxious time if it is your first experience. As there are many different methods for installing bees, the following details are provided as a guide for the first time beekeeper. As you become more comfortable and experienced with your bees, you may modify these recommendations and methods to your own preferences.
The following equipment is needed as you install your hive. We recommend that you get familiar with the equipment and its uses before you begin.
- Bee suit (Jacket, pants, or both, depending on your comfort level)
- Gloves
- Hive boxes
- Screened or solid bottom board
- Frames
- Hive tool
- Hive stand or cinder blocks
- In-hive or boardman feeder
- Hive entrance reducer
- Spray bottle
- Sugar water (1:1 ratio)
- Mini marshmallows or candy plug (depending on the type of queen cage you receive)
- Stapler (optional)
- Bee brush
Placing your hive
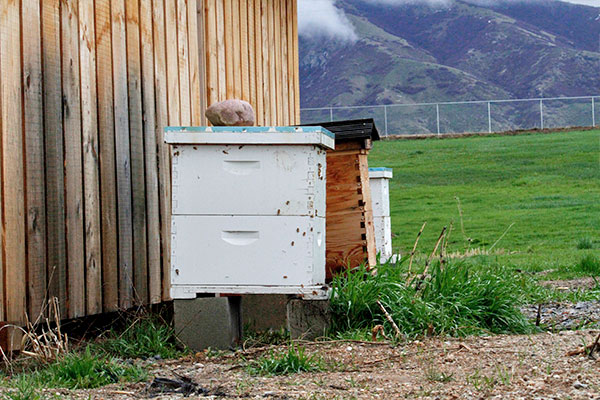
Placement of your hive will depend upon the size of your property, proximity to neighbors, current landscaping, access, etc. Remember that bees are flexible, and it is best to choose a location/orientation that minimizes disturbance to neighbors, animals, and you as the beekeeper. The following list provides recommendations to consider as you choose a location.
- Orient the entrance of the hive to the south or southeast so your hive will receive 6-8 hours of direct sun starting early in the morning.
- Ensure that the area in front of your hive is clear for 10-15 feet. Providing this area will allow a clear flight path for the bees as they leave and return to the hive. Beyond 10-15 feet, the bees' flight path should be above the average human height.
- Place your hive in an area safe from animals and people. If children are going to be near the hive, adding a small, inexpensive, wire fence around the hive may be desired.
- Look for a low traffic area where bees are less likely to be disturbed.
- Utilize a hive stand or cinder blocks to elevate the hive 12 to 18 inches off of the ground to keep it safe from skunks and other animals which may want to disturb the hive.
- Place a large rock on top or strap down your hive to keep it safe from raccoons, wind, etc.
Getting your bees
Bees are typically available for order through local beekeeping businesses as well as national farm supply stores. Check with the businesses in your local area to find out when they start taking orders and when the bee delivery will occur. Typically, orders start in January and bees arrive in March/April. Bee packages should be ordered as early as possible to ensure availability.
You may wish to ask local beekeepers or your local beekeeping association for reputable bee sources. As you find bee suppliers, you may want to ask if the bees you are purchasing have been treated with antibiotics. Though commercial bee suppliers are inspected for the health of their bees, local beekeepers/bee suppliers may not be subject to the same regulations. If the supplier indicates antibiotic treatment has occurred, you may not want to purchase those bees as the antibiotics may be masking symptoms of American foulbrood.
In Utah, Italian, Russian, and Carniolan bees are the most common races for backyard beekeepers. Each race has different advantages and disadvantages, listed below, but please keep in mind that these are general traits and there are always exceptions. The most common choice for beekeepers in the Unites States is the Italian bee; however, it is not uncommon for beekeepers to have multiple races of bees.
Carniolan
Carniolan bees are gentle and quiet. They overwinter in low numbers and build up rapidly during the spring, but unless given room for expansion, they tend to swarm. They have fewer disease problems and are good house cleaners (Caron & Conner, 2013).
Italian
Italian bees are the dominant bee race in North America. They are not overly defensive, overwinter well, have a low tendency toward swarming, and are not excessive in their use of propolis (a resinous mixture bees use as a glue in the hive). Their negative trait is their tendency to over-brood during the year, consuming stored honey rapidly (Caron & Conner, 2013).
Russian
Russian bees are similar to Italian bees, but they have been documented to be more tolerant to varroa mites. They do not raise brood until pollen is present and stop rearing brood when there is a lack of pollen, making them ideal for areas where honey and pollen flows are later in the year. Russian bees can also maintain active queen cells throughout the year, but it is not necessarily a sign of an impending swarm event (Tarpy & Lee, 2016).
Bees can be purchased in bee boxes (packages) or as a nucleus colony (nuc). Bee boxes consist of a shoe box size container (plastic or wood and screen) that holds a queen in a queen box, and a small amount of bees. They are shipped with sugar water to sustain the bees for a short time. Do not leave the bees in the package for more than necessary (4-6 days from the day they were put in the package). A nuc typically comes with frames established with wax and honey as well as the bees, some brood, and the queen. The advantage of a nuc is that the bees are a step ahead with wax production and honey/pollen storage as well as already having some brood development underway. Both nuc colonies and packaged bees can come with diseases and will almost always have varroa mites present. Be sure to inspect your bees upon arrival for anything out of the ordinary. The instructions below detail installation for a bee box.
Installing the bees
- Ideally, choose a sunny (above 55 degrees F) day with little to no wind to install your bees. If your weather forecast is below 55 degrees F, please consult your bee provider as to appropriate steps.
- Provide a 1:1 sugar water source for your bees. If using an in-hive feeder, remove one frame in your brood box and replace it with your inline feeder. If using a boardman feeder, place the feeder at your hive entrance.
- Remove 3-4 frames from the brood box opposite the inline feeder to make space for your bees.
- Put on protective clothing (bee suit, gloves, etc.).
- Lightly spray your bee box from the outside with sugar water in a spray bottle. The sugar water mixture will calm the bees and provide nutrition (optional).
- Remove the sugar can from your bee box, being careful not to drop the queen cage.
- Pull out the small queen cage from larger box. Brush the worker bees off of queen box and set aside on top of frames. Replace the sugar water can to keep the other bees inside the box.
- Install the queen into the hive.
- The queen cage will have a cork or some type of plug in one end. Before removing the cork, make sure the queen is facing away from the cork to prevent her from escaping. The easiest way to remove the cork is to use a wood screw to twist into the cork and gently pull it out. After the cork is removed, a marshmallow or candy plug will need to be quickly inserted into the hole to prevent the queen from escaping. The bees will work to chew through the marshmallow or candy plug to release her over the next few days. This will ensure that the hive is established as the bees imprint with her pheromone scent and recognize her as the queen. Only use a marshmallow if the queen has been with the bees for at least 3 days. Alternatively, there are queen cages that already have a candy plug installed and the keeper only needs to remove a gel covering. Ask your bee box provider what the best practices are for the type of box they are selling and how long the queen has been with the package.
- The queen needs to be placed suspended between the middle frames of the hive. You can use a rubber band to suspend her between two frames or staple the metal tab on top of the queen cage to one of your frames to ensure she does not fall into the bottom of the hive. Be sure not to cover the screen of the queen cage or place the screen against the foundation of the frame. The bees will need to feed the queen, and until she is released, they do this only through the screen.
- Continue installing the rest of your bees by removing the sugar water can and firmly shaking the bees into the hive. You may not be able to get all of the bees out of the box.
- Once the majority of the bees are in the hive, SLOWLY replace the frames, ensuring that the bees have time to move out of the way as the frames are lowered.
- Place your bee box near the entrance of your hive and any remaining bees will make their way to the queen.
- Most bee boxes can be returned to the vendor for reuse and some will offer a small refund for their return.
Alternative method
After installing the queen, replace all of the frames in the hive. Place the bee box with the sugar water can removed on top of the frames and place an empty hive box and lid over the bee box. The bees will make their way out of the bee box and down into the hive body over the next day and you can remove the bee box on your next inspection (typically 3-5 days after installation). This method is easier on the bees as they are not shaken out of the box; however, a potential disadvantage is that they may be reluctant to leave the package and may begin constructing comb (Caron & Conner, 2013).
Closing up the box
- Install your inner cover and the top cover.
- Be sure to place a rock or heavy object on top, or a strap around the hive to protect from raccoons, skunks, wind, people, etc.
- Install the hive reducer to the smallest opening.
Observing your hive over the next few days
It is important not to disturb your hive the next few days as the newly installed bees get settled. If too much disturbance occurs, the hive may kill the queen and you will need to replace her. A good sign will be seeing dead bees coming out of the front of the hive - the workers should be cleaning them out the front door. After 3 or 4 days, open your hive and check the queen cage to ensure the queen has been released. If so, remove the cage. If the queen has not been released, you may need to help her by carefully opening the cage and quickly placing it back in the hive and replacing the inner cover and lid to prevent her from flying. Seven to 10 days after the hive has been installed, inspect the frames and look for eggs to ensure that the queen is laying.
What's next?
Inspect your hive every 10 days to 3 weeks. See the USU Beekeeping Calendar for recommendations on actions throughout the year.
References
- Caron, D.M., & L.J. Connor (2013), Honey Bee Biology and Beekeeping, Pennsylvania, PA, Wicwas Press.
- Tarpy, D., & J. Lee (2016, Feb 23), Comparison of Russian and Italian Honey Bees, NC State Extension AG-655. Retrieved from https://content.ces.ncsu.edu/comparison-of-russian-and-italian-honey-bees.
Website created in partnership with: